Module 00: From Bare Metal to a Ready Omarchy AI Development Workstation
In this module — 55 sections
- Important: Version and Documentation Policy
- 0.1 — What You Are Actually Installing
- 0.2 — Before You Touch the Computer
- 0.3 — Hardware Preparation
- 0.4 — Understanding UEFI Before Installation
- 0.5 — Secure Boot and TPM
- 0.6 — Why You Should Have a Wired or 2.4 GHz Keyboard
- 0.7 — Download the Omarchy ISO
- 0.8 — Create the Bootable USB
- 0.9 — Boot from the USB
- 0.10 — The Omarchy Installer
- 0.11 — Choose the Correct Installation Mode
- 0.12 — Dual Boot with Windows
- 0.13 — Disk Encryption
- 0.14 — Complete the Installation
- 0.15 — First Boot
- 0.16 — Your First Five Minutes in Omarchy
- 0.17 — Verify the Omarchy Installation
- 0.18 — Inspect the Workstation
- 0.19 — Verify the Bootloader
- 0.20 — Connect to the Network
- 0.21 — Check Audio
- 0.22 — Check Bluetooth
- 0.23 — Check Your Display Properly
- 0.24 — Check Keyboard and Mouse Behavior
- 0.25 — Compact and Unusual Keyboards
- 0.26 — Perform the First Omarchy Update
- 0.27 — Understand the Automatic Snapshot
- 0.28 — Reboot After the Update if Required
- 0.29 — Verify System Health
- 0.30 — Do Not Panic Over Every Log Message
- 0.31 — Choose Your Default Terminal
- 0.32 — Choose Your Browser
- 0.33 — Choose Your Editor
- 0.34 — Choose Your Default Coding Agent
- 0.35 — Test the Coding-Agent Launcher
- 0.36 — Git
- 0.37 — GitHub CLI
- 0.38 — Create Your Development Folder
- 0.39 — Understand the Three Software Installation Layers
- 0.40 — Verify Mise
- 0.41 — Establish the Runtime Baseline
- 0.42 — Why Project-Specific Versions Matter
- 0.43 — First Manual Snapshot
- 0.44 — What a Snapshot Will NOT Save
- 0.45 — Know How to Reach Limine
- 0.46 — Security Baseline
- 0.47 — Check the Firewall Conceptually
- 0.48 — Test the Core Daily Shortcuts
- 0.49 — Establish the Known-Good Baseline
- 0.50 — Module 0 Practical Exercise
- 0.51 — Module 0 Checkpoint
- 0.52 — Common Installation Mistakes
- 0.53 — What You Can Now Do
- Module 0 Summary
About This Module
This module takes you from an existing computer — potentially one currently running Windows — to a working, updated, verified Omarchy installation ready to become an AI/software-development workstation.
We will not assume that you already know Linux, Arch Linux, UEFI, bootloaders, disk encryption, Hyprland, or Linux package management.
By the end of Module 0, you will have:
- installed Omarchy;
- understood the important installation decisions;
- configured a safe dual-boot setup if you need Windows;
- verified your hardware and boot configuration;
- connected networking, audio, and Bluetooth;
- configured your display;
- performed your first safe update;
- configured your preferred browser, terminal, editor, and coding agent;
- authenticated with GitHub;
- prepared the foundation for development runtimes;
- verified that the system is healthy;
- understood how recovery works before you start customizing the machine.
This is our known-good baseline.
Everything we do in later modules builds on it.
Important: Version and Documentation Policy
Omarchy evolves quickly.
This handbook was developed and tested using Omarchy 4.x / Quattro, including a real workstation running Omarchy 4.0.3-1, and was cross-checked against the current official Omarchy documentation in September 2026.
The goal of this handbook is not to hard-code one exact Omarchy release.
Instead, you will learn how to verify commands and system behavior on your own installation.
Whenever possible, this handbook prioritizes:
- the current official Omarchy Manual;
- the current official Omarchy GitHub repositories;
- the behavior of the current Omarchy CLI itself;
- upstream documentation for the underlying component when Omarchy’s documentation does not cover something.
Third-party tutorials should not be treated as authoritative when they disagree with the current Omarchy installation or CLI.
0.1 — What You Are Actually Installing
What You’ll Learn
Before installing anything, you should understand what Omarchy is and what makes it different from a traditional desktop Linux distribution.
Why This Matters
If you expect Omarchy to behave like Windows, macOS, Ubuntu, GNOME, or KDE, some of its design choices may initially feel strange.
They make much more sense when you understand the philosophy.
What Is Omarchy?
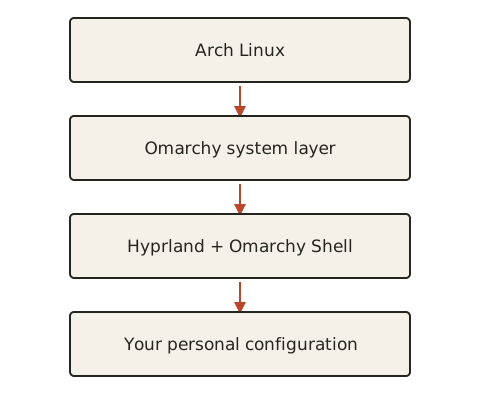
Omarchy is an opinionated Linux distribution built around:
- Arch Linux as the underlying operating system;
- Hyprland as the Wayland compositor/window manager;
- Quickshell as the foundation of the modern Omarchy desktop shell;
- a keyboard-driven workflow;
- terminal-based development tools;
- integrated themes;
- development tooling;
- AI coding-agent integration;
- configuration through plain files;
- a unified
omarchycommand-line interface.
You are therefore not simply installing “Arch with a theme.”
Omarchy adds an opinionated system layer around Arch, including:
- application installation;
- hardware configuration;
- defaults;
- themes;
- updates;
- recovery;
- desktop controls;
- coding agents;
- development environments;
- shell extensions;
- system helpers.
One of the most important concepts throughout this handbook will be:
We will explore this properly later.
For now, just remember:
Use Omarchy’s own tools when Omarchy provides a tool for the job.
Do not immediately copy generic Arch commands from random tutorials.
Learning Philosophy
This course follows a practical principle:
Do it first. Understand it deeply afterwards.
We will explain enough theory to make safe decisions during installation.
Later, in the dedicated Linux concepts module, we will connect everything together properly.
You do not need to understand the complete Linux boot process before installing Linux.
0.2 — Before You Touch the Computer
What You’ll Learn
How to prepare before installing Omarchy.
Why This Matters
Operating-system installation is one of the rare computer tasks where selecting the wrong disk can destroy all data on that disk.
Do this preparation before opening your BIOS or booting the installer.
Step 1 — Decide What Kind of Installation You Want
There are three common scenarios.
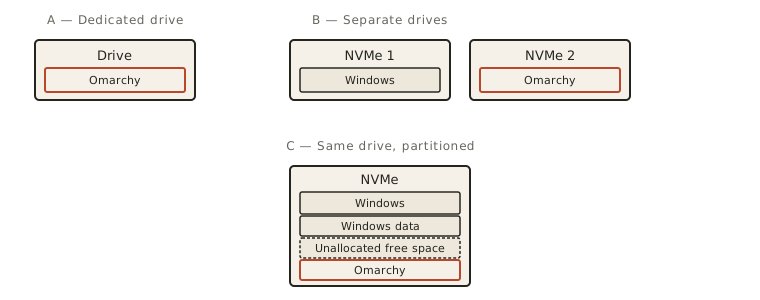
Option A — Dedicated Omarchy Computer
Omarchy receives the entire computer or entire installation drive.
This is the simplest setup.
Choose this when:
- you do not need Windows;
- the drive contains nothing you need;
- this machine will become a Linux workstation.
Option B — Separate Physical Drives
This is often the cleanest dual-boot arrangement when the hardware allows it.
The operating systems remain physically separated.
Option C — Windows and Omarchy on the Same Drive
Omarchy’s official installer supports a Free space install specifically for this situation.
We will cover it separately.
Step 2 — Back Up Important Files
Before modifying partitions or installing an operating system, make sure anything important exists somewhere else.
Examples:
- source code;
- SSH keys;
- documents;
- password databases;
- browser data;
- photos;
- project files;
- local databases;
- game saves;
- application configuration;
- encryption/recovery keys.
A backup on another partition of the same physical drive is not sufficient protection against selecting the wrong drive during installation.
Prefer:
- external drive;
- NAS;
- another computer;
- trusted cloud storage.
Step 3 — If Windows Is Installed, Check BitLocker
This is particularly important for dual boot.
On current Windows versions, this may appear under:
Settings
→ Privacy & Security
→ Device encryption
The exact Windows interface can change between releases and editions.
Before disabling BitLocker
Make sure you have access to your Windows recovery information.
Do not begin repartitioning an encrypted Windows installation without understanding its current encryption state.
Important
Turning the BitLocker switch off does not necessarily mean the drive is instantly decrypted.
Wait for Windows to complete the decryption process.
Step 4 — Identify Your Drives
Before installation, know what hardware is inside your machine.
Write down:
- number of SSDs/NVMe drives;
- approximate capacity of each;
- which drive contains Windows;
- which drive you intend to use for Omarchy.
Example:
Drive 1 — Samsung 980 Pro — 1 TB — Windows
Drive 2 — WD Black SN850X — 2 TB — Omarchy target
This simple note can prevent an expensive mistake.
0.3 — Hardware Preparation
Desktop or Laptop?
Omarchy can be used on both.
Some later controls are hardware-specific.
Desktop examples
- external monitor configuration;
- DDC brightness;
- dedicated GPU;
- wired Ethernet;
- external keyboard/mouse.
Laptop examples
- touchpad;
- touchscreen;
- internal display;
- hybrid GPU;
- suspend;
- hibernation;
- battery/power profiles;
- fingerprint reader.
We will separate desktop and laptop-specific instructions wherever necessary.
CPU and GPU
You do not need to manually install a separate operating system before installing Omarchy.
Because hardware support can change, this handbook will not maintain a static “supported GPU list.”
Instead, use the current Omarchy documentation and installer when checking unusual or very new hardware.
Virtualization
If you intend to:
- run virtual machines;
- use certain containerized VM solutions;
- run a Windows VM inside Omarchy;
enable CPU virtualization in your firmware.
Depending on platform, the option may appear as:
Intel VT-x
Intel Virtualization Technology

or

AMD-V
SVM Mode
The exact name is motherboard-dependent.
0.4 — Understanding UEFI Before Installation
What You’ll Learn
Enough firmware terminology to safely boot the Omarchy installer.
What Is UEFI?
UEFI is firmware that runs before your operating system.
Very simplified:

People still commonly call the firmware setup screen “the BIOS,” even though modern systems generally use UEFI.
Throughout this handbook, we may say BIOS/UEFI settings when referring to that firmware configuration interface.
How to Enter UEFI Setup
The key varies by manufacturer.
Common keys include:
Delete
F2
F10
F12
Esc
Desktop motherboards commonly use Delete or F2.
Laptops vary significantly.
Do not guess when changing unknown firmware settings. Consult the motherboard or laptop manufacturer’s documentation when necessary.
0.5 — Secure Boot and TPM
This is an area where following current documentation matters.
Because firmware implementations and Omarchy’s boot architecture can change over time, always check the current Omarchy installation documentation before installing.
Secure Boot
Secure Boot verifies trusted boot components before they are allowed to execute.
For the current Omarchy installation process:
Secure Boot → Disable for installationThe option is normally under sections such as:
Boot
Security
Authentication
Secure Boot
The exact location depends on the computer.
TPM
TPM stands for Trusted Platform Module.
It is used by operating systems including Windows for security features such as device encryption and credential protection.
Important for Windows users
Do not randomly change TPM-related settings on an existing encrypted Windows machine without first ensuring you have your Windows recovery information.
Checkpoint
Before continuing:
- Important files are backed up.
- You know which drive will receive Omarchy.
- Windows BitLocker is handled if dual booting.
- You can enter UEFI.
- Secure Boot is configured according to the current Omarchy installation requirements.
- You have a wired or 2.4 GHz keyboard available if using encryption.
0.6 — Why You Should Have a Wired or 2.4 GHz Keyboard
This detail is easy to overlook.
Omarchy uses drive encryption by default.
During the earliest boot stage, Bluetooth is not yet available to enter the disk-unlock password.
The official Omarchy documentation therefore recommends using:
- a wired keyboard; or
- a keyboard with a 2.4 GHz USB receiver.
A Bluetooth-only keyboard cannot be relied upon for entering the encryption password during startup.
This is especially important for compact wireless keyboards.
0.7 — Download the Omarchy ISO
What Is an ISO?
An ISO is a disk image containing the operating-system installer.
The current official installation method for Omarchy is the Omarchy ISO.
Step 1 — Download from the Official Omarchy Site
Use the download provided by the official Omarchy project.
Avoid downloading installation images from:
- mirrors linked by random tutorials;
- file-sharing sites;
- forum attachments;
- unofficial repackaged images.
Step 2 — Optional but Recommended: Verify the Download
Omarchy publishes signatures for its ISO releases.
This allows you to verify that:
- the ISO was signed by the expected Omarchy key;
- the downloaded image was not modified.
For a beginner’s first installation, do not paste an unfamiliar signature-verification command from an old guide. Follow the current official signature instructions and compare the fingerprint against the current official security documentation.
0.8 — Create the Bootable USB
You will normally need:
- an Omarchy ISO;
- a USB flash drive;
- approximately several minutes.
Everything currently on the USB may be erased.
From Windows or macOS
The current Omarchy installation guide recommends balenaEtcher.
The basic process is:
Select image
→ Select USB drive
→ Flash
→ Wait for verification
From Linux
The current official Omarchy installation guide recommends caligula for Linux.
Follow the current installation instructions for caligula rather than copying an old package command from a tutorial.
Do Not Simply Copy the ISO File
This:
USB/
└── omarchy.iso
is not the same thing as creating a bootable installer.
The image-writing tool writes the ISO’s filesystem and boot structure onto the USB device.
Checkpoint
You should now have:
- official Omarchy ISO;
- bootable USB;
- backups;
- known target drive;
- appropriate BIOS/UEFI settings.
0.9 — Boot from the USB
Restart the computer.
Open the firmware boot menu.
Common boot-menu keys include:
F8
F11
F12
Esc
The exact key is manufacturer-specific.
Choose the USB’s UEFI boot entry when available.
Example:
UEFI: SanDisk USBrather than a legacy/non-UEFI entry.
If the USB Does Not Appear
Check:
- Is the USB physically detected?
- Was the ISO actually flashed rather than copied?
- Is UEFI USB boot enabled?
- Did you create the USB successfully?
- Are Secure Boot settings compatible with the current Omarchy installer?
- Can you try another USB port?
On desktop systems, rear motherboard USB ports are often a good troubleshooting choice.
0.10 — The Omarchy Installer
Once the USB boots, the Omarchy installer will guide you through configuration.
Read every screen.
Do not automatically press Enter through disk-selection screens.
0.11 — Choose the Correct Installation Mode
This is the most important installation decision.
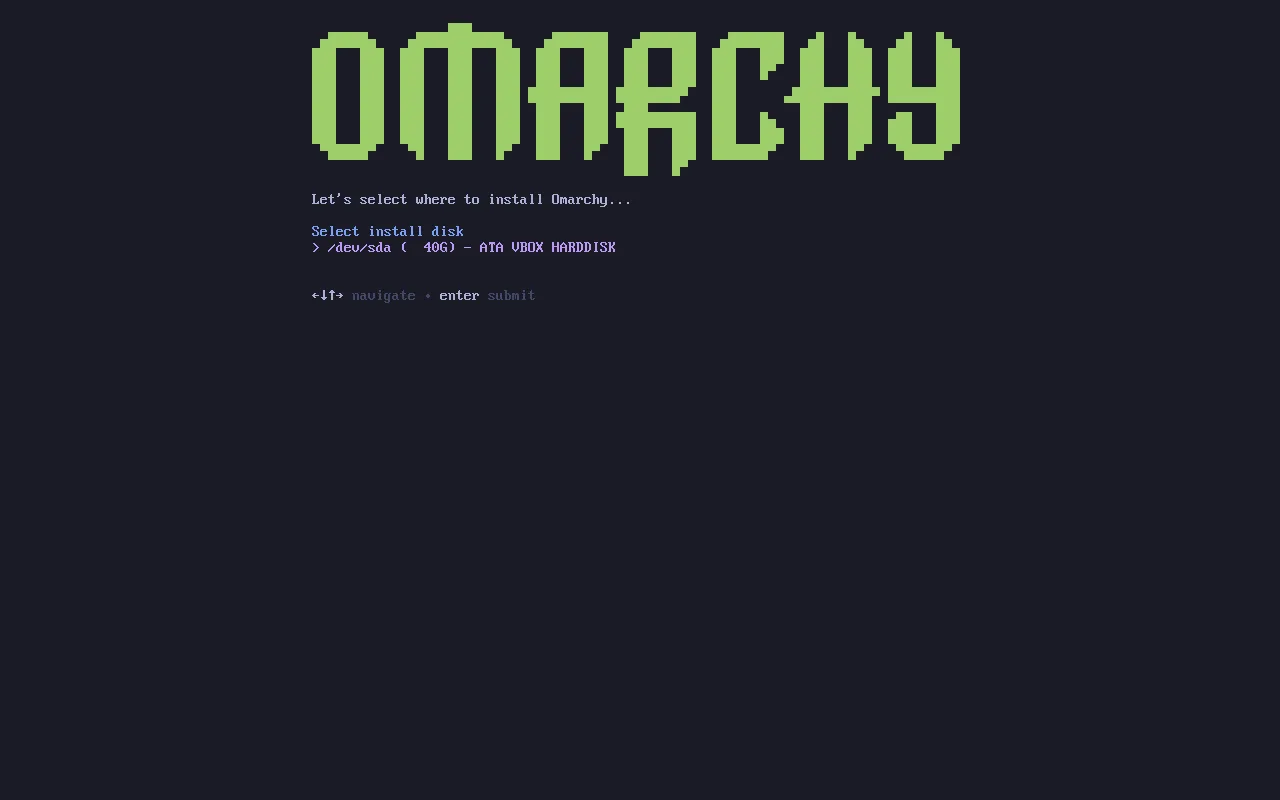
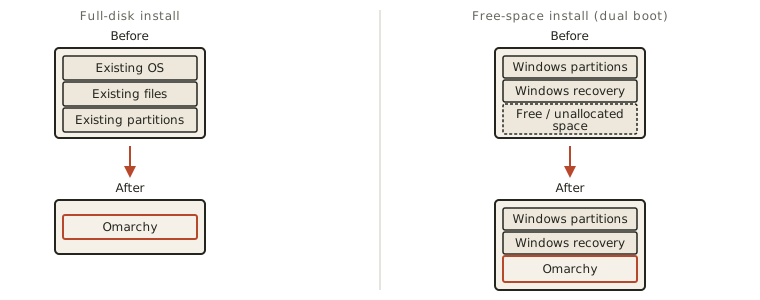
Path A — Full-Disk Installation
Choose this if the selected disk can be completely erased.
Conceptually:
Stop and Verify
Before confirming:
- correct disk model;
- correct disk capacity;
- no important data on it.
0.12 — Dual Boot with Windows
If you need Windows and Omarchy on the same computer, do not choose full-disk installation on the Windows drive.
The current Omarchy installer supports a Free space install.
Preparing Free Space
Resize Windows from Windows before installation if necessary.
You want genuine:
Unallocated spacenot simply an empty Windows folder.
Do not manually delete unfamiliar EFI or recovery partitions.
During Installation
After selecting the correct disk:
Choose:
Free space installrather than:
Full diskConfirm that the installer is using the intended free space.
0.13 — Disk Encryption
Omarchy installs with encryption by default.
What Encryption Protects
If the computer is stolen while powered off, the files on the encrypted drive cannot simply be read by removing the SSD and connecting it to another machine.
You unlock the encrypted system during boot using your password.
Should You Disable Encryption?
For the overwhelming majority of developer workstations:
No.
Stevinator Recommendation
Use Omarchy’s default encrypted installation unless you have a specific technical reason not to.
0.14 — Complete the Installation
Continue through the installer’s personal settings.
These may include:
- keyboard;
- username;
- password;
- hostname;
- timezone.
Read the current prompts rather than relying on screenshots from an older installer release.
After confirmation, allow installation to finish.
Do not:
- remove power;
- reset the machine;
- unplug the target drive;
- interrupt installation.
When prompted to reboot:
- complete the installation;
- reboot;
- remove the installer USB when appropriate.
0.15 — First Boot
You should now reach your installed Omarchy system.
If encryption is enabled, the machine will ask for the disk-unlock password during boot.
This happens before the full desktop environment starts.
This is why your wired/2.4 GHz keyboard matters.
What You Are Booting Through
On current standard Omarchy installations, Limine is the default bootloader.
A simplified modern Omarchy boot path looks like:
UEFI → Limine → Omarchy UKI → Linux kernel → Userspace → Hyprland → Omarchy Shell
Do not worry if most of those terms are unfamiliar.
We will explain them properly later.
0.16 — Your First Five Minutes in Omarchy
Omarchy is designed around the keyboard.
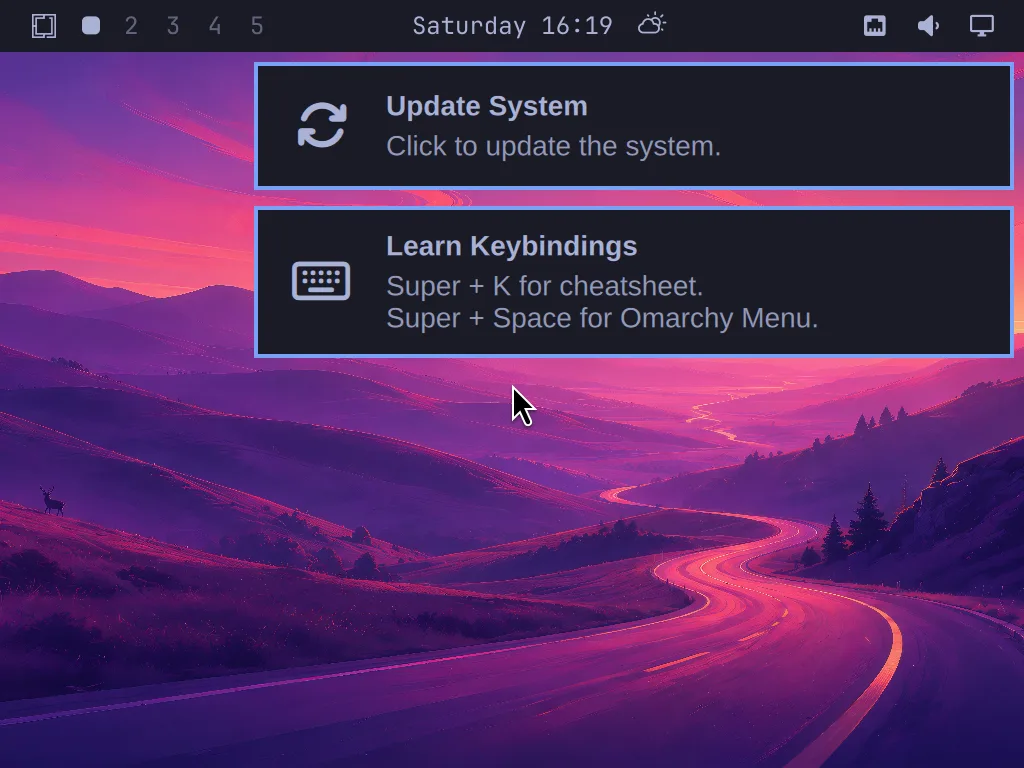
The first shortcut you should know is:
Super + SpaceThis opens the Omarchy Menu.
Super is normally the Windows key on a PC keyboard.
Open a Terminal
Press:
Super + ReturnOpen the Browser
Press:
Super + Shift + ReturnYou should see the browser tile alongside the terminal.
Show Available Keybindings
Press:
Super + KDo not attempt to memorize dozens of shortcuts now.
Remember just this:
When you forget a keybinding, ask Omarchy.
0.17 — Verify the Omarchy Installation
Open a terminal.
Run:
omarchy versionImportant
Use:
omarchy versionnot:
omarchy --versionDiscover the CLI
Run:
omarchyThen:
omarchy commandsFor the complete command surface:
omarchy commands --allThis is one of the most important habits in the handbook.
Course Rule
Whenever documentation and your installed system appear to disagree:
- check your version;
- check the current official manual;
- inspect the installed CLI;
- verify actual system behavior.
Never blindly assume.
0.18 — Inspect the Workstation
On current releases:
omarchy launch aboutUse this as a quick visual health check.
0.19 — Verify the Bootloader
Check:
bootctl statusLook for:
Current Boot Loader:A standard current Omarchy installation should normally report Limine.
Example:
Current Boot Loader:
    Product: Limine
0.20 — Connect to the Network
Wi-Fi
Press:
Super + Ctrl + WSelect your network and connect.
Ethernet
Connect the cable.
Verify from the Terminal
omarchy network status --verbose0.21 — Check Audio
Open:
Super + Ctrl + AConfirm the expected output device appears and sound works.
0.22 — Check Bluetooth
Open:
Super + Ctrl + BIf you use Bluetooth:
- ensure Bluetooth is powered on;
- pair the device;
- connect;
- verify operation.
0.23 — Check Your Display Properly
Run:
hyprctl monitors allLook for:
- output name;
- current resolution;
- current refresh rate;
- available modes;
- scale.
Example desired mode:
2560x1440@144A monitor displaying an image does not mean it is running at its best settings.
0.24 — Check Keyboard and Mouse Behavior
Omarchy input customization lives in:
~/.config/hypr/input.luaVerify:
- keyboard layout;
- Super key;
- mouse movement;
- scrolling;
- Caps Lock behavior;
- numpad if relevant.
0.25 — Compact and Unusual Keyboards
Before assuming an Omarchy shortcut is broken, verify what key event the keyboard actually sends.
Useful tool:
wevLesson
Diagnose the input event before changing the operating system.
0.26 — Perform the First Omarchy Update
Check whether an update is available:
omarchy update availableThen perform the update through the Omarchy update workflow.
Prefer Omarchy’s update tooling over blindly running generic Arch upgrade commands.
0.27 — Understand the Automatic Snapshot
Omarchy creates system snapshots around updates.
But remember:
Snapshot ≠ personal backupA system snapshot restores the system root state, not your personal /home files.
0.28 — Reboot After the Update if Required
Check:
omarchy update restartIf Omarchy indicates a reboot is required, reboot.
0.29 — Verify System Health
systemctl --failedThen:
systemctl --user --failedA healthy baseline should ideally show no failed units.
0.30 — Do Not Panic Over Every Log Message
Later, when troubleshooting, we may use:
journalctl -p 3 -bBut logs require interpretation.
Use this methodology:
symptom → relevant component → service state → logs → reproduce → fix
not:
see red text → panic
0.31 — Choose Your Default Terminal
For this course our recommended AI/developer workstation uses:
Ghostty
but this is a recommendation, not a requirement.
Inspect the current choices with:
omarchy default terminal --help0.32 — Choose Your Browser
Our baseline is:
Chromium
Inspect supported choices with:
omarchy default browser --help0.33 — Choose Your Editor
Our baseline is:
NeovimInspect current choices:
omarchy default editor --help0.34 — Choose Your Default Coding Agent
Inspect the available agents:
omarchy default agent --helpStevinator Baseline
For the workstation used while building this handbook, the selected default coding agent is:
OMPThis course teaches the Omarchy integration, not one specific coding agent.
0.35 — Test the Coding-Agent Launcher
Current shortcut:
Super + Shift + Ctrl + AThe checkpoint is only:
Can Omarchy launch your selected coding agent?
0.36 — Git
Check:
git --version0.37 — GitHub CLI
Check:
gh --versionAuthenticate:
gh auth loginVerify:
gh auth status0.38 — Create Your Development Folder
mkdir -p ~/Projects
cd ~/Projects
pwd
Expected:
/home/YOUR_USERNAME/Projects0.39 — Understand the Three Software Installation Layers
Layer 1 — System Packages
omarchy pkgLayer 2 — Omarchy-Integrated Applications
omarchy installLayer 3 — Developer Runtimes and Tools
miseThis separation keeps the workstation cleaner and more reproducible.
0.40 — Verify Mise
mise --versionThe important concept:
System packages
       ≠
Development runtimes
0.41 — Establish the Runtime Baseline
Common environments:
- Node.js;
- Python;
- Bun.
Verify:
node --version
python --version
bun --version
If one is missing, do not randomly install it with sudo pacman.
0.42 — Why Project-Specific Versions Matter
Example:
Project A
requires Node 24

Project B
requires Node 26
With mise:
~/Projects/project-a/mise.toml
→ Node 24

~/Projects/project-b/mise.toml
→ Node 26
0.43 — First Manual Snapshot
Inspect:
omarchy snapshot --helpThen create a snapshot:
omarchy snapshot create0.44 — What a Snapshot Will NOT Save
A snapshot does not replace:
- Git;
- cloud backup;
- external backup;
- dotfiles repository;
- source-control repositories.
0.45 — Know How to Reach Limine
You do not need to restore a snapshot now.
You only need to know:
“If an update breaks the system, I have a recovery path.”
0.46 — Security Baseline
A fresh Omarchy installation already includes important security decisions.
General rule:
Do not enable services you do not need.
0.47 — Check the Firewall Conceptually
At this stage, the goal is simply to know:
Firewall exists
Incoming connections are restricted
SSH is not automatically exposed
0.48 — Test the Core Daily Shortcuts
Omarchy Menu
Super + Space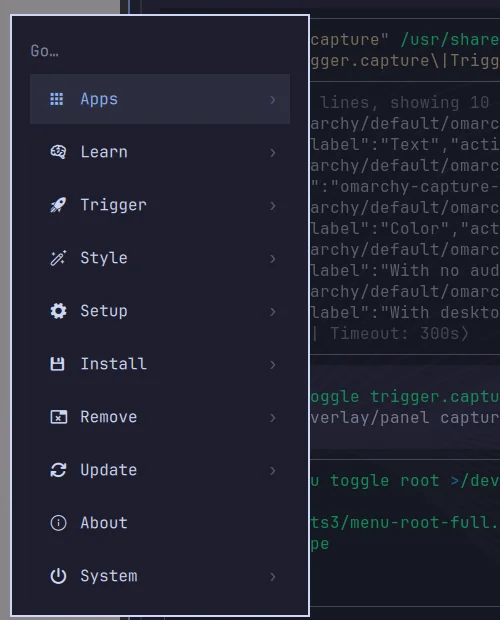
Terminal
Super + ReturnBrowser
Super + Shift + ReturnKeybinding Help
Super + KAudio
Super + Ctrl + ABluetooth
Super + Ctrl + BNetwork
Super + Ctrl + WDisplay
Super + Ctrl + DActivity Monitor
Super + Ctrl + TCapture Tools
Super + Ctrl + CEmoji Picker
Super + Ctrl + EIf one does not match your installation, inspect the actual binding with:
Super + K0.49 — Establish the Known-Good Baseline
Run:
omarchy version
systemctl --failed
systemctl --user --failed
omarchy network status --verbose
hyprctl monitors all
gh auth status
git --version
mise --version
node --version
python --version
bun --version
0.50 — Module 0 Practical Exercise
You should now be able to:
- Open a terminal.
- Find your Omarchy version.
- Open the complete Omarchy command list.
- Check your active network.
- Identify your monitor.
- Verify its refresh rate.
- Check for failed services.
- Check your GitHub authentication.
- Check your development-runtime manager.
- Open the Omarchy keybinding menu.
Suggested commands:
omarchy version
omarchy commands --all
omarchy network status --verbose
hyprctl monitors all
systemctl --failed
systemctl --user --failed
gh auth status
mise --version
Then:
Super + K0.51 — Module 0 Checkpoint
Verify It for Real
Instead of only self-reporting the checklist below, you can run an actual check against your machine:
curl -O https://raw.githubusercontent.com/smanookian/omarchy-course-verify/main/verify.sh
chmod +x verify.sh
./verify.sh
Read the script before you run it — that’s the point of downloading it instead of piping curl straight into bash. Source and full explanation.
Install the Practice Companion
Reading a shortcut is not the same as having it in your hands. Superkey is a free, open-source plugin for the Omarchy 4 desktop that fixes that gap: a small robot named Kappy sits in the corner of your screen, asks you to press a real shortcut on your real desktop, and confirms it actually worked before moving on. It never records keystrokes — it watches the effect through Hyprland, tmux, and Neovim themselves.
It is built for this course. Ten lessons, 70 steps, and every lesson points back to the module that teaches it. You will meet it again in Modules 3, 5, 8, and 15.
Install it now so it is ready when you get there:
omarchy plugin add https://github.com/smanookian/superkey.git
omarchy plugin enable stevinator.superkey
Omarchy installs every third-party plugin disabled so you can read the code before it runs — that is what the second line is for. An SK button appears in the bar:

Click it and Kappy shows the lesson list, grouped by track:
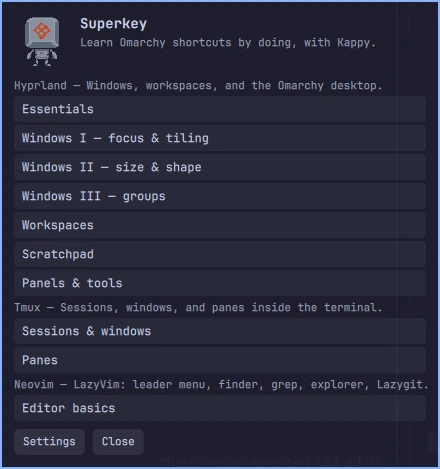
A few things worth knowing before you trust a plugin that watches your desktop:
- It never edits your Hyprland, tmux, Neovim, or Omarchy configuration.
- It never closes, moves, or resizes a window it did not open itself. Its own windows are titled Superkey practice.
- Tmux lessons run on a private server (
tmux -L superkey); Neovim lessons open a throwaway sample project. Your sessions and files are untouched. - It installs nothing else and never goes online.
- Between lessons it is just a bar button — nothing runs in the background.
Requires Omarchy 4.0.4 or newer, which you already have if you installed from the current ISO. Source and full design notes.
Remove it the same way you added it: omarchy plugin remove stevinator.superkey.
Installation
- Omarchy boots successfully.
- The correct drive was used.
- Encryption works.
- I can enter my boot/decryption password.
- I know whether this is full-disk or dual-boot.
Windows / Dual Boot
If applicable:
- Windows still boots.
- BitLocker was handled according to current Omarchy requirements.
- I understand which partitions belong to which OS.
Firmware
- I know how to enter my UEFI/BIOS.
- I understand what Secure Boot is at a basic level.
- I know how to open the firmware boot menu.
Omarchy
- I know
Super + Space. - I know
Super + K. - I can open a terminal.
- I can open a browser.
- I know how to check
omarchy version. - I know how to discover Omarchy commands instead of guessing.
Hardware
- Wi-Fi/Ethernet works.
- Audio works.
- Bluetooth works if needed.
- Keyboard works.
- Mouse/trackpad works.
- Monitor resolution is correct.
- Monitor refresh rate is correct.
Development
- Git works.
- GitHub CLI works.
- GitHub authentication works.
- Mise works.
- I have a development-project directory.
- I understand that system packages and project runtimes are different things.
AI
- I understand that Omarchy supports a default coding agent.
- I have either chosen one or know where to choose one.
- I can launch the configured agent.
Recovery
- I know that Omarchy uses system snapshots.
- I understand that snapshots do not back up
/home. - I have established a known-good baseline.
- I know how to identify my bootloader.
- I understand that Limine is part of the normal current Omarchy recovery path.
0.52 — Common Installation Mistakes
Mistake 1 — Installing to the Wrong Drive
Know the drive model, capacity, and purpose before installation.
Mistake 2 — Leaving BitLocker Active for the Official Free-Space Dual-Boot Path
Check the current official Omarchy dual-boot documentation before proceeding.
Mistake 3 — Forgetting About Secure Boot
Always check the current installation requirements.
Mistake 4 — Using a Bluetooth-Only Keyboard
Keep a wired or 2.4 GHz keyboard available.
Mistake 5 — Assuming the Monitor Is Running at Maximum Refresh Rate
Verify:
hyprctl monitors allMistake 6 — Assuming a Shortcut from a Tutorial Must Be Correct
Use:
Super + Kor:
omarchy menu keybindingsMistake 7 — Guessing Omarchy Commands
Use:
omarchy commands --alland:
omarchy <command-group> --helpMistake 8 — Treating Every Linux Tool as a Pacman Package Problem
Determine whether it belongs to:
system package
Omarchy-integrated application
mise-managed runtime/tool
Mistake 9 — Assuming the Bootloader
Verify:
bootctl statusMistake 10 — Thinking a Snapshot Is a Backup
It is not.
0.53 — What You Can Now Do
After completing Module 0, you can now:
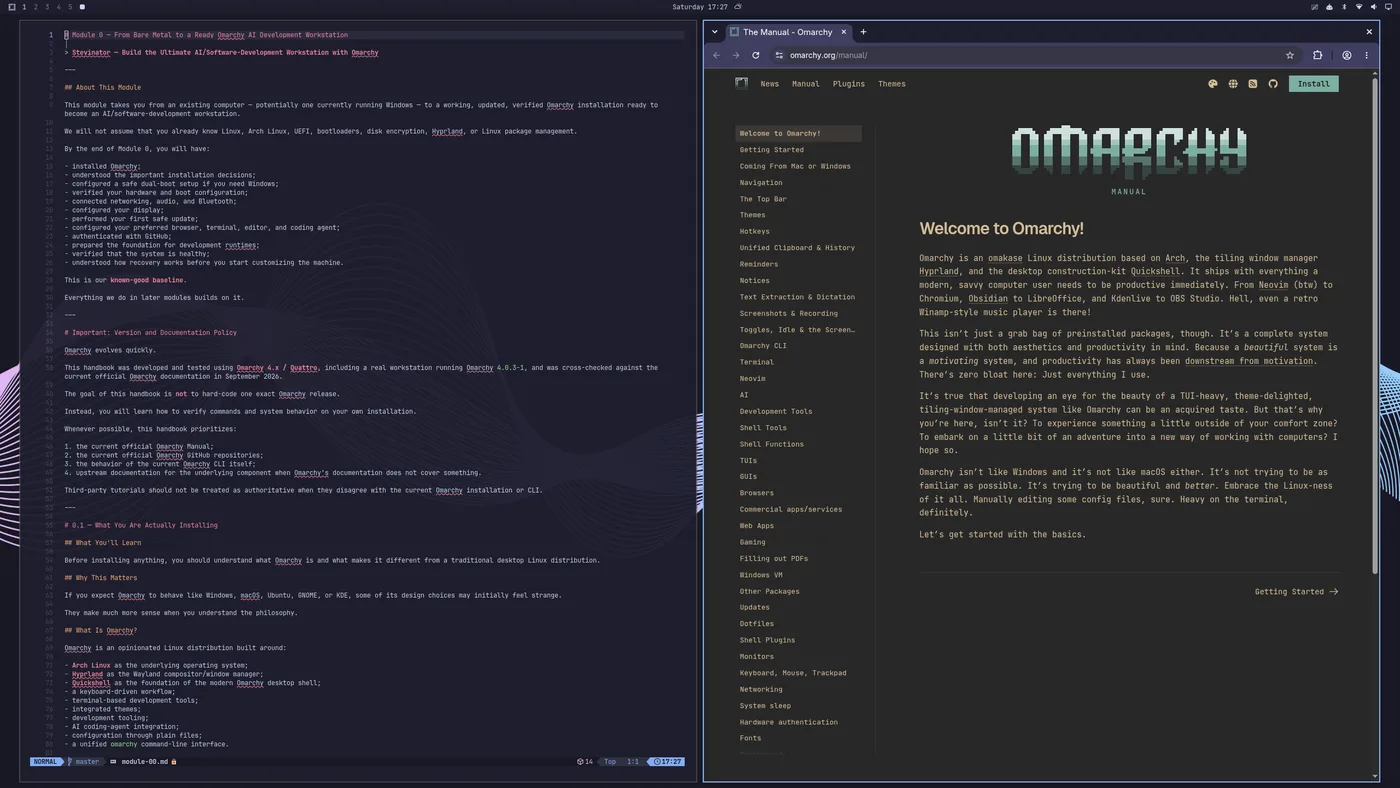
- prepare a PC for Omarchy;
- distinguish full-disk and dual-boot installations;
- protect an existing Windows installation during planning;
- understand the role of BitLocker during dual boot;
- enter and configure UEFI;
- create the official Omarchy installer;
- install Omarchy;
- boot an encrypted Omarchy system;
- navigate the basic Omarchy desktop;
- discover commands and shortcuts;
- verify your Omarchy version;
- identify your bootloader;
- verify networking;
- verify audio;
- verify Bluetooth;
- inspect display resolution and refresh rate;
- perform a safe Omarchy update;
- understand automatic snapshots;
- recognize the difference between snapshots and backups;
- configure the foundations of a development workstation;
- authenticate with GitHub;
- understand why mise matters;
- select a coding agent;
- verify basic system health.
Most importantly:
You are no longer working on an unknown Linux installation.
You now have a known-good Omarchy baseline from which we can deliberately build the AI/software-development workstation.
Module 0 Summary
The path we followed was:
- Plan
- Back up
- Choose full-disk or dual-boot
- Prepare Windows if necessary
- Configure UEFI
- Create Omarchy USB
- Install
- Boot
- Verify
- Update
- Check hardware
- Configure core defaults
- Prepare Git/GitHub
- Prepare developer tooling
- Understand snapshots
- Verify system health
- Known-good baseline