Module 01: How Omarchy Actually Works
In this module — 42 sections
- What You Will Learn
- 1.1 — The Mental Model
- 1.2 — What Is Arch Linux?
- 1.3 — Omarchy Is Opinionated
- 1.4 — What Is Hyprland?
- 1.5 — What Is Wayland?
- 1.6 — What Is Quickshell?
- 1.7 — The Omarchy Shell
- 1.8 — The Omarchy CLI
- 1.9 — Why the CLI Matters for AI Development
- 1.10 — Menu, Hotkeys, and CLI Are Different Interfaces to the Same System
- 1.11 — Where Omarchy’s Own Files Live
- 1.12 — Where Your Personal Configuration Lives
- 1.13 — What Does ~ Mean?
- 1.14 — What Is a Dotfile?
- 1.15 — Key Omarchy Configuration Files
- 1.16 — Inspect Your Configuration
- 1.17 — Defaults First, Your Overrides After
- 1.18 — Real Example: Our Hyprland Load Order
- 1.19 — Why You Should Not Copy Entire Defaults
- 1.20 — Editing Configuration Through the Omarchy Menu
- 1.21 — Editing Configuration Manually
- 1.22 — Do Not Edit /usr/share/omarchy for Normal Customization
- 1.23 — Reading Defaults Is Extremely Useful
- 1.24 — What Happens During Updates?
- 1.25 — What If You Break Your Personal Configuration?
- 1.26 — Your Shell Configuration
- 1.27 — Autostart
- 1.28 — Hooks
- 1.29 — Shell Plugins
- 1.30 — Why Version Awareness Matters
- 1.31 — Verify the Installed Version
- 1.32 — Use the Current CLI as Documentation
- 1.33 — Use --help Before Guessing Syntax
- 1.34 — Real-World Mistakes That Became Course Lessons
- 1.35 — A Better Troubleshooting Habit
- 1.36 — Practical Exercise: Map Your Own System
- 1.37 — Practical Exercise: Inspect Without Editing
- 1.38 — Practical Exercise: Discover a Command
- 1.39 — Checkpoint
- 1.40 — What You Can Now Do
- Module 1 Summary
About This Module
Module 0 gave you a working Omarchy workstation.
Module 1 gives you the mental model needed to understand what you installed.
This is important because Omarchy is not just “Arch Linux with Hyprland” and it is not a traditional desktop environment like Windows, macOS, GNOME, or KDE.
Omarchy combines several layers:
- Arch Linux
- Hyprland
- Quickshell
- Omarchy packages
- Omarchy configuration
- the Omarchy CLI
- your own user configuration
Once you understand where each layer begins and ends, customization becomes much safer.
You also stop treating every problem as:
“Linux is broken.”
Instead, you learn to ask:
“Which layer is responsible for this behavior?”
That question will save you a huge amount of time later.
What You Will Learn
By the end of this module, you will understand:
- what Omarchy actually is;
- how Arch Linux fits underneath it;
- what Hyprland does;
- what Quickshell does;
- what the Omarchy shell is;
- what the
omarchyCLI controls; - where Omarchy’s own files live;
- where your personal configuration lives;
- why you should not edit files under
/usr/share/omarchy; - how Omarchy loads defaults and personal overrides;
- how menus, keyboard shortcuts, and CLI commands relate to each other;
- how to inspect your installed system instead of guessing;
- why version-aware troubleshooting matters.
1.1 — The Mental Model
A useful simplified model of Omarchy looks like this:
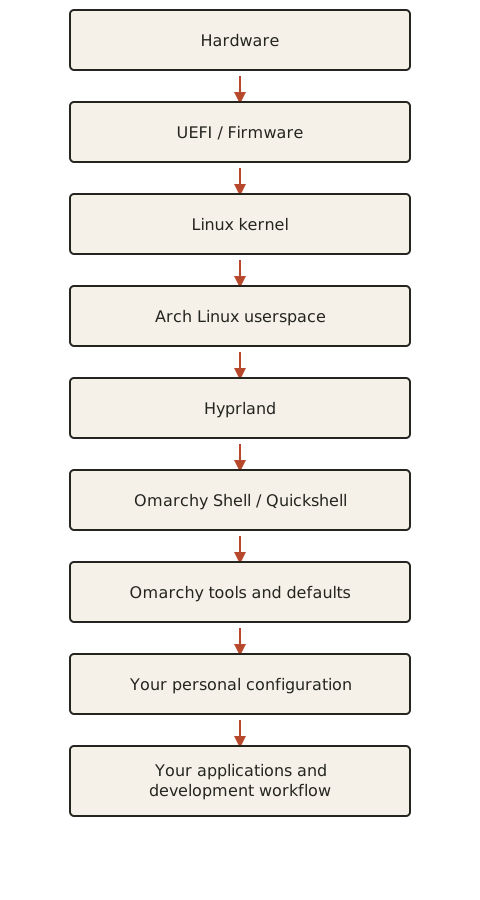
You do not need to understand every layer deeply yet.
For now, the important point is:
Omarchy is a complete system assembled from multiple Linux components, with its own opinionated configuration and tooling on top.
1.2 — What Is Arch Linux?
What You’ll Learn
What Arch Linux contributes to your Omarchy installation.
The Short Version
Arch Linux is the underlying Linux distribution.
It provides things such as:
- the Linux kernel;
- system libraries;
- package management;
- systemd;
- hardware support;
- filesystem layout;
- networking components;
- command-line tools.
Omarchy builds its own experience on top of this foundation.
Conceptually:
Arch Linux
    +
Omarchy configuration
    +
Hyprland
    +
Quickshell
    +
curated applications
    +
Omarchy tooling
Why This Matters
When following generic Arch Linux instructions, remember:
Omarchy may already have its own preferred way of doing the same task.
For example, instead of immediately reaching for raw package-manager commands, Omarchy may expose a dedicated command or menu action.
This does not mean Arch documentation is useless.
It means you should first ask:
- Does Omarchy already handle this?
- Is there an
omarchycommand for it? - Is there an official Omarchy manual section?
- Only then: do I need the underlying Arch approach?
1.3 — Omarchy Is Opinionated
The official Omarchy project describes itself as an omakase Linux distribution.
“Omakase” is a useful concept here.
It means the system makes many choices for you instead of presenting endless setup decisions.
Omarchy chooses and integrates:
- a tiling window manager;
- a shell;
- themes;
- keybindings;
- applications;
- development tools;
- workflows;
- helper commands.
This is deliberate.
The goal is not:
“Give the user a blank Arch installation and make them configure everything.”
The goal is closer to:
“Provide a highly curated workstation that can still be customized deeply.”
That makes Omarchy especially interesting for developers who want a powerful Linux workstation without spending weeks assembling every component manually.
1.4 — What Is Hyprland?
Short Definition
Hyprland is the Wayland compositor and tiling window manager used by Omarchy.
It controls major parts of how windows behave.
Examples include:
- window placement;
- tiling;
- floating;
- workspaces;
- focus;
- fullscreen behavior;
- monitor configuration;
- input configuration;
- window rules;
- keyboard bindings.
Traditional Desktop vs Tiling Workflow
A traditional desktop often encourages windows to overlap:
Desktop
├── Browser window
├── Terminal window
├── Editor window
└── Chat window
You manually resize and move them.
Hyprland usually tiles them automatically:
Workspace
├───────────────┬───────────────┐
│               │               │
│    Editor     │    Browser    │
│               │               │
├───────────────┼───────────────┤
│          Terminal             │
└───────────────────────────────┘
This is one reason Omarchy feels different immediately.
Important Distinction
Hyprland is not the entire Omarchy desktop.
Hyprland controls the compositor/window-management layer.
Omarchy adds its own shell and tools on top.
1.5 — What Is Wayland?
You will see the word Wayland frequently.
You do not need to learn the complete graphics stack now.
The simple explanation is:
Wayland is the modern display protocol used by Hyprland and many current Linux desktops.
Applications talk to the compositor, and the compositor controls how they appear on screen.
Simplified:
Application
    ↓
Wayland
    ↓
Hyprland
    ↓
Monitor
Older Linux systems commonly used X11/Xorg.
Some applications may still use compatibility layers such as XWayland.
We will only go deeper when a real troubleshooting situation requires it.
1.6 — What Is Quickshell?
Omarchy 4 / Quattro introduced a major architectural change.
The current Omarchy desktop shell is built using Quickshell.
The Omarchy 4 release consolidated many previously separate desktop components into one integrated shell process.
This includes areas such as:
- the top bar;
- launcher;
- menus;
- notifications;
- on-screen displays;
- control panels;
- lock screen;
- policy authentication UI.
This architecture is one reason current Omarchy 4 documentation may differ significantly from older tutorials.
Why This Matters
If you find an older tutorial telling you to configure components such as:
- Waybar;
- Mako;
- SwayOSD;
- Hyprlock;
- Hypridle;
it may describe an older Omarchy architecture.
Current Omarchy 4 uses its Quickshell-based shell for many of those responsibilities.
This is exactly why this handbook prioritizes current official documentation.
1.7 — The Omarchy Shell
The Omarchy shell is the visible system layer surrounding your applications.
Examples include:
- top bar;
- Omarchy menu;
- Wi-Fi panel;
- Bluetooth panel;
- audio panel;
- display panel;
- notifications;
- lock screen;
- OSD elements;
- plugin-driven widgets.
You interact with it constantly, even though Hyprland is handling the windows underneath.
A useful distinction is:
Hyprland
→ manages windows, monitors, workspaces, focus

Omarchy Shell
→ menus, panels, bar, notifications, widgets, system UI
1.8 — The Omarchy CLI
One of the most important pieces of the system is:
omarchyThe official Omarchy manual describes the CLI as a command center exposing the same internal tooling used throughout the Omarchy experience.
This is particularly useful for:
- developers;
- automation;
- troubleshooting;
- AI coding agents;
- scripting;
- reproducible workstation configuration.
Open the Command Center
Run:
omarchyYou should see the main command help.
Discover Common Commands
Run:
omarchy commandsDiscover Everything
Run:
omarchy commands --allThis can return a large list.
That is expected.
You are not supposed to memorize it.
Get Help for a Group
Example:
omarchy theme --helpAnother example:
omarchy restart --helpAnd for deeper command groups:
omarchy <group> <command> --help1.9 — Why the CLI Matters for AI Development
One of the most interesting design aspects of Omarchy is that its graphical controls and command-line tools are closely related.
That makes it particularly suitable for AI-assisted workstation management.
For example, instead of telling an AI agent:
“Click the Wi-Fi icon, open some settings window, and try to figure out what is wrong.”
you may be able to ask it to inspect:
omarchy network status --verboseor discover the available system tools with:
omarchy commands --allThis gives coding agents a structured interface for inspecting and configuring the machine.
Later in the course, this becomes an important part of our AI-native workflow.
1.10 — Menu, Hotkeys, and CLI Are Different Interfaces to the Same System
You will often have multiple ways to perform the same task.
For example:
Keyboard shortcut
        ↓
Omarchy system action
or:
Super + Space
→ Menu
→ System action
or:
omarchy ...The exact implementation varies by feature, but the important mental model is:
Do not think of the Omarchy menu, keyboard shortcuts, and CLI as completely separate systems.
They are different ways of interacting with the same workstation.
1.11 — Where Omarchy’s Own Files Live
This is one of the most important lessons in the entire course.
Official Omarchy files primarily live under:
/usr/share/omarchy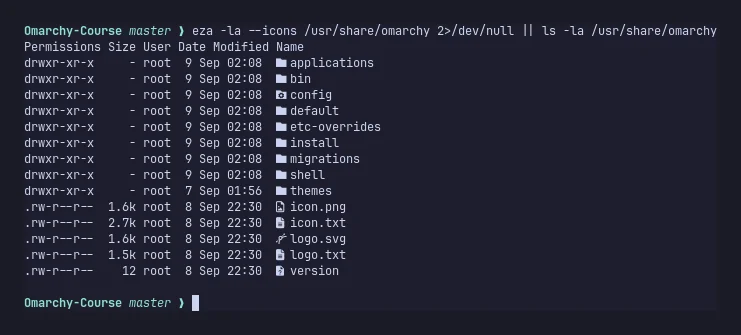
These files belong to Omarchy itself.
The official dotfiles documentation explicitly advises users not to modify them directly.
Why?
Because package updates can replace them.
Example
Suppose you change:
/usr/share/omarchy/default/...It works perfectly.
Then you update Omarchy.
Your modification disappears.
That is not a bug.
You edited a file owned by the Omarchy package.
1.12 — Where Your Personal Configuration Lives
Your personal configuration primarily belongs under:
~/.config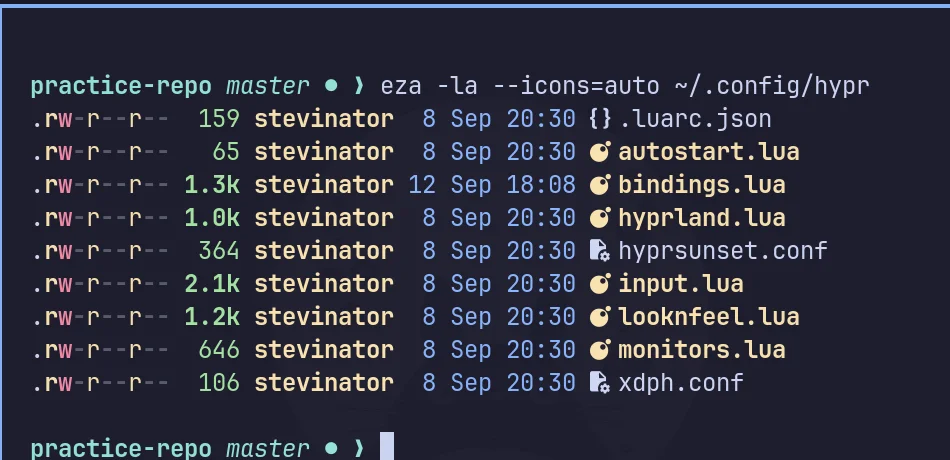
The official Omarchy manual describes these dotfiles as your files for your changes.
Examples include:
~/.config/hypr/
~/.config/omarchy/
~/.config/mise/
These are the files we will customize throughout the course.
1.13 — What Does ~ Mean?
You will constantly see paths beginning with:
~The tilde means:
your home directoryFor a user named:
alexthis:
~/.configusually means:
/home/alex/.configCheck your own home directory:
echo "$HOME"Then:
cd ~
pwd
1.14 — What Is a Dotfile?
A file or directory beginning with a period is normally hidden from ordinary directory listings.
Examples:
.config
.bashrc
.gitconfig
Hence the common Linux term:
dotfiles
Show hidden files with:
ls -laLater you will learn more convenient Omarchy aliases and tools for this.
1.15 — Key Omarchy Configuration Files
Current Omarchy documentation identifies several important files under ~/.config.
For Hyprland:
~/.config/hypr/hyprland.luaMain Hyprland user configuration.
~/.config/hypr/bindings.luaPersonal keybindings and binding overrides.
~/.config/hypr/monitors.luaMonitor resolution, scaling, and positioning.
~/.config/hypr/input.luaKeyboard, mouse, and trackpad configuration.
~/.config/hypr/looknfeel.luaVisual and layout behavior.
~/.config/hypr/autostart.luaExtra processes started with your session.
For the Omarchy shell:
~/.config/omarchy/shell.jsonControls shell behavior such as bar layout, widgets, screensaver, lock, and idle settings.
1.16 — Inspect Your Configuration
Run:
ls -la ~/.config/hyprThen:
ls -la ~/.config/omarchyDo not edit anything yet.
We are only learning the structure.
Try It Yourself
Find the monitor configuration:
ls ~/.config/hypr/monitors.luaFind the input configuration:
ls ~/.config/hypr/input.luaFind the keybinding configuration:
ls ~/.config/hypr/bindings.lua1.17 — Defaults First, Your Overrides After
Current Omarchy uses a layered configuration approach.
Conceptually:
Omarchy defaults
       ↓
Your configuration
       ↓
Final behavior
This is extremely useful.
It means you do not need to copy the entire Omarchy configuration into your home folder just to change one setting.
Instead, you change only what you want to override.
Example
Imagine Omarchy’s default mouse sensitivity is:
0You want:
-0.3You do not need to rewrite the entire input configuration.
You add your override in your own configuration.
This keeps your personal setup small and allows Omarchy updates to continue improving its defaults.
1.18 — Real Example: Our Hyprland Load Order
A current Omarchy user configuration may look conceptually like this:
dofile((os.getenv("OMARCHY_PATH") or "/usr/share/omarchy") .. "/default/hypr/bootstrap.lua")

require("default.hypr.omarchy")

require("hypr.monitors")
require("hypr.input")
require("hypr.bindings")
require("hypr.looknfeel")
require("hypr.autostart")

require("default.hypr.toggles")
Notice the idea:
Omarchy defaults
        ↓
personal monitor settings
personal input settings
personal bindings
personal look and feel
personal autostart
This is the pattern we want.
1.19 — Why You Should Not Copy Entire Defaults
A common beginner mistake is:
- copy a large default config;
- change two lines;
- keep the entire copied file forever.
The problem is that your copy may stop benefiting from upstream improvements.
Instead, prefer:
small intentional overrides
This also makes your configuration easier to:
- understand;
- troubleshoot;
- back up;
- put in Git;
- reproduce on another machine.
Later, our dotfiles repository may contain only a handful of changes even though Omarchy itself contains thousands of lines of defaults.
That is a feature.
1.20 — Editing Configuration Through the Omarchy Menu
The current official documentation allows key configuration files to be opened directly from the Omarchy menu.
For example:
Super + Space
→ Setup
→ Monitors
or configuration-related menu entries for:
- keybindings;
- input;
- config files.
One benefit of using Omarchy’s integrated configuration actions is that required reload/restart behavior can be handled automatically after the editor exits.
1.21 — Editing Configuration Manually
You can also edit files directly.
For example:
nvim ~/.config/hypr/monitors.luaor:
nvim ~/.config/hypr/bindings.luaLater we will learn:
- which file to edit;
- how to reload changes;
- how to recover from errors.
For now:
Know where the file is before editing it.
1.22 — Do Not Edit /usr/share/omarchy for Normal Customization
This deserves its own rule.
Course Rule
Treat
/usr/share/omarchyas reference material, not your personal configuration folder.
It is perfectly useful to read those files.
For example:
rg "workspace" /usr/share/omarchy/default/hyprThis can help you understand how Omarchy implements something.
But do not normally save your personal modifications there.
1.23 — Reading Defaults Is Extremely Useful
Although you should not usually edit Omarchy’s own files, reading them is one of the best ways to learn the system.
Example:
grep -R "SUPER + S" /usr/share/omarchy/default/hypr 2>/dev/nullThis might help you discover where a shortcut is defined.
A better modern search tool is often:
rg "SUPER \+ S" /usr/share/omarchyWe will learn rg properly in the terminal module.
1.24 — What Happens During Updates?
Because Omarchy’s core files are package-managed:
/usr/share/omarchycan change when Omarchy updates.
Your personal files:
~/.configare intended to hold your overrides.
This separation allows:
new Omarchy defaults
        +
your customizations
to coexist.
This is one of the reasons we strongly avoid hacking directly inside /usr/share/omarchy.
1.25 — What If You Break Your Personal Configuration?
Omarchy provides reset and refresh mechanisms.
For example, current Omarchy includes commands for refreshing specific configuration areas and reinstalling user configs.
However, some of these operations are destructive.
Example:
omarchy reinstall configscan reset user configuration.
Do not run destructive recovery commands casually.
Our later recovery module will teach this hierarchy:
inspect
   ↓
fix the specific file
   ↓
restart/reload component
   ↓
refresh specific config
   ↓
restore/reinstall only if necessary
1.26 — Your Shell Configuration
Not all personal configuration belongs under ~/.config.
For Bash, personal shell additions commonly live in:
~/.bashrcThe official Omarchy dotfiles documentation recommends putting your own:
- aliases;
- functions;
- exports;
there.
Later we will inspect how Omarchy’s shell defaults are loaded and where your own additions belong.
1.27 — Autostart
If you want your own application or service to start with the desktop session, Omarchy provides a user autostart configuration.
The key file is:
~/.config/hypr/autostart.luaA current Omarchy-style example is:
o.launch_on_start("my-service")You do not need to use this yet.
The important point is:
Omarchy provides a supported place for your own session startup commands.
1.28 — Hooks
Omarchy also supports hooks for system events.
Current documented hook events include areas such as:
- post-boot;
- post-update;
- theme changes;
- font changes;
- low battery.
User hooks live under:
~/.config/omarchy/hooks/This is different from autostart.
Conceptually:
autostart
→ run when the desktop session starts

hook
→ run when a specific Omarchy event happens
We will build one later.
1.29 — Shell Plugins
Omarchy 4’s shell also has a plugin architecture.
Plugins can extend the desktop shell with:
- widgets;
- panels;
- services;
- UI components.
This is much more powerful than a simple shell hook.
Conceptually:
Hook
→ event-driven script

Plugin
→ extension to the Omarchy shell
We will cover both in a dedicated module.
1.30 — Why Version Awareness Matters
Omarchy changes quickly.
A tutorial written for an older release may reference:
- different shortcuts;
- different shell components;
- removed applications;
- old configuration formats;
- renamed commands;
- tools no longer used by current Omarchy.
For example, Omarchy 4’s Quickshell architecture replaced multiple previously separate desktop components.
Therefore our rule is:
Never treat a tutorial’s behavior as more authoritative than the current installed system and current official documentation.
1.31 — Verify the Installed Version
Run:
omarchy versionWrite down the result.
Example:
4.x.xThis handbook is intentionally not locked to one patch version.
But knowing your own version is essential when troubleshooting.
1.32 — Use the Current CLI as Documentation
Suppose this handbook says a command exists.
But your system reports:
Unknown Omarchy commandDo not keep retrying it.
Run:
omarchy commands --allSearch for the capability.
Example:
omarchy commands --all | grep -i networkor:
omarchy commands --all | grep -i hyprYour installed command surface is often the fastest way to see what your current version supports.
1.33 — Use --help Before Guessing Syntax
Example:
omarchy network --helpMaybe the command group supports:
status
speedtest
band
qr
The exact syntax matters.
This is safer than guessing:
omarchy network testand assuming something is broken when that command never existed.
1.34 — Real-World Mistakes That Became Course Lessons
While building this workstation, several assumptions turned out to be wrong.
These are valuable because they demonstrate why verification matters.
Examples included:
- assuming
omarchy --versionwhen the real command wasomarchy version; - assuming shortcut combinations from older expectations;
- assuming clipboard history used a different shortcut;
- assuming a command group existed when it did not;
- assuming a package should be installed through the system package layer when it belonged in mise;
- assuming a project config was named
.mise.tomlinstead of the actualmise.toml; - assuming the active bootloader instead of checking it.
These are not just mistakes.
They reveal an important engineering principle:
Observe the real system before changing the real system.
1.35 — A Better Troubleshooting Habit
Bad troubleshooting:
Something did not work.
↓
Search random blog.
↓
Paste five commands.
↓
System changes.
↓
Still do not know what was wrong.
Better troubleshooting:
Something did not work.
↓
Identify the affected component.
↓
Check current Omarchy version.
↓
Inspect current CLI/help.
↓
Inspect configuration/state.
↓
Reproduce the problem.
↓
Make one targeted change.
↓
Verify.
This methodology will appear throughout the handbook.
1.36 — Practical Exercise: Map Your Own System
Open a terminal.
Run:
omarchy versionThen:
omarchy commandsThen:
ls -la ~/.config/hyprThen:
ls -la ~/.config/omarchyThen:
ls -ld /usr/share/omarchyFinally:
echo "$HOME"What You Should Be Able to Explain
After running those commands, answer:
- What version of Omarchy am I running?
- Where are my Hyprland user configs?
- Where is my Omarchy shell config?
- Where are Omarchy’s package-owned files?
- What is my home directory?
- Which location should contain my own customizations?
1.37 — Practical Exercise: Inspect Without Editing
Let’s inspect one user configuration file:
cat ~/.config/hypr/hyprland.luaThen inspect the Omarchy defaults directory:
ls /usr/share/omarchy/default/hyprDo not modify anything.
The purpose is to recognize the separation:
my configuration
vs
Omarchy implementation/defaults
1.38 — Practical Exercise: Discover a Command
Imagine you want to know what network tools Omarchy provides.
Instead of searching the web first:
omarchy network --helpThen:
omarchy commands --all | grep -i networkNow imagine you want to know about restart helpers:
omarchy restart --helpThis is the habit we want to develop.
1.39 — Checkpoint
Before moving on, you should be able to answer yes to the following.
Omarchy Architecture
- I understand that Omarchy is based on Arch Linux.
- I know that Hyprland handles window/compositor behavior.
- I know that the Omarchy shell is a separate system layer.
- I know that current Omarchy 4 uses Quickshell for the desktop shell.
- I understand that Omarchy adds its own tooling and conventions on top.
Configuration
- I know that my personal configuration primarily belongs under
~/.config. - I know that Omarchy’s own package-managed files live under
/usr/share/omarchy. - I understand why I should not normally edit
/usr/share/omarchy. - I understand the idea of defaults plus overrides.
- I can locate
bindings.lua,monitors.lua, andinput.lua.
CLI
- I know how to run
omarchy. - I know how to run
omarchy commands. - I know how to run
omarchy commands --all. - I know how to inspect a command group with
--help. - I understand that I should discover syntax instead of guessing.
Version Awareness
- I can check my Omarchy version.
- I know that older tutorials may describe outdated behavior.
- I understand that current official documentation and my actual installed system should take priority.
1.40 — What You Can Now Do
You can now:
- explain what Omarchy is at a high level;
- distinguish Omarchy from Arch Linux;
- explain Hyprland’s role;
- explain the Omarchy shell’s role;
- understand why Omarchy 4’s Quickshell architecture matters;
- find Omarchy’s own files;
- find your personal configuration;
- inspect configuration safely;
- discover available Omarchy commands;
- use built-in help;
- verify the installed version;
- avoid blindly following old tutorials;
- understand how personal overrides survive while upstream defaults continue evolving.
Module 1 Summary
The core mental model is:
Arch Linux
    ↓
Hyprland
    ↓
Omarchy Shell / Quickshell
    ↓
Omarchy tools and defaults
    ↓
Your configuration
    ↓
Your workflow
For configuration:
/usr/share/omarchy
→ Omarchy-owned
→ read/reference
→ updated by packages
→ do not normally modify
~/.config
→ user-owned
→ customize here
→ preserve your intentional overridesFor command discovery:
omarchy
↓
omarchy commands
↓
omarchy commands --all
↓
omarchy <group> --help
And the most important lesson of this module:
Understand which layer owns the behavior before trying to change it.