Module 03: Master the Omarchy Desktop
In this module — 68 sections
- What You Will Learn
- 3.1 — The Omarchy Navigation Philosophy
- 3.2 — The Super Key
- 3.3 — Open the Omarchy Menu
- 3.4 — Open the Application Launcher
- 3.5 — Open the System Menu
- 3.6 — Lock the Computer
- 3.7 — Launch the Terminal
- 3.8 — Launch the Browser
- 3.9 — See Tiling in Action
- 3.10 — Close a Window
- 3.11 — Move Focus Between Windows
- 3.12 — How to Know Which Window Is Focused
- 3.13 — Swap Tiled Windows
- 3.14 — Toggle Tiling and Floating
- 3.15 — Fullscreen
- 3.16 — Full Width
- 3.17 — Fullscreen Inside the Window
- 3.18 — Change the Tiling Orientation
- 3.19 — Toggle Workspace Layout
- 3.20 — Resize Tiled Windows
- 3.21 — Save and Restore Window Width
- 3.22 — Workspaces
- 3.23 — Switch to a Workspace
- 3.24 — Move a Window to Another Workspace
- 3.25 — Move a Window Without Following
- 3.26 — Next and Previous Workspace
- 3.27 — Return to the Former Workspace
- 3.28 — Scroll Through Workspaces
- 3.29 — The Scratchpad
- 3.30 — Why the Scratchpad Is Useful
- 3.31 — Move a Window to the Scratchpad
- 3.32 — Remove a Window from the Scratchpad
- 3.33 — Pop a Window
- 3.34 — Window Groups
- 3.35 — The Omarchy Panels
- 3.36 — Audio Panel
- 3.37 — Network Panel
- 3.38 — Bluetooth Panel
- 3.39 — Display Panel
- 3.40 — Activity Monitor
- 3.41 — Capture Menu
- 3.42 — Print Screen Capture Shortcuts
- 3.43 — Clipboard
- 3.44 — Clipboard History
- 3.45 — Emoji Picker
- 3.46 — Calculator
- 3.47 — Notifications
- 3.48 — Style Shortcuts
- 3.49 — Scaling Shortcuts
- 3.50 — Discover Current Keybindings
- 3.51 — CLI Keybinding Discovery
- 3.52 — Why We Verify Instead of Memorize
- 3.53 — Practical Developer Workspace
- 3.54 — Exercise: Build Workspace 1
- 3.55 — Exercise: Build Workspace 2
- 3.56 — Exercise: Build Workspace 3
- 3.57 — Practice Moving Windows
- 3.58 — Practice Former Workspace
- 3.59 — Practice the Scratchpad
- 3.60 — Practice Tiling
- 3.61 — Practice Fullscreen and Full Width
- 3.62 — Practice Layout Switching
- 3.63 — Practical Exercise: No Mouse for Five Minutes
- 3.64 — Common Desktop Mistakes
- 3.65 — Checkpoint
- 3.66 — What You Can Now Do
- Module 3 Summary
About This Module
You now understand:
- what Omarchy is;
- how Arch Linux fits underneath it;
- where Hyprland and the Omarchy Shell fit;
- where your configuration lives;
- the Linux concepts needed to follow the rest of the course.
Now we start using Omarchy the way it is designed to be used.
This module is about daily desktop operation.
Omarchy is heavily keyboard-driven. The official navigation documentation makes that explicit: the keyboard is the primary interface, and the Omarchy Menu is the entry point when you do not yet know the faster shortcut.
That means this module is not about memorizing dozens of keys.
It is about building a small number of strong habits:
Open
→ Focus
→ Move
→ Tile
→ Switch workspace
→ Use panels
→ Discover missing shortcuts
By the end of this module, you should feel comfortable operating Omarchy without constantly reaching for the mouse.
What You Will Learn
By the end of Module 3, you will be able to:
- open the Omarchy Menu;
- open the application launcher;
- open the system menu;
- launch core applications quickly;
- close windows;
- move focus between tiled windows;
- swap tiled windows;
- switch between tiling and floating;
- use fullscreen and full-width modes;
- navigate workspaces;
- move windows between workspaces;
- use the scratchpad;
- switch between Omarchy layouts;
- resize tiled windows;
- use the clipboard manager;
- use capture tools;
- use emoji and utility panels;
- control notifications;
- discover current keybindings instead of memorizing old ones;
- build a practical multi-workspace developer workflow.
3.1 — The Omarchy Navigation Philosophy
The official Omarchy navigation guide describes the desktop as keyboard-first.
The basic idea is:
Super + Space
→ discover anything

direct shortcut
→ do it faster
You should not try to memorize the full shortcut map on day one.
Instead, learn shortcuts in layers.
Layer 1 — Essential
Super + Space
Super + Return
Super + Shift + Return
Super + K
Super + W
Layer 2 — Window management
Super + Arrows
Super + Shift + Arrows
Super + T
Super + F
Super + Alt + F
Layer 3 — Workspaces
Super + 1..0
Super + Shift + 1..0
Super + Tab
Super + Shift + Tab
Layer 4 — Panels and tools
Super + Ctrl + A
Super + Ctrl + B
Super + Ctrl + W
Super + Ctrl + D
Super + Ctrl + C
Super + Ctrl + E
This gives you a manageable learning path.
3.2 — The Super Key
Throughout Omarchy documentation you will see:
SuperOn a typical PC keyboard, this is the Windows key.
Example:
Super + Spacemeans:
Hold the Windows/Super key and press Space.
3.3 — Open the Omarchy Menu
Press:
Super + SpaceThis opens the main Omarchy Menu.
The menu is the safest place to start when you do not remember a shortcut.
You can use it to access areas such as:
- applications;
- system controls;
- setup;
- install;
- themes;
- capture tools;
- power actions;
- configuration.
3.4 — Open the Application Launcher
Press:
Super + Alt + SpaceThis opens the apps menu.
The distinction is useful:
Super + Space
→ Omarchy Menu

Super + Alt + Space
→ applications
The exact presentation may evolve between Omarchy releases, so always verify with the current keybinding list if necessary.
3.5 — Open the System Menu
Press:
Super + EscapeThis opens the system menu containing actions such as:
- lock;
- suspend;
- restart;
- power off.
Do not confuse the system menu with the main Omarchy Menu.
3.6 — Lock the Computer
Current Omarchy hotkeys include:
Super + Ctrl + Lfor locking the workstation.
This is a shortcut worth learning early.
Especially on a development workstation, you should not leave an unlocked session unattended.
3.7 — Launch the Terminal
Press:
Super + ReturnThis launches your configured default terminal.
In our Stevinator baseline, that is:
Ghosttybut the binding follows the configured Omarchy default terminal.
This is important.
The shortcut is not conceptually:
“Launch Ghostty.”
It is:
“Launch my Omarchy default terminal.”
That makes the binding resilient if you later change terminal.
3.8 — Launch the Browser
Press:
Super + Shift + ReturnThis launches your configured default browser.
In our baseline:
ChromiumAgain, Omarchy launches the configured default rather than forcing one browser forever.
3.9 — See Tiling in Action
Open:
- terminal;
- browser.
You should see Hyprland automatically arrange both windows.
Conceptually:
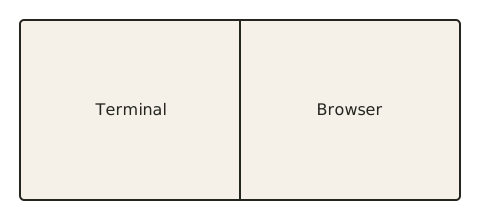
You did not manually resize the windows.
Hyprland tiled them.
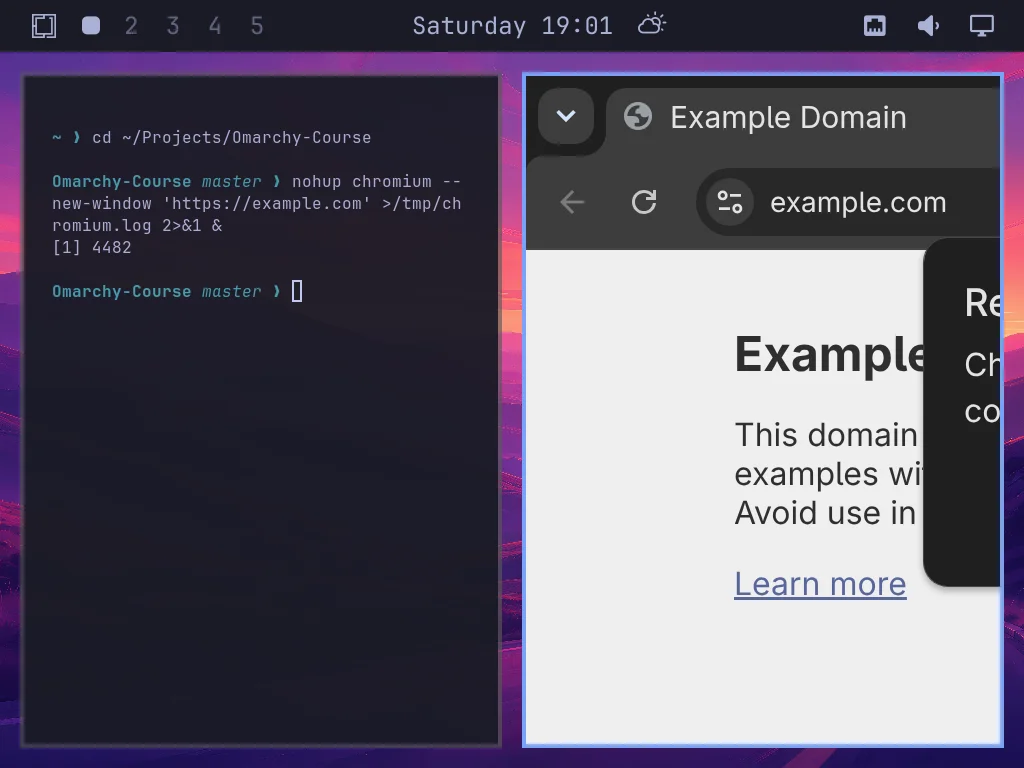
This is one of the defining behaviors of the Omarchy desktop.
3.10 — Close a Window
Use:
Super + WCurrent Omarchy also exposes:
Super + Qfor closing the focused window.
You only need to remember one.
Stevinator Recommendation
Use:
Super + Wbecause it is easy to associate with “window.”
Practice with Superkey
If you installed Superkey in Module 0, this is where it starts earning its place. Lesson Essentials — 7 steps: the Omarchy menu, terminal, browser, keybindings reference, closing a window, and the system menu from 3.3 to here, plus one you have not met yet — Super + Shift + N launches the editor. Click SK in the bar → Hyprland → Essentials, or launch it directly:
omarchy-shell shell summon stevinator.superkey '{"lesson":"hyprland.essentials"}'Kappy shows the keys and waits. Press them on the real desktop:
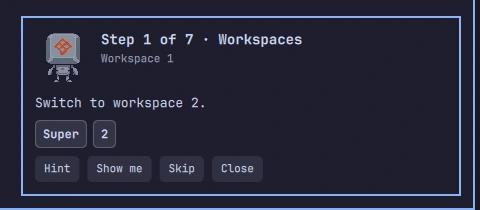
When Hyprland reports the effect, the step is verified — the keys turn blue, Kappy adds a short note on why the shortcut matters, and the next step loads:
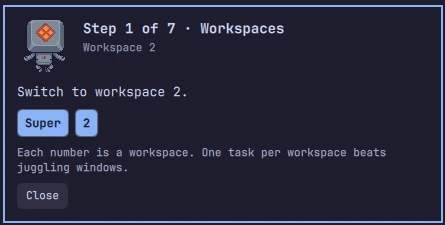
Hint rephrases the instruction. Show me performs the action for you, puts everything back, and says “Now you.” Skip moves on without blocking completion. Progress is saved, so you can leave and come back.
3.11 — Move Focus Between Windows
When multiple tiled windows are visible, move focus using:
Super + Left
Super + Right
Super + Up
Super + Down
Example:
Super + Rightmoves focus to the window on the right.
This is much faster than reaching for the mouse.
3.12 — How to Know Which Window Is Focused
The exact visual styling depends on the current theme, but the active window generally has some visual distinction.
You can also inspect the focused window from the terminal:
hyprctl activewindowLater we will use this command for window rules.
For daily navigation, rely on the visual focus indicator.
3.13 — Swap Tiled Windows
Use:
Super + Shift + ArrowExample:
Super + Shift + Rightswaps the focused window with the window to the right.
Conceptually:
Before:
┌───────────────┬───────────────┐
│   Terminal    │    Browser    │
└───────────────┴───────────────┘
After swapping right from Terminal:
┌───────────────┬───────────────┐
│    Browser    │   Terminal    │
└───────────────┴───────────────┘
This is one of the most useful Hyprland habits.
3.14 — Toggle Tiling and Floating
Press:
Super + TThis toggles the focused window between:
tiled
↕
floating
Use floating mode when a window should not occupy a permanent tile.
Examples:
- small utility windows;
- dialogs;
- media controls;
- temporary tools.
Do not float everything.
The tiling workflow is one of the main advantages of Omarchy.
3.15 — Fullscreen
Press:
Super + FThis makes the focused window fullscreen.
Use it for:
- coding;
- videos;
- focused writing;
- presentations.
Press it again to return.
3.16 — Full Width
Press:
Super + Alt + FThis expands the focused window across the available workspace width while preserving Omarchy’s window-management context.
This is useful when you want more horizontal space without necessarily using full screen.
Examples:
- large editor;
- wide terminal output;
- data table;
- browser dev tools.
3.17 — Fullscreen Inside the Window
Current Omarchy hotkeys also include:
Super + Ctrl + Ffor fullscreening content inside the focused window where supported.
This is a more specialized shortcut.
You do not need it for normal navigation.
3.18 — Change the Tiling Orientation
Current Omarchy uses:
Super + Jto toggle the arrangement direction.
For example, two windows might change from:
side by sideto:
stacked verticallyConceptually:
┌───────────────┬───────────────┐
│   Terminal    │    Browser    │
└───────────────┴───────────────┘
becomes:
┌───────────────────────────────┐
│           Terminal            │
├───────────────────────────────┤
│            Browser            │
└───────────────────────────────┘
Press:
Super + Jagain to change the orientation back.
Practice with Superkey
Lesson Windows I — focus & tiling — 9 steps covering 3.11 to here: move focus with Super + Arrows, swap two windows, float and re-tile with Super + T, fullscreen and full width with Super + F and Super + Alt + F, and change the split orientation with Super + J. Superkey opens two practice windows on an empty workspace, so nothing of yours gets moved. Click SK in the bar → Hyprland → Windows I, or launch it directly:
omarchy-shell shell summon stevinator.superkey '{"lesson":"hyprland.windows-1"}'3.19 — Toggle Workspace Layout
Current Omarchy supports multiple Hyprland layout styles.
Press:
Super + Lto toggle the active workspace between:
dwindle
↕
scrolling
You do not need to decide which one is “best.”
Try both.
Dwindle Layout
Dwindle recursively splits available space.
Conceptually:
┌───────────────┬───────────────┐
│               │       A       │
│       C       ├───────────────┤
│               │       B       │
└───────────────┴───────────────┘
This is familiar to many tiling-window-manager users.
Scrolling Layout
Scrolling layout allows windows to behave more like horizontally arranged columns that you move through.
This can be particularly useful on:
- ultrawide displays;
- laptop screens;
- coding workflows with several vertical panes.
Try it rather than choosing based only on screenshots.
3.20 — Resize Tiled Windows
Current Omarchy hotkeys expose directional resizing.
The main shortcuts include:
Super + Minus
Super + Equal
Super + Shift + Minus
Super + Shift + Equal
The exact direction depends on the current layout/orientation.
Current hotkeys also expose:
Super + Alt + Minus/Equalfor smaller resize steps and:
Super + Ctrl + Minus/Equalfor larger resize steps.
Mouse Resize
You can also hold:
Super + Right Mouseand drag to resize.
For learning, the mouse method can help you understand how tiling sizes behave.
Later, keyboard resizing becomes faster.
3.21 — Save and Restore Window Width
Current Omarchy exposes:
Super + Alt + Hometo save the current window width and:
Super + Hometo restore it.
This is useful when you have a preferred working width for a terminal, editor, or browser.
You do not need to use this immediately.
Just know the feature exists.
Practice with Superkey
Lesson Windows II — size & shape — 5 steps: change the focused window’s width with Super + = and Super + -, its height with Super + Shift + = and -, save a width with Super + Alt + Home and restore it with Super + Home. The last step, Super + O, pops the window out — you will meet it in 3.33; Kappy explains it if you get there first. Click SK in the bar → Hyprland → Windows II, or launch it directly:
omarchy-shell shell summon stevinator.superkey '{"lesson":"hyprland.windows-2"}'3.22 — Workspaces
Workspaces are one of the most important parts of the Omarchy workflow.
Instead of putting every application on one desktop, distribute work across multiple workspaces.
Example:
Workspace 1
→ browser / communication

Workspace 2
→ coding

Workspace 3
→ terminal / infrastructure

Workspace 4
→ documentation / research
This is much cleaner than minimizing and restoring dozens of overlapping windows.
3.23 — Switch to a Workspace
Use:
Super + NumberExamples:
Super + 1
Super + 2
Super + 3
Current Omarchy defines numeric workspace bindings through the standard number row.
You can use workspaces 1 through 10.
3.24 — Move a Window to Another Workspace
Use:
Super + Shift + NumberExample:
Super + Shift + 2moves the focused window to workspace 2 and follows it.
3.25 — Move a Window Without Following
Current Omarchy also exposes:
Super + Shift + Alt + NumberExample:
Super + Shift + Alt + 3moves the window to workspace 3 without switching your view to workspace 3.
This is extremely useful when organizing windows quickly.
Example:
browser popup appears
→ send to workspace 1 silently
→ keep coding on workspace 2
3.26 — Next and Previous Workspace
Use:
Super + Tabfor the next workspace.
Use:
Super + Shift + Tabfor the previous workspace.
This is useful when you are moving sequentially through several active workspaces.
3.27 — Return to the Former Workspace
Press:
Super + Ctrl + Tabto jump back to the previous workspace you were using.
This creates a very efficient two-workspace workflow.
Example:
Workspace 2 → code
Workspace 1 → browser documentation
You can jump back and forth quickly.
Practice with Superkey
Lesson Workspaces — 7 steps covering 3.23 to here: Super + 2, Super + 1, Super + Tab, Super + Shift + Tab, sending a window to another workspace with and without following it, and Super + Ctrl + Tab to bounce back. Click SK in the bar → Hyprland → Workspaces, or launch it directly:
omarchy-shell shell summon stevinator.superkey '{"lesson":"hyprland.workspaces"}'3.28 — Scroll Through Workspaces
Current Omarchy also supports:
Super + Mouse Wheelfor cycling through workspaces.
This is optional.
Keyboard workspace navigation is generally faster once learned.
3.29 — The Scratchpad
Omarchy includes a special workspace called the scratchpad.
Think of it as:
A temporary overlay workspace you can summon over whatever you are doing.
Toggle it with:
Super + Sor:
Super + Gravewhere Grave is typically the backtick key:
`3.30 — Why the Scratchpad Is Useful
Good scratchpad candidates include:
- terminal;
- AI agent;
- music controls;
- calculator;
- monitoring tool;
- notes;
- quick reference.
Example:
Coding workspace
        ↓
Super + S
        ↓
temporary terminal/AI overlay
        ↓
Super + S
        ↓
back to code
You do not need to leave the current workspace.
3.31 — Move a Window to the Scratchpad
Current Omarchy uses:
Super + Alt + Sor:
Super + Shift + Graveto move the focused window to the scratchpad.
Then:
Super + Sshows or hides it.
Practice with Superkey
Lesson Scratchpad — 3 steps: send the practice window to the scratchpad with Super + Alt + S, show it with Super + S, hide it again. Click SK in the bar → Hyprland → Scratchpad, or launch it directly:
omarchy-shell shell summon stevinator.superkey '{"lesson":"hyprland.scratchpad"}'3.32 — Remove a Window from the Scratchpad
Send it to a normal workspace.
Example:
Super + Shift + 2moves it to workspace 2.
3.33 — Pop a Window
Current Omarchy provides:
Super + Oto “pop” a tiled window into a floating, sticky-style state.
This is useful for windows that should remain visible while moving between workspaces.
Examples:
- video;
- monitoring;
- call window.
Do not confuse this with the scratchpad.
Conceptually:
Scratchpad
→ summon/hide a special workspace

Pop
→ make one window float/stick across workspace use
3.34 — Window Groups
Current Omarchy also exposes Hyprland window grouping.
Toggle grouping with:
Super + GGrouped windows can behave like a tabbed group.
This is more advanced than normal tiling.
Inside a group, current Omarchy exposes shortcuts such as:
Super + Alt + Taband:
Super + Ctrl + Left/Rightfor moving through grouped windows.
You do not need groups to be productive.
Treat them as an advanced desktop feature.
Practice with Superkey
Lesson Windows III — groups — 2 steps: turn the focused window into a group with Super + G, then cycle inside it with Super + Alt + Tab. Click SK in the bar → Hyprland → Windows III, or launch it directly:
omarchy-shell shell summon stevinator.superkey '{"lesson":"hyprland.windows-3"}'3.35 — The Omarchy Panels
Omarchy’s top bar exposes interactive panels.
The official current top-bar documentation emphasizes that these are functional control panels, not just status indicators.
Current shortcuts include:
Super + Ctrl + A
→ Audio

Super + Ctrl + W
→ Network

Super + Ctrl + B
→ Bluetooth

Super + Ctrl + D
→ Display

Super + Ctrl + P
→ Power

Super + Ctrl + Alt + D
→ Calendar
3.36 — Audio Panel
Press:
Super + Ctrl + AThe current Omarchy shell audio panel can expose controls such as:
- master volume;
- output device;
- per-application audio.
Practical Exercise
Open:
- browser audio;
- audio panel.
Try changing the application volume without changing the entire system volume.
3.37 — Network Panel
Press:
Super + Ctrl + WCurrent functionality includes:
- Wi-Fi networks;
- signal strength;
- connecting/disconnecting;
- network settings.
Later we will also use:
omarchy network status --verbosefrom the terminal.
3.38 — Bluetooth Panel
Press:
Super + Ctrl + BUse it to:
- inspect devices;
- connect;
- disconnect;
- view device state.
3.39 — Display Panel
Press:
Super + Ctrl + DThis provides display-related controls.
For precise monitor configuration, we will later use:
~/.config/hypr/monitors.luaThe panel is the fast daily interface.
The config is the persistent engineering interface.
3.40 — Activity Monitor
Press:
Super + Ctrl + TThis opens:
btopUse it to inspect:
- CPU;
- memory;
- processes;
- load;
- system activity.
This is one of the most useful quick troubleshooting shortcuts.
3.41 — Capture Menu
Press:
Super + Ctrl + CThis opens Omarchy’s capture controls.
Current Omarchy capture functionality includes:
- screenshot;
- screen recording;
- text extraction/OCR;
- color picking.
This menu is especially useful for compact keyboards without a dedicated Print Screen key.
3.42 — Print Screen Capture Shortcuts
On keyboards with a working Print Screen key, current Omarchy hotkeys include:
Print Screen
→ Screenshot
Alt + Print Screen
→ Screen recordingSuper + Print Screen
→ Color pickerSuper + Ctrl + Print Screen
→ Text extraction to clipboardBecause compact keyboards may map Print Screen differently, verify the actual key event if these do not work.
3.43 — Clipboard
Omarchy provides unified clipboard shortcuts.
Current hotkeys include:
Super + C
→ Copy

Super + X
→ Cut

Super + V
→ Paste
and:
Super + Ctrl + Vfor the clipboard manager/history.
This is useful because traditional Linux terminal copy/paste shortcuts can differ from graphical applications.
Omarchy attempts to make the desktop behavior more consistent.
3.44 — Clipboard History
Press:
Super + Ctrl + V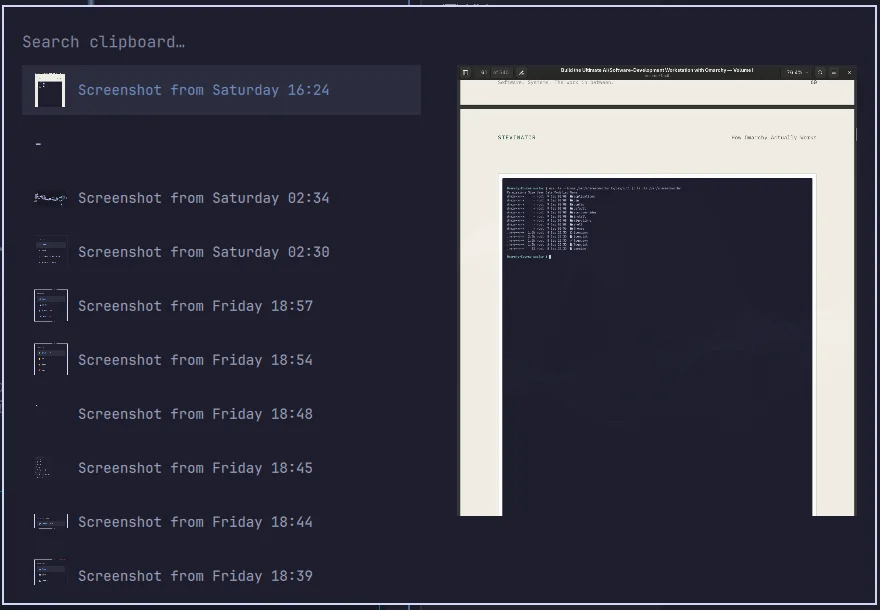
This opens clipboard history.
This is incredibly useful during development.
Examples:
- reuse multiple copied commands;
- recover a previous URL;
- paste an older code snippet;
- switch between copied values.
3.45 — Emoji Picker
Press:
Super + Ctrl + EThis opens the emoji picker.
Select an emoji and it becomes available through the clipboard workflow.
You may not use it constantly for programming, but it is useful for:
- documentation;
- communication;
- README files;
- project status;
- issue discussions.
3.46 — Calculator
Current Omarchy includes:
Super + Ctrl + Qfor a calculator interface.
Useful for quick calculations without opening a browser.
3.47 — Notifications
Current Omarchy provides several notification shortcuts.
Useful ones include:
Super + ,
→ dismiss latest notification
Super + Shift + ,
→ dismiss all notificationsSuper + Ctrl + ,
→ toggle notification silencingSuper + Shift + Alt + ,
→ notification historyNotification silencing is effectively Omarchy’s do-not-disturb mode.
This is useful during focused coding sessions.
3.48 — Style Shortcuts
Current Omarchy exposes quick visual customization.
Examples include:
Super + Ctrl + Shift + Space
→ choose theme
Super + Ctrl + Space
→ choose theme backgroundSuper + Backspace
→ toggle transparency for focused windowWe will cover themes properly later.
For now, know that visual customization is integrated into the same keyboard-first workflow.
Practice with Superkey
Lesson Panels & tools — 13 steps, one per panel and tool from 3.35 to here: audio, network, Bluetooth, display, power, the capture menu, emoji picker, clipboard history, activity monitor, calculator, app launcher, theme picker, and background picker. Click SK in the bar → Hyprland → Panels & tools, or launch it directly:
omarchy-shell shell summon stevinator.superkey '{"lesson":"hyprland.panels"}'3.49 — Scaling Shortcuts
Current Omarchy exposes monitor scaling steps through:
Super + /and:
Super + Alt + /These step through monitor scaling options.
Do not randomly change scaling on a working workstation unless you understand what you are testing.
Persistent display configuration belongs in the later display/Hyprland modules.
3.50 — Discover Current Keybindings
This is one of the most important shortcuts in the entire course:
Super + KThe official Omarchy hotkey documentation recommends this as the main way to inspect current bindings.
This is better than:
- memorizing a screenshot;
- relying on a year-old YouTube video;
- assuming our handbook version exactly matches your installed version.
3.51 — CLI Keybinding Discovery
You can also use:
omarchy menu keybindingsOn current versions, the keybinding menu may also support output-oriented options such as:
omarchy menu keybindings --printif exposed by your installed version.
Verify current syntax with:
omarchy menu keybindings --help3.52 — Why We Verify Instead of Memorize
During the real workstation setup used to create this course, several shortcut assumptions turned out to be wrong for the installed configuration.
That taught us an important rule:
The installed keybinding map is the source of truth for your machine.
So when a shortcut does not work:
do not immediately edit configInstead:
1. open Super + K
2. search for the action
3. verify the current shortcut
4. only then troubleshoot further
3.53 — Practical Developer Workspace
Now let’s build a useful daily layout.
We will use:
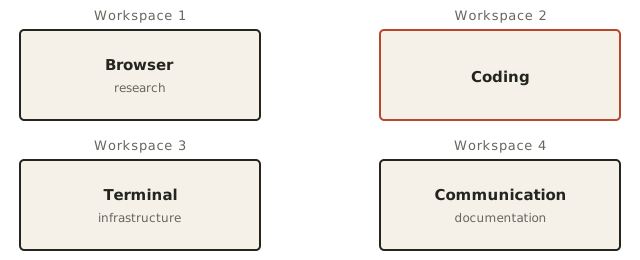
You do not have to keep this layout forever.
It is a training exercise.
3.54 — Exercise: Build Workspace 1
Switch:
Super + 1Open browser:
Super + Shift + ReturnThis becomes your:
research / docs workspace3.55 — Exercise: Build Workspace 2
Switch:
Super + 2Open terminal:
Super + ReturnLater, this workspace will contain:
- editor;
- coding agent;
- terminal.
For now, just establish the workspace.
3.56 — Exercise: Build Workspace 3
Switch:
Super + 3Open another terminal.
This can become:
infrastructure
logs
servers
Git operations
3.57 — Practice Moving Windows
Focus a terminal.
Move it to workspace 4:
Super + Shift + 4Then move it silently back to workspace 3:
Super + Shift + Alt + 3Verify that you remain on workspace 4 when moving silently.
3.58 — Practice Former Workspace
Switch between:
Workspace 1
Workspace 2
Then press:
Super + Ctrl + Tabseveral times.
This is extremely useful for:
code
↔
documentation
3.59 — Practice the Scratchpad
Open a terminal.
Move it to scratchpad:
Super + Alt + SToggle scratchpad:
Super + SHide it:
Super + SShow it again:
Super + SThen move the terminal back:
Super + Shift + 23.60 — Practice Tiling
On one workspace, open:
- terminal;
- browser.
Use:
Super + Left/Rightto change focus.
Use:
Super + Shift + Left/Rightto swap them.
Use:
Super + Jto change orientation.
Use:
Super + Tto float one.
Then:
Super + Tagain to tile it.
3.61 — Practice Fullscreen and Full Width
With a browser or terminal focused:
Super + FReturn.
Then:
Super + Alt + FReturn.
Notice the difference.
3.62 — Practice Layout Switching
Open several windows on one workspace.
Press:
Super + LMove between them.
Then press:
Super + Lagain.
Decide which layout feels more natural for your display.
3.63 — Practical Exercise: No Mouse for Five Minutes
This exercise is intentionally simple.
For five minutes, do the following without using the mouse:
- open a browser;
- open two terminals;
- move one terminal to another workspace;
- switch between workspaces;
- move focus between tiled windows;
- swap two windows;
- fullscreen one;
- open the audio panel;
- open the clipboard manager;
- open the keybinding search.
The point is not speed.
The point is teaching your hands the Omarchy model.
3.64 — Common Desktop Mistakes
These will be explored more deeply in the troubleshooting module.
Mistake 1 — Trying to Operate Omarchy Like Windows
Constantly:
- minimizing;
- dragging;
- resizing;
- stacking overlapping windows;
works against the tiling workflow.
Try workspaces and focus movement first.
Mistake 2 — Memorizing Too Many Shortcuts
You do not need 50 shortcuts.
Remember:
Super + Space
Super + K
and discover the rest when needed.
Mistake 3 — Assuming a Shortcut Is Broken
First check:
Super + KYour version or personal configuration may differ.
Mistake 4 — Confusing Clipboard Paste With Clipboard History
Current Omarchy:
Super + V
→ paste

Super + Ctrl + V
→ clipboard manager
Mistake 5 — Confusing Share With Scratchpad
Current Omarchy uses:
Super + S
→ scratchpad
while sharing functionality is under a different shortcut.
Always verify current keybindings.
Mistake 6 — Floating Everything
Floating mode is useful.
But if every application is floating, you lose much of the benefit of a tiling environment.
Mistake 7 — Putting Everything on Workspace 1
Workspaces are not an advanced feature.
They are central to the intended workflow.
Use them.
3.65 — Checkpoint
Before moving on, you should be able to answer yes to the following.
Core Navigation
- I can open the Omarchy Menu.
- I can open the app launcher.
- I can open the system menu.
- I can open a terminal.
- I can open a browser.
- I can close a window.
- I can open current keybinding help.
Window Management
- I can move focus with
Super + Arrow. - I can swap tiled windows.
- I can toggle floating.
- I can fullscreen a window.
- I understand full-width mode.
- I can change tiling orientation.
- I can switch workspace layout.
Workspaces
- I can switch to numbered workspaces.
- I can move a window to another workspace.
- I can move a window silently.
- I can go to the next and previous workspace.
- I can return to the former workspace.
Scratchpad
- I understand what the scratchpad is.
- I can toggle it.
- I can send a window to it.
- I can move a window back to a normal workspace.
System Controls
- I can open audio.
- I can open network.
- I can open Bluetooth.
- I can open display controls.
- I can open
btop. - I can open capture tools.
Productivity
- I know how to open clipboard history.
- I know how to open the emoji picker.
- I know how to silence notifications.
- I can discover a shortcut rather than guess it.
3.66 — What You Can Now Do
After completing Module 3, you can now:
- navigate Omarchy primarily from the keyboard;
- organize work across workspaces;
- move focus without using the mouse;
- rearrange tiled windows;
- choose between tiled and floating modes;
- use fullscreen and full-width modes;
- use the scratchpad for temporary tools;
- use Omarchy’s built-in panels;
- inspect system activity quickly;
- use clipboard history;
- capture screenshots and recordings;
- control notifications;
- discover current shortcuts;
- create a practical multi-workspace developer layout.
Most importantly:
You have started using Omarchy as a tiling workstation rather than treating it like a traditional overlapping-window desktop.
Module 3 Summary
Core entry points:
Super + Space
→ Omarchy Menu

Super + Alt + Space
→ Apps

Super + Escape
→ System Menu

Super + K
→ Keybindings
Core applications:
Super + Return
→ Terminal

Super + Shift + Return
→ Browser
Window management:
Super + Arrow
→ Focus

Super + Shift + Arrow
→ Swap

Super + T
→ Tile / float

Super + J
→ Change tiling direction

Super + F
→ Fullscreen

Super + Alt + F
→ Full width

Super + L
→ Toggle layout
Workspaces:
Super + Number
→ Switch workspace

Super + Shift + Number
→ Move window + follow

Super + Shift + Alt + Number
→ Move window silently

Super + Tab
→ Next workspace

Super + Shift + Tab
→ Previous workspace

Super + Ctrl + Tab
→ Former workspace
Scratchpad:
Super + S
→ Toggle

Super + Alt + S
→ Move window to scratchpad
System panels:
Super + Ctrl + A
→ Audio

Super + Ctrl + B
→ Bluetooth

Super + Ctrl + W
→ Network

Super + Ctrl + D
→ Display

Super + Ctrl + T
→ Activity

Super + Ctrl + C
→ Capture
Productivity:
Super + Ctrl + V
→ Clipboard history

Super + Ctrl + E
→ Emoji picker

Super + Ctrl + ,
→ Notification silencing
The most important lesson:
Do not memorize Omarchy. Learn how to discover Omarchy.