Module 05: Tmux for Omarchy Developers
In this module — 69 sections
- What You Will Learn
- 5.1 — What Is Tmux?
- 5.2 — Why Tmux Matters on Omarchy
- 5.3 — Tmux Persists Separately from the Terminal Window
- 5.4 — Sessions, Windows, and Panes
- 5.5 — Launch Tmux Through Omarchy
- 5.6 — Launch Tmux from an Existing Terminal
- 5.7 — The Omarchy t Helper
- 5.8 — The Tmux Prefix Key
- 5.9 — Why a Prefix Exists
- 5.10 — Show the Tmux Keybinding Help
- 5.11 — Create a Pane Beside the Current Pane
- 5.12 — Create a Pane Below
- 5.13 — Split Without Using the Prefix
- 5.14 — Move Between Panes
- 5.15 — Resize Panes
- 5.16 — Resize Using the Tmux Command Prompt
- 5.17 — Zoom a Pane
- 5.18 — Close a Pane
- 5.19 — Create a New Tmux Window
- 5.20 — Switch Between Windows
- 5.21 — Move Tmux Windows
- 5.22 — Rename a Window
- 5.23 — Close a Window
- 5.24 — List Sessions
- 5.25 — Detach from a Session
- 5.26 — Check Sessions from the Shell
- 5.27 — Reattach to a Session
- 5.28 — Why Persistence Matters
- 5.29 — Tmux over SSH
- 5.30 — Sessions
- 5.31 — A Simple Session Strategy
- 5.32 — Copy Mode
- 5.33 — Tmux Copy Mode vs Omarchy Clipboard History
- 5.34 — Reload Tmux Configuration
- 5.35 — Tmux Configuration Location
- 5.36 — Working Directory Behavior
- 5.37 — Important Mental Model
- 5.38 — Starting Fresh in the Correct Project
- 5.39 — Omarchy Developer Layout Helpers
- 5.40 — tdl: Development Layout
- 5.41 — tdl with Your AI Agent
- 5.42 — Start tdl from the Project Directory
- 5.43 — tdl with Two Agents
- 5.44 — tds: Square Development Layout
- 5.45 — Dependencies of tds
- 5.46 — tdlm: One Layout Per Subdirectory
- 5.47 — When tdlm Makes Sense
- 5.48 — tsl: Swarm Layout
- 5.49 — Do Not Start With Swarms
- 5.50 — Tmux and Git Worktrees
- 5.51 — Tmux vs Hyprland Workspaces
- 5.52 — Tmux vs Terminal Tabs
- 5.53 — Tmux vs Multiple Terminal Windows
- 5.54 — A Recommended Omarchy Development Layout
- 5.55 — Practical Exercise: Create Your First Split
- 5.56 — Practical Exercise: Horizontal Split
- 5.57 — Practical Exercise: Windows
- 5.58 — Practical Exercise: Detach and Reattach
- 5.59 — Practical Exercise: Persistence Test
- 5.60 — Practical Exercise: Use tdl
- 5.61 — Practical Exercise: Resize the AI Pane
- 5.62 — Practical Exercise: Check the Working Directory
- 5.63 — Practical Exercise: Try tds
- 5.64 — Practical Exercise: Tmux Cheatsheet
- 5.65 — Common Tmux Mistakes
- 5.66 — Checkpoint
- 5.67 — What You Can Now Do
- Module 5 Summary
About This Module
You now know how to use the terminal efficiently.
The next step is learning how to keep multiple terminal tasks organized without opening a large number of separate terminal windows.
That is where Tmux comes in.
Tmux is a terminal multiplexer.
It gives you:
- persistent terminal sessions;
- multiple windows inside one session;
- multiple panes inside one window;
- keyboard navigation between terminal areas;
- layouts for development;
- resumable work after closing the terminal;
- the same terminal workflow on local and remote machines.
Current Omarchy includes a customized Tmux configuration and several developer-focused layout helpers.
This makes Tmux especially useful for the workstation we are building.
A typical AI development layout may contain:
Editor
+
AI coding agent
+
Terminal
inside one Tmux session.
The goal of this module is not to teach every Tmux command.
It is to make you productive with the Omarchy Tmux workflow.
What You Will Learn
By the end of Module 5, you will be able to:
- understand what Tmux is;
- understand sessions, windows, and panes;
- launch Tmux through Omarchy;
- use the Omarchy Tmux prefix;
- create and close panes;
- move between panes;
- resize panes;
- create and switch windows;
- detach from a session;
- resume an existing session;
- inspect active sessions;
- use copy mode;
- reload Tmux configuration;
- understand Tmux working-directory behavior;
- use Omarchy’s
tdl,tds,tdlm, andtsldevelopment layouts; - build an editor + AI + terminal workspace;
- understand when Tmux is useful and when it is unnecessary.
5.1 — What Is Tmux?
Tmux stands for:
terminal multiplexer
A normal terminal window usually contains one shell.
Conceptually:
Terminal
└── Bash
Tmux adds another layer:
Terminal
└── Tmux
    ├── Window 1
    │   ├── Pane 1
    │   └── Pane 2
    │
    ├── Window 2
    │   └── Pane 1
    │
    └── Window 3
        ├── Pane 1
        ├── Pane 2
        └── Pane 3
This gives you a programmable terminal workspace.
5.2 — Why Tmux Matters on Omarchy
The current official Omarchy terminal documentation recommends Tmux as a way to gain:
- panes;
- windows/tabs;
- resumable sessions;
regardless of which terminal emulator you use.
This matters because Omarchy supports several terminals:
- Foot;
- Ghostty;
- Alacritty;
- Kitty.
Even if the terminal itself has tabs or splits, Tmux gives you the same workflow everywhere.
That includes remote machines over SSH.
5.3 — Tmux Persists Separately from the Terminal Window
This is one of the most important concepts.
Without Tmux:
close terminal
→ shell process disappears
→ running work may stop
With Tmux:
close terminal
→ Tmux session can continue running
→ reconnect later
Conceptually:
Ghostty window
      ↓
Tmux client
      ↓
Tmux server/session
      ↓
shells and programs
The terminal window is only a view into the Tmux session.
5.4 — Sessions, Windows, and Panes
Tmux has three core levels.
Session
A session is the entire persistent workspace.
Example:
Session: WorkWindow
A window is similar to a tab inside a Tmux session.
Example:
Work
├── Window 1: editor
├── Window 2: server
└── Window 3: logs
Pane
A pane is a split inside a Tmux window.
Example:
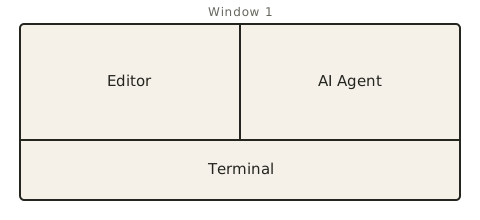
This distinction is fundamental:
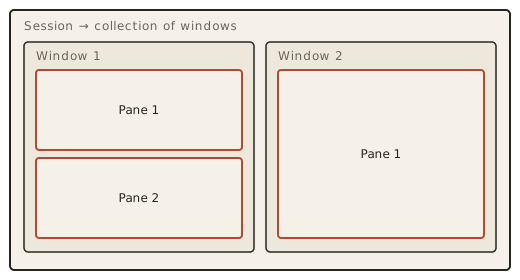
5.5 — Launch Tmux Through Omarchy
Current official Omarchy shortcut:
Super + Alt + ReturnThis launches a fresh terminal with Tmux.
The official current hotkey documentation identifies this as the Tmux terminal launcher.
5.6 — Launch Tmux from an Existing Terminal
You can also run Tmux manually.
Check the installed version:
tmux -VThen start a session:
tmuxHowever, Omarchy provides shell helpers that make the normal workflow easier.
5.7 — The Omarchy t Helper
Current Omarchy shell configuration includes Tmux helpers.
On the workstation used to build this course, the shorthand:
tattaches to or creates the default working Tmux session.
Before assuming this helper exists on a future version, verify it:
type tIf available, it should reveal the actual shell alias or function.
This is a recurring course principle:
Inspect the helper before assuming what it does.
5.8 — The Tmux Prefix Key
Tmux uses a prefix key for many commands.
Current Omarchy documentation uses:
Ctrl + Spaceas the primary Tmux prefix.
The current hotkey documentation also states that:
Ctrl + Bcontinues to work.
So:
Prefix + smeans:
- press
Ctrl + Space; - release it;
- press
s.
It does not mean pressing all keys simultaneously.
5.9 — Why a Prefix Exists
Tmux runs inside your terminal.
If every Tmux command used ordinary keys directly, it would interfere with applications such as:
- Bash;
- Neovim;
- coding agents;
- TUIs.
The prefix tells Tmux:
“The next key is for you.”
Example:
Ctrl + Space
then
c
creates a Tmux window.
Without the prefix, typing:
cshould simply type c into your shell.
5.10 — Show the Tmux Keybinding Help
Current Omarchy provides:
Super + Alt + Kfor Tmux keybinding help.
Inside Tmux, current bindings also include:
Prefix + ?for the Tmux keybinding cheatsheet.
This is important.
Just as:
Super + Khelps you discover Omarchy shortcuts,
Super + Alt + Khelps you discover Tmux shortcuts.
Do not try to memorize the full Tmux map.
5.11 — Create a Pane Beside the Current Pane
Current Omarchy Tmux binding:
Prefix + vThis creates a vertical divider, placing another pane beside the current one.
Conceptually:
Before

┌───────────────────────────────┐
│                               │
│           Terminal            │
│                               │
└───────────────────────────────┘
After:
┌───────────────┬───────────────┐
│               │               │
│    Pane 1     │    Pane 2     │
│               │               │
└───────────────┴───────────────┘
5.12 — Create a Pane Below
Current Omarchy binding:
Prefix + hThis splits the current pane horizontally.
Conceptually:
┌───────────────────────────────┐
│            Pane 1             │
├───────────────────────────────┤
│            Pane 2             │
└───────────────────────────────┘
5.13 — Split Without Using the Prefix
Current Omarchy Tmux configuration also provides direct shortcuts.
Split below:
Alt + ReturnSplit beside:
Alt + Shift + ReturnThese are convenient because they avoid the two-step prefix sequence.
5.14 — Move Between Panes
Current Omarchy bindings:
Ctrl + Alt + Left
Ctrl + Alt + Right
Ctrl + Alt + Up
Ctrl + Alt + Down
This lets you move focus between panes directly.
Example:
Ctrl + Alt + Rightmoves into the pane to the right.
5.15 — Resize Panes
Current Omarchy provides:
Ctrl + Alt + Shift + Arrowfor resizing panes.
Examples:
Ctrl + Alt + Shift + Left
Ctrl + Alt + Shift + Right
Use these to allocate more room to:
- editor;
- AI agent;
- logs;
- terminal.
5.16 — Resize Using the Tmux Command Prompt
Tmux also provides a command prompt.
Open it with:
Prefix + :Then you can use commands such as:
resize-pane -L 10or:
resize-pane -R 10This is useful when you need a precise adjustment.
You do not need it for normal use if the direct resize shortcuts are enough.
5.17 — Zoom a Pane
Current Omarchy binding:
Prefix + zThis temporarily expands the current pane to fill the whole Tmux window.
Example:
Editor + AI + terminal
        ↓
focus terminal
        ↓
Prefix + z
        ↓
terminal fills entire Tmux window
Press it again to restore the previous layout.
This is extremely useful.
5.18 — Close a Pane
Current Omarchy binding:
Prefix + xYou can also use the direct shortcut:
Alt + EscapeAnother natural method is simply to exit the shell running in that pane:
exitWhen the pane’s shell ends, the pane closes.
Practice with Superkey
Lesson Panes — 9 steps covering 5.11 to here: split beside and below, split without the prefix, move between panes, resize, zoom and un-zoom, close a pane, and reload the tmux configuration with Prefix + q. Click SK in the bar → Tmux → Panes, or launch it directly:
omarchy-shell shell summon stevinator.superkey '{"lesson":"tmux.panes"}'5.19 — Create a New Tmux Window
Current Omarchy binding:
Prefix + cThis creates another Tmux window.
Think:
Tmux window ≈ terminal tabbut managed by Tmux rather than the terminal emulator.
5.20 — Switch Between Windows
Current Omarchy provides:
Alt + 1
Alt + 2
Alt + 3
...
Alt + 9
to jump directly to a Tmux window.
It also provides:
Alt + Left
Alt + Right
to move between windows.
This is very fast once you use Tmux regularly.
5.21 — Move Tmux Windows
Current Omarchy shortcut:
Alt + Shift + Left
Alt + Shift + Right
This moves the current Tmux window left or right in the window order.
Useful when organizing larger sessions.
5.22 — Rename a Window
Current Omarchy binding:
Prefix + rGive windows meaningful names such as:
code
server
logs
database
deploy
This becomes useful when a session contains several windows.
5.23 — Close a Window
Current Omarchy binding:
Prefix + kThis kills the current Tmux window.
Be careful if it contains running processes you still need.
5.24 — List Sessions
Inside Tmux:
Prefix + sThe official Omarchy terminal documentation specifically recommends this to see active sessions.
This gives you a session chooser.
5.25 — Detach from a Session
Current Tmux binding:
Prefix + dDetach means:
leave the Tmux session
without stopping it
Conceptually:
Tmux session
├── editor
├── server
└── logs

Prefix + d
        ↓

terminal returns to normal shell

Tmux session still exists
This is one of Tmux’s most important features.
Practice with Superkey
Lesson Sessions & windows — 9 steps covering 5.19 to here: press the prefix, create a window, rename it, switch and move windows with Alt, close one, open the session list, switch sessions with Alt + ↑/↓, and detach. Superkey runs this on a private tmux server (tmux -L superkey), so your own sessions are never touched. Click SK in the bar → Tmux → Sessions & windows, or launch it directly:
omarchy-shell shell summon stevinator.superkey '{"lesson":"tmux.sessions"}'5.26 — Check Sessions from the Shell
Outside Tmux:
tmux lsExample:
Work: 3 windows ...If there are no sessions, Tmux may report that no server is running.
That is normal.
5.27 — Reattach to a Session
Generic Tmux syntax:
tmux attachor:
tmux attach -t SESSION_NAMEExample:
tmux attach -t WorkIf your Omarchy shell provides the t helper, it may handle the common attach/create workflow for you.
Verify with:
type t5.28 — Why Persistence Matters
Imagine you have:
Window 1
→ Neovim

Window 2
→ development server

Window 3
→ logs
You accidentally close Ghostty.
Without Tmux:
everything may disappearWith Tmux:
open a new terminal
→ reattach
→ continue
This becomes even more useful on remote servers.
5.29 — Tmux over SSH
Tmux runs on whichever machine you start it on.
For example:
Your Omarchy laptop
        ↓ SSH
Remote Linux server
        ↓
Tmux
        ↓
server processes
If your network connection drops:
SSH disconnectsbut the remote Tmux session can continue.
Reconnect and attach again.
This is one of Tmux’s classic strengths.
5.30 — Sessions
Current Omarchy Tmux bindings include:
Prefix + C
→ new session

Prefix + K
→ kill session

Prefix + R
→ rename session

Prefix + N
→ next session

Prefix + P
→ previous session
And direct movement:
Alt + Up
Alt + Down
for moving between sessions.
Most developers do not need many sessions at first.
Start with one.
5.31 — A Simple Session Strategy
For a beginner:
Session: Workis enough.
Inside:
Window 1
→ current project

Window 2
→ infrastructure

Window 3
→ misc
As your workflow develops, you may prefer:
one Tmux session per projector:
one long-lived Work sessionBoth are valid.
Choose based on actual workflow rather than theoretical purity.
5.32 — Copy Mode
Tmux has its own scrollback/copy mode.
Enter it with:
Prefix + [Current Omarchy config uses vi-style copy-mode bindings.
Inside copy mode:
vstarts selection.
Then:
ycopies the selection.
This is useful for terminal output that has scrolled away.
5.33 — Tmux Copy Mode vs Omarchy Clipboard History
These solve different problems.
Tmux copy mode
→ navigate and select historical terminal output
Super + Ctrl + V
→ browse clipboard historyYou can use both.
5.34 — Reload Tmux Configuration
Current Omarchy binding:
Prefix + qreloads Tmux configuration.
Omarchy also exposes:
omarchy restart tmuxwhich reloads/restarts Tmux integration using current configuration when appropriate.
Later, if you customize:
~/.config/tmux/tmux.confyou will know how to apply changes.
5.35 — Tmux Configuration Location
Current official Omarchy hotkey documentation identifies the user Tmux configuration at:
~/.config/tmux/tmux.confThis is where you would place personal Tmux configuration.
As always:
Prefer user-owned configuration over editing package-owned Omarchy defaults.
You do not need to customize Tmux yet.
The current Omarchy configuration is already designed for its workflow.
5.36 — Working Directory Behavior
This is an important real-world gotcha.
Suppose you already have a Tmux session named:
Workand one of its panes is currently in:
~/Projects/project-aNow you leave Tmux and run:
cd ~/Projects/project-bThen you attach to the existing Work session.
The old pane can still be in:
~/Projects/project-aWhy?
Because the shell inside that pane never changed directories.
You merely reattached to the same running session.
5.37 — Important Mental Model
Attaching to a Tmux session does not mean:
“Recreate this session using my current terminal directory.”
It means:
“Show me the already-running session exactly where it was.”
This distinction matters when starting project layouts.
5.38 — Starting Fresh in the Correct Project
If you want a new Tmux workspace for a project:
- go to the project directory;
- create a new session or ensure you are not attaching to an old unrelated one;
- then start the layout.
Example:
cd ~/Projects/my-projectThen start a fresh Tmux environment.
This prevents confusion about why tools opened in the wrong repository.
5.39 — Omarchy Developer Layout Helpers
Current Omarchy ships special Tmux layout functions for development.
The official current terminal documentation describes:
tdl
tds
tdlm
tsl
These are one of the strongest reasons for developers to learn Tmux on Omarchy.
5.40 — tdl: Development Layout
Current official syntax:
tdl [agent]or with two AI agents:
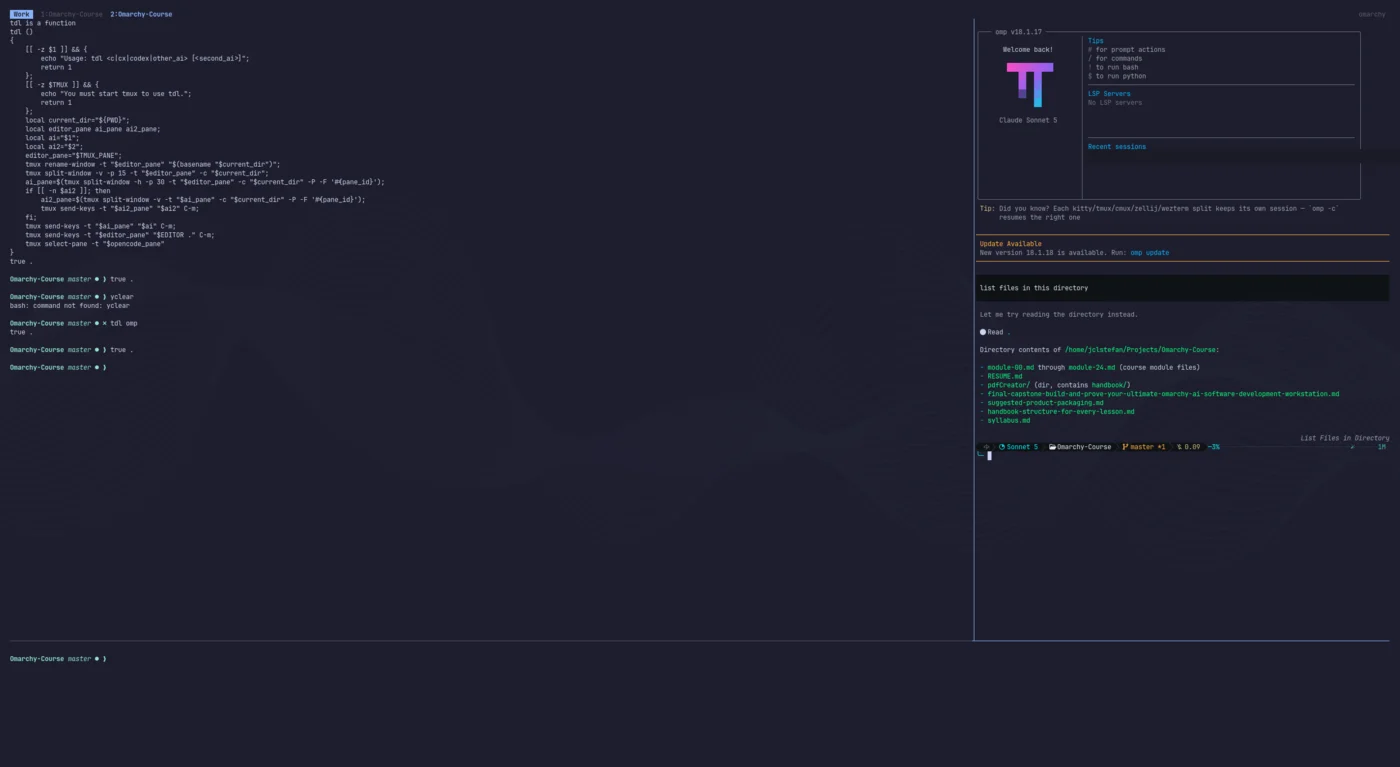
tdl [agent] [second_agent]The official current Omarchy documentation describes tdl as a three-way IDE-like layout containing:
- editor on the left;
- AI coding agent on the right;
- terminal at the bottom.
Conceptually:
┌──────────────────────┬──────────────────────┐
│                      │                      │
│       Editor         │       AI Agent       │
│                      │                      │
├──────────────────────┴──────────────────────┤
│                  Terminal                   │
└─────────────────────────────────────────────┘
This is an excellent layout for the workstation we are building.
5.41 — tdl with Your AI Agent
The exact agent command depends on which coding agent you have configured and installed.
Examples in the current official Omarchy documentation use short agent commands for tools such as:
- OpenCode;
- Claude;
- Codex.
On our Stevinator workstation, we also tested layouts with OMP.
Do not assume a specific agent shorthand exists.
Verify:
type AGENT_COMMANDand:
type tdlbefore building a custom workflow around it.
5.42 — Start tdl from the Project Directory
This is important.
First:
cd ~/Projects/YOUR_PROJECTThen enter your Tmux session.
Then:
tdl YOUR_AGENT_COMMANDThis keeps:
- editor;
- AI;
- terminal;
anchored to the intended project.
5.43 — tdl with Two Agents
Current official Omarchy documentation supports:
tdl AGENT_1 AGENT_2This can give you a development layout with two agent processes.
That may be useful for:
- implementation + review;
- primary agent + second opinion;
- parallel research.
But do not use two agents merely because the feature exists.
More agents create:
- more context;
- more cost;
- more coordination;
- more opportunities for conflicting edits.
Start with one.
5.44 — tds: Square Development Layout
Current official Omarchy documentation also provides:
tdsThe current documented layout includes:
- editor;
- live diff watcher;
- terminal;
- OpenCode.
Conceptually:
┌──────────────────────┬──────────────────────┐
│                      │                      │
│       Editor         │     Diff Watcher     │
│                      │                      │
├──────────────────────┼──────────────────────┤
│                      │                      │
│      Terminal        │      AI Agent        │
│                      │                      │
└──────────────────────┴──────────────────────┘
This layout is particularly useful when reviewing continuous AI-generated changes.
5.45 — Dependencies of tds
A helper layout may depend on other tools.
If tds opens a pane and reports:
command not founddo not assume Tmux is broken.
Inspect the missing command.
Use:
type COMMANDThen determine whether that tool belongs to:
- Omarchy package;
- system package;
- mise-managed CLI.
This exact situation occurred while building the workstation used for this course.
That makes it an excellent troubleshooting example.
5.46 — tdlm: One Layout Per Subdirectory
Current official Omarchy documentation provides:
tdlm [agent]This creates a development layout for subdirectories in the current directory.
The official current workflow allows navigation using:
Alt + 1
Alt + 2
Alt + 3
...
This can be useful for repositories containing multiple related applications or services.
Example:
project/
├── frontend/
├── backend/
├── worker/
└── infrastructure/
tdlm can help organize those as separate Tmux windows.
5.47 — When tdlm Makes Sense
Useful:
monorepo
multi-service project
directory containing several independent repos
Not useful:
small single-folder projectUse the simplest layout that solves the problem.
5.48 — tsl: Swarm Layout
Current official Omarchy syntax:
tsl <count> <command>Example from current documentation:
tsl 4 ccreates four panes running the selected command.
Conceptually:
┌──────────────────────┬──────────────────────┐
│       Agent 1        │       Agent 2        │
├──────────────────────┼──────────────────────┤
│       Agent 3        │       Agent 4        │
└──────────────────────┴──────────────────────┘
This is intended for parallel/swarm workflows.
5.49 — Do Not Start With Swarms
A multi-agent swarm looks impressive.
That does not mean it should be your default development workflow.
Potential issues include:
- competing file changes;
- duplicated work;
- higher model cost;
- difficult coordination;
- confusing Git state.
Use swarms only when tasks can genuinely be separated.
We will discuss parallel AI work later.
5.50 — Tmux and Git Worktrees
Tmux becomes especially powerful when combined with Git worktrees.
Conceptually:
Tmux Window 1
→ Worktree A
→ Agent A

Tmux Window 2
→ Worktree B
→ Agent B

Tmux Window 3
→ Worktree C
→ Agent C
Each agent can work in a separate filesystem checkout.
We will cover Git worktrees conceptually in the Git module and revisit the AI use case later.
Do not set this up yet.
5.51 — Tmux vs Hyprland Workspaces
These are not competitors.
They operate at different layers.
Hyprland Workspace
Organizes graphical applications.
Example:
Workspace 1
→ browser

Workspace 2
→ terminal/Tmux

Workspace 3
→ communication
Tmux
Organizes terminal tasks inside the terminal.
Example:
Hyprland Workspace 2
└── Ghostty
    └── Tmux
        ├── editor
        ├── AI agent
        └── terminal
This layered organization is extremely powerful.
5.52 — Tmux vs Terminal Tabs
If your terminal emulator supports tabs, you may wonder why Tmux is necessary.
Terminal tabs are fine for simple local work.
Tmux adds:
- persistence;
- remote portability;
- programmable layouts;
- pane/window/session hierarchy;
- Omarchy developer layout helpers.
You do not have to use Tmux for every terminal.
A useful rule:
quick command
→ normal terminal

long development session
→ Tmux
5.53 — Tmux vs Multiple Terminal Windows
Multiple windows can be perfectly valid.
Tmux becomes more valuable when you want:
- one project workspace;
- reproducible layouts;
- long-running processes;
- remote sessions;
- editor + AI + terminal together.
Use the tool because it solves a problem, not because terminal multiplexers are fashionable.
5.54 — A Recommended Omarchy Development Layout
A very practical workstation structure is:
Hyprland Workspace 1
→ Browser / documentation

Hyprland Workspace 2
→ Ghostty + Tmux

Hyprland Workspace 3
→ infrastructure / monitoring

Hyprland Workspace 4
→ communication
Inside Workspace 2:
Tmux Work session

┌──────────────────────┬──────────────────────┐
│                      │                      │
│       Editor         │       AI Agent       │
│                      │                      │
├──────────────────────┴──────────────────────┤
│                  Terminal                   │
└─────────────────────────────────────────────┘
This gives you two levels of organization:
Hyprland
→ graphical workflow

Tmux
→ development workflow
5.55 — Practical Exercise: Create Your First Split
Launch Tmux:
Super + Alt + ReturnCreate a pane beside:
Prefix + vMove between panes:
Ctrl + Alt + Left/RightClose one pane:
exit5.56 — Practical Exercise: Horizontal Split
Create:
Prefix + hMove:
Ctrl + Alt + Up/DownZoom:
Prefix + zRestore:
Prefix + z5.57 — Practical Exercise: Windows
Create a new Tmux window:
Prefix + cSwitch:
Alt + 1
Alt + 2
Rename the second window:
Prefix + rName it:
serverReturn to Window 1.
5.58 — Practical Exercise: Detach and Reattach
Inside Tmux:
Prefix + dNow check sessions:
tmux lsReattach:
tmux attachYou should return to the same Tmux state.
This is the exercise that proves you understand Tmux persistence.
5.59 — Practical Exercise: Persistence Test
Inside a Tmux pane:
cd ~/ProjectsThen run:
pwdDetach:
Prefix + dClose the terminal window.
Open a new terminal.
Reattach:
tmux attachRun:
pwdYou should still be in the same directory inside that pane.
This demonstrates why existing Tmux sessions retain their own working directories.
5.60 — Practical Exercise: Use tdl
Choose an existing Git project.
Example:
cd ~/Projects/YOUR_PROJECTEnter Tmux.
Verify:
type tdlThen launch the layout using an installed agent command:
tdl YOUR_AGENTYou should get the Omarchy development layout.
5.61 — Practical Exercise: Resize the AI Pane
Inside the tdl layout, focus the AI pane.
Try the current Omarchy resize shortcuts:
Ctrl + Alt + Shift + ArrowIf you want a precise resize:
Prefix + :then:
resize-pane -L 10or the direction appropriate to your layout.
The goal is to understand that Tmux layouts are adjustable, not fixed.
5.62 — Practical Exercise: Check the Working Directory
With tdl open:
Run:
pwdinside the terminal pane.
Confirm that it matches the intended project.
If it does not, ask:
Did I attach to an existing Tmux session whose pane already had a different working directory?
Do not assume the helper is broken.
5.63 — Practical Exercise: Try tds
From a Git repository:
type tdsThen:
tdsObserve the layout.
If a pane reports a missing command:
- record the command name;
- do not randomly install packages;
- inspect with:
type COMMAND- determine the appropriate installation layer.
This is a troubleshooting exercise as much as a Tmux exercise.
5.64 — Practical Exercise: Tmux Cheatsheet
Press:
Super + Alt + K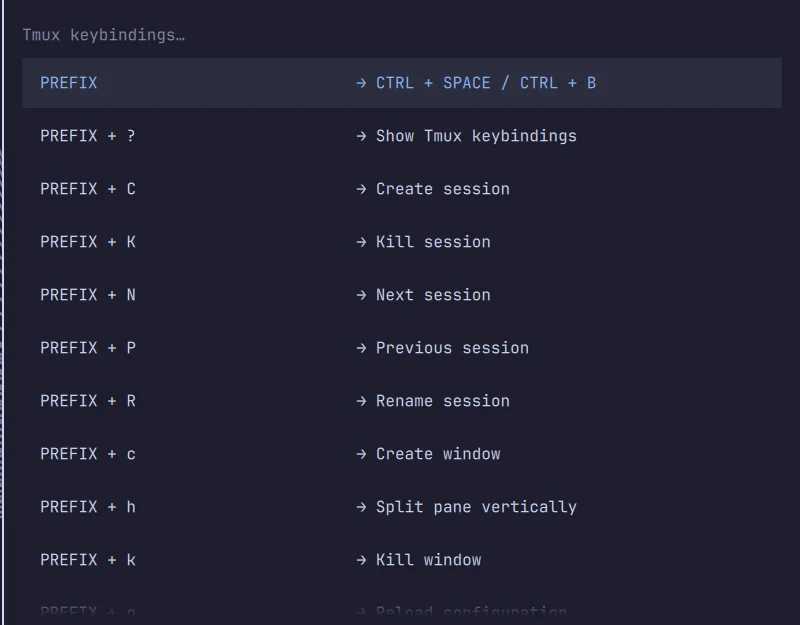
Then inside Tmux:
Prefix + ?Compare the two help experiences.
You should leave this module knowing:
I do not have to remember everything. I know where to look.
5.65 — Common Tmux Mistakes
Mistake 1 — Treating Prefix as a Simultaneous Key Combination
Wrong mental model:
Ctrl + Space + cCorrect:
Ctrl + Space
release
c
Mistake 2 — Forgetting You Are Inside Tmux
When shortcuts behave unexpectedly, check whether you are:
normal shell
or
Tmux pane
The status line normally makes this visually clear.
Mistake 3 — Attaching to an Existing Session and Expecting a New Working Directory
Existing panes retain their running shell state.
Your current directory outside Tmux does not magically replace their directory.
Mistake 4 — Opening Endless Tmux Sessions
Start simple.
One useful session is better than ten forgotten sessions.
Check:
tmux lsMistake 5 — Killing a Session Instead of Detaching
If you want to return later:
Prefix + dDo not kill the session.
Mistake 6 — Using Tmux for Every Five-Second Command
A normal terminal is perfectly fine for:
git statusor:
omarchy versionUse Tmux when persistence/layout provides value.
Mistake 7 — Assuming a Missing tds Tool Means Tmux Is Broken
Layout helpers can depend on additional CLIs.
Identify the missing dependency first.
Mistake 8 — Starting an Agent Swarm Before Understanding Single-Agent Workflows
More panes do not automatically mean more productivity.
Mistake 9 — Hard-Coding Old Agent Aliases
Agent commands can change.
Inspect:
type AGENTand current Omarchy/agent configuration.
Mistake 10 — Memorizing Old Tmux Bindings
Current Omarchy provides:
Super + Alt + Kand:
Prefix + ?Use them.
5.66 — Checkpoint
Before moving on, you should be able to answer yes to the following.
Concepts
- I understand what Tmux is.
- I understand the difference between session, window, and pane.
- I understand that Tmux persists independently of the terminal window.
- I understand how Hyprland workspaces and Tmux complement each other.
Launching
- I can launch a Tmux terminal with
Super + Alt + Return. - I know the current Omarchy prefix is
Ctrl + Space. - I know
Ctrl + Balso works on the current documented config. - I know how to open Tmux keybinding help.
Panes
- I can split beside.
- I can split below.
- I can move between panes.
- I can resize panes.
- I can zoom a pane.
- I can close a pane.
Windows
- I can create a Tmux window.
- I can switch between windows.
- I can rename a window.
- I understand that Tmux windows are similar to terminal tabs.
Sessions
- I can list sessions.
- I can detach.
- I can reattach.
- I understand why working directories persist inside existing sessions.
Developer Layouts
- I understand what
tdldoes. - I understand what
tdsdoes. - I understand what
tdlmis for. - I understand what
tslis for. - I know not to use multi-agent swarms by default.
- I can verify helper commands using
type.
5.67 — What You Can Now Do
After completing Module 5, you can now:
- organize a terminal development environment;
- keep terminal work running independently of the terminal window;
- resume work after closing or reconnecting;
- create pane-based development layouts;
- organize tasks into Tmux windows;
- use the same terminal structure locally and over SSH;
- create an editor + AI + terminal workspace;
- understand the Omarchy developer-layout helpers;
- diagnose working-directory confusion;
- inspect Tmux helpers rather than guessing;
- choose intelligently when Tmux is useful.
Most importantly:
You now have a persistent terminal workspace capable of hosting your editor, coding agent, development server, logs, and other tools in one organized environment.
Module 5 Summary
The hierarchy:
Tmux Session
├── Window
│   ├── Pane
│   └── Pane
└── Window
    └── Pane
Launch:
Super + Alt + Return
→ Tmux terminal
Prefix:
Ctrl + Spacewith current documented compatibility for:
Ctrl + BPanes:
Prefix + v
→ split beside

Prefix + h
→ split below

Ctrl + Alt + Arrow
→ move focus

Ctrl + Alt + Shift + Arrow
→ resize

Prefix + z
→ zoom

Prefix + x
→ close pane
Windows:
Prefix + c
→ new window

Alt + 1..9
→ switch window

Alt + Left/Right
→ previous/next window

Prefix + r
→ rename
Sessions:
Prefix + s
→ list sessions

Prefix + d
→ detach

tmux ls
→ list from shell

tmux attach
→ reattach
Help:
Super + Alt + K
→ Omarchy Tmux keybindings

Prefix + ?
→ Tmux cheatsheet
Developer layouts:
tdl
→ editor + AI + terminal

tds
→ editor + diff + terminal + AI

tdlm
→ layout per subdirectory

tsl
→ multi-pane command/swarm layout
The most important mental model:
Closing a terminal window and ending a Tmux session are not the same thing.
And the most important workflow lesson:
Start the project in the correct directory before creating a fresh development layout. Reattaching to an existing Tmux session restores that session’s existing state, including its working directories.