Module 06: Development Environment Management with Omarchy and Mise
In this module — 74 sections
- What You Will Learn
- 6.1 — The Core Rule: Do Not Install Everything the Same Way
- 6.2 — Layer 1: System Packages
- 6.3 — Layer 2: Omarchy-Integrated Installation
- 6.4 — Layer 3: Mise
- 6.5 — Why This Separation Matters
- 6.6 — The System Runtime Is Not Your Project Runtime
- 6.7 — Check Mise
- 6.8 — Inspect Current Mise Configuration
- 6.9 — Global Mise Configuration
- 6.10 — What “Global” Means in Mise
- 6.11 — Set a Global Tool Version
- 6.12 — Check the Global Config After mise use
- 6.13 — Project Configuration
- 6.14 — Create a Practice Project
- 6.15 — Add a Project-Specific Node Version
- 6.16 — Verify the Active Version
- 6.17 — Compare Project and Global Versions
- 6.18 — Real-World Example
- 6.19 — mise use vs mise install
- 6.20 — Typical Workflow After Cloning a Project
- 6.21 — The Official Omarchy Shortcut: mise i
- 6.22 — Check Which Configs Are Active
- 6.23 — Check Which Tools Are Active
- 6.24 — Check Where the Executable Comes From
- 6.25 — Tool Selection Through $PATH
- 6.26 — Run a Tool Through Mise Explicitly
- 6.27 — Temporary Version Testing
- 6.28 — Version Requests vs Exact Pins
- 6.29 — Which Should You Use?
- 6.30 — Mise Lockfiles
- 6.31 — Project Config Should Usually Go Into Git
- 6.32 — Real Course Example
- 6.33 — mise.local.toml
- 6.34 — Shared vs Local Configuration
- 6.35 — Configuration Layering
- 6.36 — Example: Work-Wide Defaults
- 6.37 — Mise Can Manage More Than Languages
- 6.38 — Omarchy’s Mise-Managed Lazy Tools
- 6.39 — Inspect a Mise-Managed Command
- 6.40 — Omarchy Development Environment Installers
- 6.41 — Why Use Omarchy’s Development Installer?
- 6.42 — A Practical Decision Tree
- 6.43 — Do Not Default to sudo pacman -S
- 6.44 — Do Not Default to npm install -g
- 6.45 — The Same Principle Applies to Python pip
- 6.46 — Runtime Manager vs Package Manager
- 6.47 — Verify Node
- 6.48 — Verify Python
- 6.49 — Verify Bun
- 6.50 — Compare with System Python
- 6.51 — Do Not Remove System Python Because You Use Mise
- 6.52 — Trust and Project Configuration
- 6.53 — mise trust
- 6.54 — Why This Matters for AI Development
- 6.55 — Environment Variables in mise.toml
- 6.56 — Mise Tasks
- 6.57 — Upgrade Tools Carefully
- 6.58 — Omarchy Updates and Mise Tools
- 6.59 — Global Defaults Should Be Conservative
- 6.60 — Project Configuration Should Express Project Reality
- 6.61 — Reproducibility Workflow
- 6.62 — New Project Workflow
- 6.63 — Practical Exercise: Global vs Project Node
- 6.64 — Practical Exercise: Inspect Configuration Resolution
- 6.65 — Practical Exercise: Clone-Style Setup
- 6.66 — Practical Exercise: Command Resolution
- 6.67 — Practical Exercise: Add Python Too
- 6.68 — Practical Exercise: Commit the Environment
- 6.69 — Practical Exercise: Local-Only Override
- 6.70 — Common Development Environment Mistakes
- 6.71 — Checkpoint
- 6.72 — What You Can Now Do
- Module 6 Summary
About This Module
You now have:
- a working Omarchy desktop;
- strong terminal fundamentals;
- a Tmux-based development workspace.
The next step is making your development environment clean, predictable, and reproducible.
This is one of the most important modules in the entire course.
Many developers eventually end up with a workstation where:
- Node comes from one package manager;
- Python comes from the system;
- another Python came from somewhere else;
- a CLI was installed globally with npm;
- another tool came from the AUR;
- project requirements conflict;
- one update breaks another project;
- nobody remembers which version is active.
We want the opposite.
The goal is:
system packages
→ managed as system packages

Omarchy-integrated software
→ installed through Omarchy

developer runtimes and CLIs
→ managed through mise

project requirements
→ declared inside the project
This gives us a workstation that is easier to:
- understand;
- update;
- troubleshoot;
- reproduce;
- share with teammates;
- automate with AI agents.
Current official Omarchy documentation explicitly uses mise for the majority of supported development environments.
What You Will Learn
By the end of Module 6, you will understand:
- the three software-installation layers on our Omarchy workstation;
- when to use
omarchy pkg; - when to use
omarchy install; - when to use
mise; - what a development runtime is;
- why system Python and project Python should be treated separately;
- how mise manages multiple tool versions;
- the difference between global and project-specific tool versions;
- where mise configuration lives;
- how
mise.tomlworks; - why
.mise.tomlis not the default current filename; - how project configuration overrides global configuration;
- how to install declared tools after cloning a repository;
- how to inspect active mise configuration;
- how to verify which executable the shell actually uses;
- how to pin or broadly request versions;
- how to use
mise.local.tomlfor non-shared configuration; - how mise trust affects project configuration;
- how to build a reproducible developer environment.
6.1 — The Core Rule: Do Not Install Everything the Same Way
On our Omarchy workstation, software falls into different categories.
A useful mental model is:
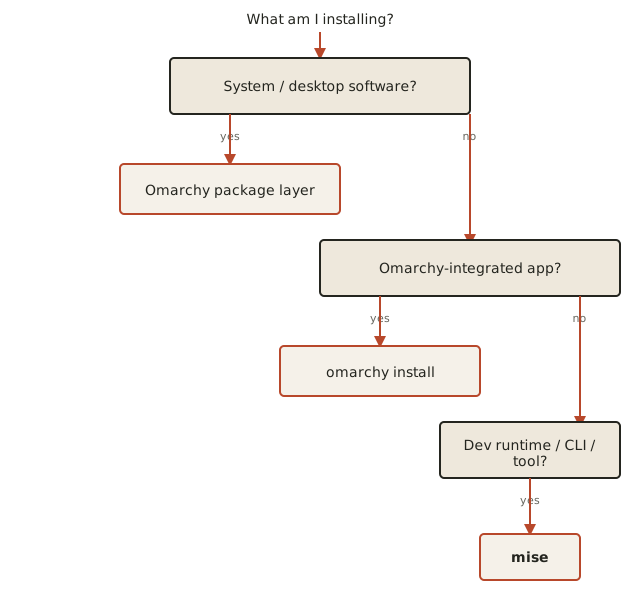
This is not an absolute rule for every package in existence.
It is our preferred decision process.
6.2 — Layer 1: System Packages
Omarchy is based on Arch Linux, so system software ultimately lives in the Arch package ecosystem.
Current Omarchy exposes package-management helpers through:
omarchy pkgInspect the current package command surface:
omarchy pkg --helpDepending on the current version, you may see functionality for:
- installing packages;
- removing packages;
- checking package presence;
- AUR packages;
- package discovery.
When to Think “System Package”
Examples include:
- Linux utilities;
- desktop applications;
- system libraries;
- hardware-related software;
- tools that should exist as part of the operating system.
The key question is:
Does this tool belong to the machine, or does it belong to a development environment?
6.3 — Layer 2: Omarchy-Integrated Installation
Omarchy also exposes curated installation flows through:
omarchy installInspect:
omarchy install --helpCurrent Omarchy provides installation flows for areas such as:
- editors;
- browsers;
- development environments;
- AI tooling;
- services;
- other integrated applications.
The exact list evolves.
Do not maintain a static mental list.
Inspect your installed command surface.
6.4 — Layer 3: Mise
For the majority of development environments, current official Omarchy documentation uses:
miseMise is a development-tool version manager.
It can install and select versions of tools such as:
- Node.js;
- Python;
- Ruby;
- Go;
- Rust;
- Java;
- Bun;
- many development CLIs.
The current official Omarchy manual describes mise as the system that allows multiple versions of programming languages to coexist on the same machine.
6.5 — Why This Separation Matters
Consider this bad workstation state:
/usr/bin/python
→ manually replaced

npm -g
→ dozens of global tools

AUR
→ another Node version

curl | bash
→ random CLI

project
→ expects something else
This is difficult to reason about.
Instead:
Operating system
→ keeps its own system dependencies

mise global defaults
→ tools you prefer across projects

mise project config
→ exact project requirements
Much easier.
6.6 — The System Runtime Is Not Your Project Runtime
This is particularly important with Python.
Linux distributions may depend on their own Python version.
Suppose:
System
→ Python 3.14
but your project needs:
Project
→ Python 3.13
Do not “fix” the project by replacing the system Python.
Instead, let mise provide the project version.
Conceptually:
/usr/bin/python
→ operating-system Python

mise Python
→ development/project Python
Your shell can select the mise-managed version for development without destroying the system copy.
6.7 — Check Mise
Run:
mise --versionYou should receive the installed mise version.
Then:
mise --helpYou do not need to memorize the command list.
6.8 — Inspect Current Mise Configuration
Current mise provides:
mise config lsto show active configuration files.
Run it from your home directory:
cd ~
mise config ls
Then run it inside one of your projects:
cd ~/Projects/YOUR_PROJECT
mise config ls
You may see additional project configuration appear.
This demonstrates mise’s layered configuration system.
6.9 — Global Mise Configuration
Current mise uses:
~/.config/mise/config.tomlas the default global configuration file.
Inspect it:
bat ~/.config/mise/config.tomlIf the file exists, it may contain something like:
[tools]
node = "26"
python = "3.13"
bun = "1"
These are personal defaults.
6.10 — What “Global” Means in Mise
Global does not mean:
Install into
/usr/binfor the whole operating system.
It means:
Use this as my personal default when no more specific project configuration overrides it.
That is an important distinction.
Conceptually:
Global mise config
~/.config/mise/config.toml

        ↓ default

Project mise.toml

        ↓ overrides global
6.11 — Set a Global Tool Version
Current official mise syntax:
mise use --global node@24Short form:
mise use -g node@24This:
- installs the tool version if necessary;
- records it in your global configuration.
For example:
mise use --global python@3.13Do not blindly copy these exact versions into a future workstation.
Choose versions appropriate to the current toolchain and projects.
6.12 — Check the Global Config After mise use
After:
mise use --global node@24inspect:
bat ~/.config/mise/config.tomlYou should see a [tools] entry.
Example:
[tools]
node = "24"
This is far better than a mysterious global installation with no declared configuration.
6.13 — Project Configuration
Current mise’s default project filename is:
mise.tomlThis point matters because older examples on the internet may use:
.mise.tomlThe current default filename is:
mise.tomlunless the user deliberately changes mise’s filename settings.
6.14 — Create a Practice Project
Create:
mkdir -p ~/Projects/mise-practice
cd ~/Projects/mise-practice
Initialize Git:
git initCheck:
pwd6.15 — Add a Project-Specific Node Version
Inside the practice project:
mise use node@24Current mise behavior:
- installs Node 24 if needed;
- creates or updates the project’s
mise.toml.
Inspect:
bat mise.tomlYou should see something similar to:
[tools]
node = "24"
6.16 — Verify the Active Version
Run:
node --versionThen:
mise ls --currentCurrent mise documentation recommends:
mise ls --currentfor seeing which tools are selected by the active configuration.
6.17 — Compare Project and Global Versions
Suppose your global default is:
Node 26and your project requests:
Node 24Inside the project:
node --versionshould resolve to Node 24.
Now:
cd ~
node --version
should return your global default.
This demonstrates the core principle:
project config
→ more specific
→ overrides global config
6.18 — Real-World Example
On the workstation used to create this course, the global Node version was:
26.8.1A project was configured with:
[tools]
node = "24"
Inside that repository:
Node 24.xbecame active.
Outside it:
Node 26.8.1remained the global default.
The system did not need two competing global Node installations.
This is exactly the behavior we want.
6.19 — mise use vs mise install
These commands have different purposes.
mise use
Example:
mise use node@24This:
- installs the tool if needed;
- records the version requirement in configuration.
mise install
Example:
mise installThis installs tools already declared by the active configuration.
It does not need to create a new tool declaration.
6.20 — Typical Workflow After Cloning a Project
Imagine a repository contains:
mise.tomlwith:
[tools]
node = "24"
python = "3.13"
After cloning:
git clone ...
cd project
run:
mise installMise installs the declared tool versions.
This is one of the major reproducibility advantages.
6.21 — The Official Omarchy Shortcut: mise i
Current official Omarchy development documentation also references:
mise ias the short form for:
mise installFor clarity in the handbook, we will normally use:
mise installuntil the learner is comfortable.
6.22 — Check Which Configs Are Active
Inside a project:
mise config lsThis is an extremely useful diagnostic.
If mise selects an unexpected version, ask:
Which config file is telling it to do that?
mise config ls helps answer that.
6.23 — Check Which Tools Are Active
Run:
mise ls --currentThis shows selected tools for the current location.
Use it when:
- Node version looks wrong;
- Python version looks wrong;
- one project behaves differently;
- an AI agent is using an unexpected runtime.
6.24 — Check Where the Executable Comes From
Suppose:
python --versionlooks unexpected.
Run:
type pythonThen:
command -v pythonThen:
mise ls --currentThis is a strong troubleshooting sequence.
Do not immediately reinstall Python.
6.25 — Tool Selection Through $PATH
Mise works by making the selected tool versions available through your command environment.
Conceptually:
project mise config
        ↓
mise selects tool version
        ↓
shell PATH/environment
        ↓
python / node / bun command
This is why the $PATH and command-resolution concepts from Module 4 matter.
6.26 — Run a Tool Through Mise Explicitly
Current mise supports:
mise exec -- node --versionThis executes the command using the active mise environment.
You can also temporarily request a specific version without saving it.
Example:
mise exec node@24 -- node --versionThis is useful for testing.
6.27 — Temporary Version Testing
Suppose you want to know whether your project works with a new Node version.
Instead of immediately editing mise.toml, try:
mise exec node@25 -- node --versionor run a relevant test through that environment.
This helps separate:
temporary experimentfrom:
declared project requirement6.28 — Version Requests vs Exact Pins
A project can request a version family.
Example:
[tools]
node = "24"
This means:
use an appropriate version in the Node 24 series.
Current mise also supports exact pinning.
Example:
mise use --pin node@24.20.0This records a concrete version.
6.29 — Which Should You Use?
Use a broad series when:
- patch updates are desirable;
- the project supports any version in that major/minor range.
Use exact pins when:
- reproducibility requires exact behavior;
- a dependency is sensitive;
- production matches one exact runtime;
- CI expects one precise version.
For many projects:
major/minor request
+
lockfile
is a good balance.
6.30 — Mise Lockfiles
Current mise supports:
mise.lockfor recording resolved versions.
The official mise documentation recommends committing normal project lockfiles.
Conceptually:
mise.toml
→ declares what the project wants

mise.lock
→ records what was resolved
This can improve reproducibility across machines.
We will not require lockfiles for every beginner project.
Know that they exist.
6.31 — Project Config Should Usually Go Into Git
A project-level:
mise.tomlusually belongs in version control.
Why?
Because it communicates:
“This repository expects these tools.”
Example:
[tools]
node = "24"
python = "3.13"
Then:
git add mise.toml
git commit -m "chore: add mise project config"
Other developers and AI environments can reproduce the same toolchain.
6.32 — Real Course Example
During development of the project used in this course, we created:
mise.tomland committed it to Git.
This transformed the runtime version from:
something known only to one developer's machineinto:
part of the project's declared environmentThat is the philosophy we want.
6.33 — mise.local.toml
Sometimes you need project configuration that should not be shared.
Current mise provides:
mise.local.tomlfor personal project-specific configuration.
Examples:
- personal tool override;
- local development preference;
- machine-specific environment setting.
This file should generally be added to:
.gitignore6.34 — Shared vs Local Configuration
A useful rule:
Does every developer need this?
        ↓
yes
→ mise.toml

no, only me / this machine
→ mise.local.toml
Do not put secrets in normal committed configuration.
6.35 — Configuration Layering
Current mise can combine configuration from multiple levels.
Conceptually:
~/.config/mise/config.toml
        ↓
~/Projects/mise.toml
        ↓
~/Projects/my-app/mise.toml
        ↓
~/Projects/my-app/mise.local.toml
More specific configuration can override broader defaults.
This allows sophisticated setups without duplicating everything.
6.36 — Example: Work-Wide Defaults
Suppose every repository under:
~/Projects/companyuses:
Node 24You could have:
~/Projects/company/mise.tomlwith:
[tools]
node = "24"
Then an individual project could override it.
This is powerful, but not necessary for a beginner.
Start with:
global
+
project
and add deeper layering only when needed.
6.37 — Mise Can Manage More Than Languages
Mise is not limited to:
- Node;
- Python;
- Ruby.
Current mise supports many CLI tools through multiple backends.
This means some development CLIs are better managed through mise than through the system package manager.
Examples can include:
- AI coding CLIs;
- formatting tools;
- build tools;
- release utilities.
Always check the current registry and installation source.
6.38 — Omarchy’s Mise-Managed Lazy Tools
Current Omarchy uses mise-backed wrappers for a number of development tools.
This is especially visible in current AI-agent integration.
The current official Omarchy AI documentation states that major coding-agent CLIs are exposed through lazy-loaded launcher stubs under:
~/.local/binand installed through mise when first used.
This reinforces the architecture:
Omarchy integration
+
mise-managed CLI
rather than forcing every developer CLI into the base operating system.
6.39 — Inspect a Mise-Managed Command
For example:
type ompor another installed tool.
Then:
command -v ompYou may see a wrapper under:
~/.local/binThis is a good example of why command resolution matters.
6.40 — Omarchy Development Environment Installers
Current official Omarchy documentation provides a broad set of development environments through:
Super + Space
→ Install
→ Development
Current documented environments include categories such as:
- Node;
- Bun;
- Deno;
- Python;
- Ruby;
- Go;
- Rust;
- Java;
- PHP frameworks;
- Elixir;
- .NET;
- Zig;
- OCaml;
- Clojure;
- Scala.
The exact list can change.
Use the current menu or:
omarchy install --helpto discover what your installed version supports.
6.41 — Why Use Omarchy’s Development Installer?
The Omarchy installer can provide a curated setup around the runtime.
That may include:
- dependencies;
- environment setup;
- integrations;
- expected conventions.
For a supported development environment, it is often a good starting point.
For precise runtime versioning and project overrides, mise remains the core tool.
6.42 — A Practical Decision Tree
When you want to install something, ask:
Is it a desktop/system application?
        ↓
yes → check Omarchy install/pkg

Is it an Omarchy-supported development environment?
        ↓
yes → consider Omarchy development installer

Is it a runtime or development CLI whose version matters by project?
        ↓
yes → mise
Examples:
Chromium
→ Omarchy browser/install layer

system USB utility
→ package layer

Node.js
→ mise / Omarchy development setup

Python project runtime
→ mise

AI coding CLI
→ Omarchy lazy wrapper / mise-backed tooling
6.43 — Do Not Default to sudo pacman -S
Arch documentation frequently uses:
sudo pacman -S PACKAGEThat is a valid underlying Arch command.
But our workstation policy is:
First decide whether the tool belongs in the system layer.
If it is really a project runtime, pacman may be the wrong layer.
This is especially important for:
- Node;
- Python;
- Ruby;
- Go;
- Java;
- development CLIs.
6.44 — Do Not Default to npm install -g
Another common pattern:
npm install -g TOOLGlobal npm installation can be appropriate in some contexts.
But if a CLI can be managed through mise or belongs to the project, that may provide a cleaner lifecycle.
Ask:
Does the tool need a specific version?
Should teammates reproduce it?
Does it belong to one project?
Can mise manage it?
before installing globally.
6.45 — The Same Principle Applies to Python pip
Avoid casually filling your global environment with:
pip install ...For project Python packages, use an appropriate project environment/package manager.
Mise manages the Python runtime version, not the entire Python dependency strategy.
Later project tooling may use:
uv;- virtual environments;
- Poetry;
- pip;
- project-specific tooling.
Those are a different layer from runtime selection.
6.46 — Runtime Manager vs Package Manager
This distinction matters.
Example:
mise
→ selects Python 3.13

uv / pip
→ installs Python packages for the project
Similarly:
mise
→ selects Node 24

npm / pnpm / bun
→ installs project JavaScript dependencies
Mise does not replace every ecosystem package manager.
6.47 — Verify Node
Run:
type nodeThen:
node --versionThen:
mise ls --currentYou want these three outputs to tell a consistent story.
6.48 — Verify Python
Run:
type pythonThen:
python --versionThen:
mise ls --currentIf you are inside a project with a Python override, expect the project version.
6.49 — Verify Bun
Run:
type bunThen:
bun --versionAgain:
mise ls --current6.50 — Compare with System Python
If you want to inspect the underlying Arch Python explicitly:
/usr/bin/python --versionThen compare:
python --versionIf mise controls your active development Python, these may differ.
That is fine.
In fact, that separation is intentional.
6.51 — Do Not Remove System Python Because You Use Mise
This deserves a direct warning.
Even if:
pythonresolves to a mise-managed version,
do not assume:
/usr/bin/pythonis redundant.
System packages may depend on it.
Leave operating-system dependencies alone unless you understand the package dependency graph.
6.52 — Trust and Project Configuration
Current mise documentation warns that project configuration can include:
- tasks;
- hooks;
- environment behavior;
that may execute code.
Therefore:
Treat a
mise.tomlfrom an unknown repository as executable development configuration, not harmless text.
Review unfamiliar project configuration before trusting/running it.
6.53 — mise trust
Current mise provides:
mise trustfor explicitly trusting configuration you have reviewed.
Exact trust behavior can depend on current mise mode/settings.
Use current official mise documentation when configuring stricter trust policies.
6.54 — Why This Matters for AI Development
AI agents frequently:
- clone repositories;
- enter project directories;
- run setup commands;
- execute tests.
If the repository contains development configuration capable of executing hooks/tasks, trust boundaries matter.
A strong AI workstation does not mean:
auto-approve every repository setup script.
It means:
make environment setup reproducible and inspect what will execute.
6.55 — Environment Variables in mise.toml
Current mise project configuration can also declare environment variables.
Example:
[env]
NODE_ENV = "development"
This can make environment expectations explicit.
However:
Do not commit secrets directly into
mise.toml.
Bad:
[env]
API_KEY = "super-secret-real-key"
Use a proper secrets strategy.
6.56 — Mise Tasks
Current mise can also define project tasks.
Example:
[tasks.test]
run = "npm test"
Then:
mise run testThis can become useful for standardized project commands.
However, we will not turn Module 6 into a complete mise course.
For our workstation, the primary role is:
tool version management
+
reproducible project environment
6.57 — Upgrade Tools Carefully
Current mise supports commands such as:
mise upgradefor moving within configured version requests.
Do not automatically upgrade every project runtime before checking compatibility.
For example:
Project says Node 24does not mean:
switch project to Node 26 because newer existsProject requirements come first.
6.58 — Omarchy Updates and Mise Tools
Current Omarchy’s update pipeline includes mise-managed tooling.
The current official Omarchy update architecture runs mise updates as part of the supported update process.
This is another reason to prefer:
omarchy updatefor normal workstation maintenance.
It keeps Omarchy’s package-backed and mise-managed layers aligned with its expected update flow.
6.59 — Global Defaults Should Be Conservative
Do not install every language “just in case.”
A good global configuration contains tools you genuinely use frequently.
Example:
[tools]
node = "26"
python = "3.13"
bun = "1"
If you never use:
- Rust;
- Go;
- Ruby;
- Java;
there is no reason to populate the machine with all of them.
Install environments when needed.
6.60 — Project Configuration Should Express Project Reality
Suppose a project genuinely requires:
Node 24Declare:
[tools]
node = "24"
Do not change it to Node 26 merely because your machine’s global default is newer.
The project configuration exists specifically to prevent this kind of machine-dependent assumption.
6.61 — Reproducibility Workflow
A healthy project workflow looks like:
git clone repository
        ↓
cd repository
        ↓
inspect mise.toml
        ↓
mise install
        ↓
mise ls --current
        ↓
install project dependencies
        ↓
run tests
This gives both humans and AI agents a predictable setup path.
6.62 — New Project Workflow
For a new project:
mkdir -p ~/Projects/new-project
cd ~/Projects/new-project
git init
Choose runtime:
mise use node@24Check:
bat mise.tomlVerify:
node --version
mise ls --current
Commit:
git add mise.toml
git commit -m "chore: add mise project config"
Now the runtime requirement is part of the repository.
6.63 — Practical Exercise: Global vs Project Node
First inspect your global version:
cd ~
node --version
mise ls --current
Now create:
mkdir -p ~/Projects/mise-node-test
cd ~/Projects/mise-node-test
Set a different major version:
mise use node@24Check:
node --version
mise ls --current
Return home:
cd ~
node --version
You should see the project override disappear.
6.64 — Practical Exercise: Inspect Configuration Resolution
From home:
mise config lsThen from your test project:
cd ~/Projects/mise-node-test
mise config ls
Identify:
- global configuration;
- project configuration.
This is one of the most useful mise debugging exercises.
6.65 — Practical Exercise: Clone-Style Setup
Inside your practice project:
cat mise.tomlThen simulate a new setup by asking:
If another developer cloned this repository, what command would install the declared runtime?
Answer:
mise installThat simple contract is the foundation of reproducibility.
6.66 — Practical Exercise: Command Resolution
Inside the project:
type node
command -v node
node --version
mise ls --current
Then return home and repeat.
Observe what changes.
6.67 — Practical Exercise: Add Python Too
Inside the project:
mise use python@3.13Inspect:
bat mise.tomlYou should now see multiple tools.
Example:
[tools]
node = "24"
python = "3.13"
Verify:
node --version
python --version
mise ls --current
6.68 — Practical Exercise: Commit the Environment
Run:
git statusThen:
git add mise.toml
git commit -m "chore: define project runtime versions"
You have now made the development environment part of the project history.
6.69 — Practical Exercise: Local-Only Override
Create:
mise.local.tomlwith a harmless local tool/config example if you want to experiment.
Then ensure:
mise.local.tomlis listed in:
.gitignoreThe lesson is:
shared config
→ version control

personal local config
→ not version control
6.70 — Common Development Environment Mistakes
Mistake 1 — Installing Every Runtime with Pacman
If runtime version matters by project, use mise.
Mistake 2 — Replacing System Python
Do not overwrite or remove the operating system’s Python just because your project needs a different version.
Mistake 3 — Using the Wrong Mise Filename
Current default:
mise.tomlnot:
.mise.tomlunless you have explicitly configured otherwise.
Mistake 4 — Setting Everything Globally
If a project requires a particular version, declare it in the project.
Mistake 5 — Forgetting to Commit mise.toml
A local-only runtime choice is not reproducible.
Mistake 6 — Committing Secrets
Do not place real credentials in shared mise configuration.
Mistake 7 — Running mise install on an Unknown Repository Without Review
Project configuration can include executable behavior.
Review unfamiliar configuration first.
Mistake 8 — Assuming python Comes from /usr/bin
Run:
type pythonbefore making assumptions.
Mistake 9 — Installing a CLI Globally with npm/pip Before Checking Mise
Determine the correct software layer first.
Mistake 10 — Upgrading Runtime Versions Because “Newer Is Better”
Project compatibility is more important than novelty.
6.71 — Checkpoint
Before moving on, you should be able to answer yes to the following.
Architecture
- I understand the difference between system packages, Omarchy-integrated installers, and mise.
- I know why not every development tool belongs in pacman.
- I understand why system Python should remain separate from project Python.
Mise
- I can check the mise version.
- I know the global config path.
- I know the default project config filename is
mise.toml. - I can use
mise use. - I can use
mise use --global. - I can use
mise install. - I can use
mise config ls. - I can use
mise ls --current.
Project Environments
- I can create a project-specific runtime override.
- I understand that project config overrides global config.
- I know why
mise.tomlshould usually be committed. - I know what
mise.local.tomlis for. - I understand the purpose of a mise lockfile at a high level.
Debugging
- I can use
type node. - I can use
type python. - I can use
command -v. - I know how to inspect which mise configs are active.
- I know not to reinstall a runtime before checking command resolution.
Security
- I understand that project development config should be reviewed.
- I know not to commit secrets into
mise.toml. - I understand why AI agents should not blindly execute unknown project setup.
6.72 — What You Can Now Do
After completing Module 6, you can now:
- choose the correct installation layer for development tools;
- protect the operating system from project runtime changes;
- manage multiple Node/Python/etc. versions;
- create global developer defaults;
- override those defaults per project;
- reproduce a project’s runtime environment after cloning;
- commit runtime requirements to Git;
- inspect active environment configuration;
- diagnose incorrect tool versions;
- distinguish runtime management from dependency management;
- use mise safely in AI-assisted development workflows.
Most importantly:
Your workstation’s development environment is becoming declarative instead of accidental.
Module 6 Summary
The three layers:
System software
→ Omarchy package layer

Omarchy-integrated apps/environments
→ omarchy install

Developer runtimes / versioned CLIs
→ mise
Global config:
~/.config/mise/config.tomlProject config:
mise.tomlLocal-only project config:
mise.local.tomlCore mise commands:
mise use node@24mise use --global node@24mise installmise config lsmise ls --currentmise exec -- node --versionDebugging:
type node
command -v node
node --version
mise config ls
mise ls --current
The core hierarchy:
global defaults
        ↓
project configuration
        ↓
local project overrides
And the most important rule:
The operating system owns its system runtimes. Your projects own their development runtime requirements. Mise lets both coexist cleanly.