Module 07: Git and GitHub on Omarchy
In this module — 80 sections
- What You Will Learn
- 7.1 — What Is Git?
- 7.2 — Git vs GitHub
- 7.3 — Check Git
- 7.4 — Check GitHub CLI
- 7.5 — Authenticate with GitHub
- 7.6 — Verify Which Account Is Active
- 7.7 — What Is a Repository?
- 7.8 — Create a Practice Project
- 7.9 — Initialize Git
- 7.10 — The Four Important Git States
- 7.11 — Working Tree
- 7.12 — The Staging Area
- 7.13 — Commits
- 7.14 — Remote Repository
- 7.15 — git status: Your Most Important Git Command
- 7.16 — Short Status
- 7.17 — Untracked Files
- 7.18 — Stage a File
- 7.19 — Stage Everything
- 7.20 — Inspect Staged Changes
- 7.21 — Inspect Unstaged Changes
- 7.22 — Create Your First Commit
- 7.23 — Good Commit Messages
- 7.24 — Check Commit History
- 7.25 — Check the Current Branch
- 7.26 — Create a Private GitHub Repository from an Existing Folder
- 7.27 — What That Command Does
- 7.28 — Verify the Remote
- 7.29 — Open the Repository on GitHub
- 7.30 — Push Later Changes
- 7.31 — The Core Daily Git Workflow
- 7.32 — Clone an Existing Repository
- 7.33 — Pull Remote Changes
- 7.34 — Fetch Without Integrating
- 7.35 — .gitignore
- 7.36 — Create a .gitignore
- 7.37 — Do Not Commit Secrets
- 7.38 — A Good Project Start
- 7.39 — Restore an Unstaged File
- 7.40 — Unstage a File
- 7.41 — Do Not Reach for git reset --hard Casually
- 7.42 — Branches
- 7.43 — Create and Switch to a Branch
- 7.44 — Switch Back
- 7.45 — List Branches
- 7.46 — Why Branches Matter
- 7.47 — Merging Conceptually
- 7.48 — Merge Conflicts
- 7.49 — Branches and AI Agents
- 7.50 — What Is a Worktree?
- 7.51 — Why Worktrees Are Powerful
- 7.52 — Standard Git Worktree Commands
- 7.53 — Omarchy Worktree Helpers
- 7.54 — Inspect the Helpers Before Using Them
- 7.55 — Why Worktrees Matter for AI
- 7.56 — Do Not Use Worktrees Just Because They Exist
- 7.57 — Lazygit
- 7.58 — Why Lazygit Is Useful
- 7.59 — Lazygit and Neovim
- 7.60 — GitHub Repository Visibility
- 7.61 — Private Does Not Mean “Safe for Secrets”
- 7.62 — Creating a GitHub Repository Interactively
- 7.63 — Existing Folder → Private GitHub Repo: Recommended Workflow
- 7.64 — Practical Exercise: Build a Repository from Scratch
- 7.65 — Practical Exercise: Two Focused Commits
- 7.66 — Practical Exercise: Create a Private Remote
- 7.67 — Practical Exercise: Daily Workflow
- 7.68 — Practical Exercise: Create a Branch
- 7.69 — Practical Exercise: Create a Worktree
- 7.70 — Practical Exercise: Remove the Worktree
- 7.71 — Practical Exercise: Inspect Omarchy Worktree Helpers
- 7.72 — Practical Exercise: Lazygit
- 7.73 — Common Git Mistakes
- 7.74 — AI-Assisted Git Workflow
- 7.75 — Why Git Is Essential for AI Development
- 7.76 — Recommended Commit Boundaries for AI Work
- 7.77 — Checkpoint
- 7.78 — What You Can Now Do
- Module 7 Summary
About This Module
You now have:
- a working Omarchy workstation;
- strong terminal fundamentals;
- Tmux for persistent development sessions;
- mise for reproducible runtimes.
Now we add the version-control layer.
Git is the foundation of modern software development.
GitHub adds:
- remote hosting;
- collaboration;
- pull requests;
- issues;
- code review;
- CI/CD integration;
- repository discovery;
- backup of source history.
Omarchy already provides a strong Git-centered developer workflow.
Current official Omarchy documentation includes:
- GitHub CLI integration;
- Lazygit;
- Git worktree helper functions;
- terminal-based development layouts that pair naturally with Git and AI coding agents.
This module teaches the Git workflow you actually need for daily development.
It is not a complete Git internals course.
The goal is:
create
→ inspect
→ stage
→ commit
→ push
→ branch when needed
→ use worktrees when parallel work becomes useful
By the end, you should be able to create a local project, turn it into a Git repository, create a private GitHub repository, connect the two, push your work, and understand the concepts needed for AI-assisted development.
What You Will Learn
By the end of Module 7, you will be able to:
- understand what Git tracks;
- understand repository, working tree, staging area, and commit history;
- initialize a repository;
- inspect repository state;
- understand tracked vs untracked files;
- stage files;
- create commits;
- inspect history;
- understand remotes;
- authenticate with GitHub CLI;
- create a private GitHub repository from an existing folder;
- push local commits;
- clone repositories;
- pull remote changes;
- understand branches;
- create and switch branches;
- understand merge conflicts conceptually;
- understand
.gitignore; - understand when
git restoreandgit resetare appropriate; - use Lazygit as a visual terminal interface;
- understand Git worktrees;
- use Omarchy’s
gaandgdworktree helpers at a high level; - understand why worktrees are useful for parallel AI agents;
- avoid common Git mistakes.
7.1 — What Is Git?
Git is a distributed version-control system.
At a high level, Git records snapshots of your project’s history.
Without Git:
project/
├── app-final.js
├── app-final-2.js
├── app-really-final.js
└── app-final-working.js
With Git:
project/
└── app.js

Git history:
A → B → C → D
Each commit records a meaningful point in the project’s history.
This allows you to:
- see what changed;
- understand why it changed;
- return to older versions;
- work on multiple lines of development;
- collaborate safely.
7.2 — Git vs GitHub
These are different things.
Git
Git is the version-control system.
It works locally.
You can use Git without GitHub.
GitHub
GitHub is an online hosting and collaboration platform for Git repositories.
Conceptually:
Your computer
└── Git repository
       ↓ push

GitHub
└── remote Git repository
Do not confuse:
gitwith:
GitHub7.3 — Check Git
Run:
git --versionCurrent Git documentation recommends this as the basic version check.
On the workstation used while creating this course, Git was already installed through the Omarchy environment.
If Git is missing on a future Omarchy release, use the current Omarchy package/install workflow instead of assuming an old package command.
7.4 — Check GitHub CLI
Run:
gh --versionThe GitHub CLI command is:
ghCurrent Omarchy development documentation includes GitHub CLI integration as part of its developer tooling.
The official GitHub CLI documentation is available at:
https://cli.github.com/manual/7.5 — Authenticate with GitHub
Run:
gh auth loginCurrent GitHub CLI behavior uses a browser-based authentication flow by default for github.com.
Follow the prompts.
After authentication:
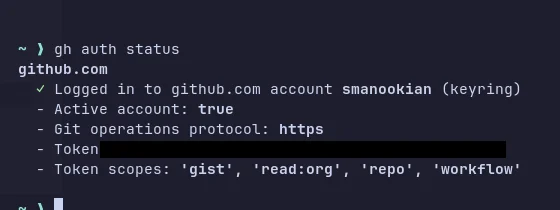
gh auth statusThe official GitHub CLI documentation states that gh auth status reports the active account and authentication state for known GitHub hosts.
7.6 — Verify Which Account Is Active
Run:
gh auth statusRead the output carefully.
If you have multiple GitHub accounts, verify the active one before creating or pushing repositories.
The repository will otherwise be created under the wrong account or organization.
7.7 — What Is a Repository?
A Git repository is a project directory whose history is tracked by Git.
A normal directory:
my-project/
├── src/
└── README.md
After Git initialization:
my-project/
├── .git/
├── src/
└── README.md
The hidden:
.gitdirectory contains Git’s repository metadata.
Do not manually edit files inside .git unless you deeply understand what you are doing.
7.8 — Create a Practice Project
Run:
mkdir -p ~/Projects/git-practice
cd ~/Projects/git-practice
Create a README:
echo "# Git Practice" > README.mdCheck:
ls -laAt this point, it is just a normal directory.
7.9 — Initialize Git
Run:
git initCheck again:
ls -laYou should now see:
.gitThe directory is now a Git repository.
7.10 — The Four Important Git States
For the beginner workflow, think in four layers:
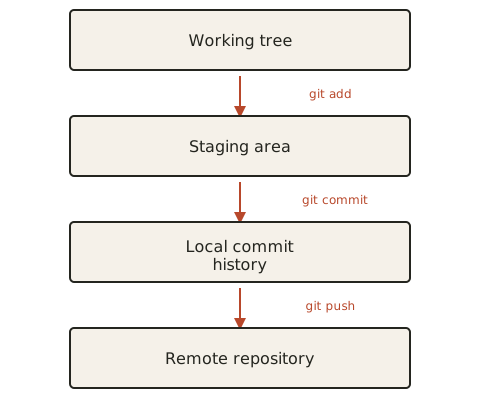
This simple model explains most everyday Git commands.
7.11 — Working Tree
The working tree is the actual files you are editing.
Example:
README.md
src/app.ts
package.json
When you modify a file, the working tree changes.
Git notices the difference.
7.12 — The Staging Area
Before committing, you normally select which changes belong in the next commit.
This selection is called the staging area or index.
Conceptually:
Working tree

README.md changed
app.ts changed
debug.log changed

        ↓ git add README.md app.ts

Staging area

README.md
app.ts

debug.log remains unstaged
This lets you create focused commits.
7.13 — Commits
A commit is a recorded snapshot in the repository history.
Example:
A
↓
B
↓
C
Each commit includes information such as:
- changes;
- author;
- timestamp;
- commit message;
- parent commit.
A good commit should represent one understandable unit of work.
7.14 — Remote Repository
A remote repository is another copy of the Git repository.
For this course, that is normally:
GitHubThe conventional remote name is:
originConceptually:
Local repository
      ↓ push
origin
      ↓
GitHub repository
7.15 — git status: Your Most Important Git Command
Run:
git statusThe official Git documentation describes git status as showing:
- changes staged for commit;
- changes not yet staged;
- untracked files.
You will use it constantly.
Course Rule
When you are unsure what state your repository is in, run
git status.
7.16 — Short Status
Git also provides:
git status --shortor:
git status -sExample:
?? README.mdmeans:
untracked fileAfter staging:
A README.mdmeans:
added to staging areaShort status becomes very useful once you are comfortable with the symbols.
7.17 — Untracked Files
Run:
git statusYour new README.md should initially be untracked.
That means:
Git sees the file, but it has not yet been added to version control.
7.18 — Stage a File
Run:
git add README.mdThen:
git statusThe file should now appear under changes to be committed.
7.19 — Stage Everything
You will often see:
git add .This stages changes under the current directory.
This is convenient, but do not use it blindly.
Before:
git add .run:
git statusand make sure you actually want everything staged.
7.20 — Inspect Staged Changes
Before committing:
git diff --stagedThis shows the changes currently staged for the next commit.
This is a very good habit.
Workflow:
git status
↓
git diff
↓
git add
↓
git diff --staged
↓
git commit
7.21 — Inspect Unstaged Changes
Use:
git diffThis shows tracked changes in the working tree that have not yet been staged.
7.22 — Create Your First Commit
Run:
git commit -m "docs: add initial README"The -m option supplies the commit message.
Check:
git statusYou should now have a clean working tree.
7.23 — Good Commit Messages
A commit message should explain the change.
Bad:
stuffBad:
changesBetter:
add project runtime configurationBetter:
fix monitor refresh-rate configurationMany development teams use a conventional style such as:
feat:
fix:
docs:
chore:
refactor:
test:
Example:
chore: add mise project configThis course will often use that style because it is readable and automation-friendly.
7.24 — Check Commit History
Run:
git logFor a compact view:
git log --onelineExample:
4c8a3f4 chore: add mise project config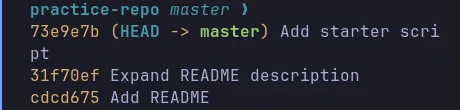
This is an excellent everyday history view.
7.25 — Check the Current Branch
Run:
git branch --show-currentYou may see:
mainor another configured default branch.
7.26 — Create a Private GitHub Repository from an Existing Folder
This is one of the most useful GitHub CLI workflows.
Suppose you already have:
~/Projects/my-projectwith Git initialized and at least one commit.
Inside the project:
gh repo create my-project --private --source=. --remote=origin --pushCurrent official GitHub CLI documentation states that:
--privatecreates a private repository;--source=.uses the current local repository as the source;--remote=origincreates the remote with that name;--pushpushes local commits.
This is the exact workflow we want for quickly putting an existing local project on GitHub.
7.27 — What That Command Does
Break it down:
gh repo create my-projectcreates a GitHub repository.
--privatesets the repository visibility to private.
--source=.uses the current directory as the local source repository.
--remote=originadds the GitHub repository as:
origin--pushpushes local commits.
One command replaces several manual steps.
7.28 — Verify the Remote
Run:
git remote -vYou should see something similar to:
origin  https://github.com/USERNAME/my-project.git (fetch)
origin  https://github.com/USERNAME/my-project.git (push)
Exact transport may differ depending on your Git/GitHub configuration.
7.29 — Open the Repository on GitHub
Current GitHub CLI supports:
gh repo view --webThis opens the current repository in the browser.
Very useful after repository creation.
7.30 — Push Later Changes
Make a change:
echo "Git and GitHub practice repository." >> README.mdInspect:
git statusThen:
git diffStage:
git add README.mdCommit:
git commit -m "docs: expand README"Push:
git pushThis is the basic everyday loop.
7.31 — The Core Daily Git Workflow
Memorize this flow, not dozens of commands:
git statusgit diffgit add ...git diff --stagedgit commit -m "..."git pushThat is enough for a large percentage of daily development.
7.32 — Clone an Existing Repository
To download a repository from GitHub:
gh repo clone OWNER/REPOSITORYor standard Git:
git clone REPOSITORY_URLWith GitHub CLI, example:
gh repo clone octocat/Hello-WorldFor your own repository:
gh repo clone YOUR_USERNAME/YOUR_REPO7.33 — Pull Remote Changes
If the remote repository changed:
git pullConceptually:
GitHub
  ↓ fetch changes
  ↓ integrate
local repository
For simple beginner workflows, git pull is convenient.
Later, advanced teams may prefer more explicit fetch/rebase strategies.
Do not overcomplicate this yet.
7.34 — Fetch Without Integrating
Use:
git fetchThis retrieves remote information without automatically changing your working branch.
This is useful when you want to inspect what changed before integrating it.
Conceptually:
git fetch
→ update knowledge of remote state

git pull
→ fetch + integrate
7.35 — .gitignore
Some files should not be committed.
Examples:
node_modules/
.env
build output
temporary files
logs
IDE caches
mise.local.toml
Git uses:
.gitignoreto define paths that should normally remain untracked.
7.36 — Create a .gitignore
Example:
cat > .gitignore <<'EOF'
node_modules/
.env
mise.local.toml
*.log
EOF
Inspect:
bat .gitignoreThen:
git statusIgnored files should no longer appear as ordinary untracked files.
7.37 — Do Not Commit Secrets
Never commit:
API keys
passwords
private SSH keys
database credentials
access tokens
real .env secrets
A repository being private does not make committing secrets a good practice.
Git preserves history.
Deleting a secret later does not automatically erase it from every historical commit.
7.38 — A Good Project Start
A clean project might contain:
my-project/
├── .git/
├── .gitignore
├── AGENTS.md
├── mise.toml
├── README.md
├── package.json
└── src/
Each file has a different role:
.git
→ Git history

.gitignore
→ files Git should ignore

AGENTS.md
→ AI-agent project instructions

mise.toml
→ development runtime requirements

README.md
→ human project documentation
This is a strong foundation for AI-assisted software development.
7.39 — Restore an Unstaged File
Suppose you modify a tracked file and want to discard those unstaged changes.
Modern Git provides:
git restore FILEExample:
git restore README.mdWarning
This discards the working-tree changes to that file.
Inspect first:
git diff README.mdThen restore only if you are sure.
7.40 — Unstage a File
Suppose you ran:
git add README.mdbut do not want it in the next commit.
Use:
git restore --staged README.mdThe file remains changed in the working tree.
It simply leaves the staging area.
This distinction is important.
7.41 — Do Not Reach for git reset --hard Casually
You will see:
git reset --hardin many tutorials.
It can discard working-tree changes.
Do not use it as a generic “make Git clean” button.
Prefer targeted operations when possible:
git restore FILEor:
git restore --staged FILEUnderstand the state you are changing.
7.42 — Branches
A branch is a named line of development.
Suppose:
maincontains stable project history.
You want to develop:
new-loginwithout immediately changing main.
Conceptually:
A ── B ── C
          │
          ├── main
          │
          └── feature/login
You create a branch and work there.
7.43 — Create and Switch to a Branch
Modern Git provides:
git switch -c feature/loginThe official Git documentation defines:
git switch -c <new-branch>as creating and switching to a new branch.
Check:
git branch --show-currentExpected:
feature/login7.44 — Switch Back
Run:
git switch mainThe working tree changes to represent the selected branch.
7.45 — List Branches
Run:
git branchThe current branch is marked with:
*Example:
* main
  feature/login
7.46 — Why Branches Matter
Branches allow:
- isolated feature development;
- bug fixes;
- experimentation;
- code review;
- pull requests.
They also become important when AI agents work on changes.
But a normal Git branch still uses the same working directory.
Only one branch is checked out there at a time.
That is where worktrees become interesting.
7.47 — Merging Conceptually
Suppose:
main
A ─ B ───────────────
     \
      C ─ D
      feature/login
After the feature is accepted, its changes can be merged back.
Conceptually:
A ─ B ────── E
     \      /
      C ─ D
You do not need deep merge strategy knowledge yet.
The key idea is:
A branch isolates a line of development; merge integrates it.
7.48 — Merge Conflicts
A conflict occurs when Git cannot automatically decide how to combine changes.
Example:
main changes:
line 10and your branch independently changes the same area.
Git may ask you to resolve the conflict manually.
Conflict does not mean:
Git is broken.
It means:
Git needs a human or agent to decide the intended final content.
We will cover conflict resolution in the troubleshooting material rather than overloading this module.
7.49 — Branches and AI Agents
An AI coding agent should generally not make unrelated experimental changes directly on your important stable branch.
A common workflow:
main
↓
feature branch
↓
AI makes changes
↓
tests
↓
review
↓
merge
This gives you a clean rollback/review boundary.
7.50 — What Is a Worktree?
Git worktrees allow the same repository to have multiple working directories checked out at the same time.
The official Git documentation describes a repository as having:
- one main worktree;
- zero or more linked worktrees.
Conceptually:
Repository history
      │
      ├── ~/Projects/app
      │       main
      │
      ├── ~/Projects/app-feature-auth
      │       feature/auth
      │
      └── ~/Projects/app-fix-api
              fix/api
All share the same repository history.
But each has its own working directory.
7.51 — Why Worktrees Are Powerful
Without worktrees:
one repository folder
→ switch branches
→ files change underneath you
With worktrees:
folder A
→ branch A

folder B
→ branch B
You can keep both open simultaneously.
This is excellent for:
- parallel development;
- code review;
- comparing branches;
- AI agents working independently.
7.52 — Standard Git Worktree Commands
List worktrees:
git worktree listCreate a worktree with a new branch:
git worktree add -b feature/example ../project-feature-exampleRemove one:
git worktree remove ../project-feature-exampleThe official Git documentation recommends using git worktree remove rather than simply deleting a linked worktree directory manually.
7.53 — Omarchy Worktree Helpers
Current official Omarchy shell-function documentation provides:
ga [branch]and:
gdCurrent documentation describes:
ga [branch]
→ create a new branch/worktree next to the current repository and enter it

gd
→ remove the current worktree and its branch after confirmation
These helpers are designed to make parallel development fast.
7.54 — Inspect the Helpers Before Using Them
Run:
type gaand:
type gdYour installed Omarchy version is the final source of truth for the actual helper implementation.
Because Omarchy evolves quickly, do not rely solely on an old blog post describing helper behavior.
7.55 — Why Worktrees Matter for AI
Imagine three independent tasks:
Task A
→ build authentication feature

Task B
→ fix API bug

Task C
→ improve tests
A parallel AI workflow can use:
main worktree
→ your stable baseline

worktree A
→ agent A

worktree B
→ agent B

worktree C
→ agent C
This avoids multiple agents changing the exact same working directory.
That is much safer than simply opening three coding-agent panes in one repository and telling all of them to edit files.
7.56 — Do Not Use Worktrees Just Because They Exist
For one small feature:
normal branchmay be enough.
For one simple solo project:
main + occasional feature branchmay be enough.
Worktrees become valuable when:
- several branches need to remain open;
- you are reviewing another branch while coding;
- parallel AI agents need filesystem isolation.
Use complexity only when it solves a real problem.
7.57 — Lazygit
Current official Omarchy documentation includes Lazygit, a terminal user interface for Git.
Run inside a Git repository:
lazygit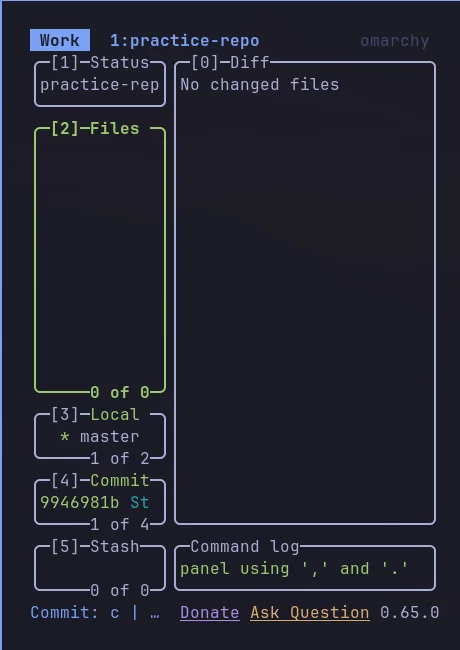
The current Omarchy manual describes:
Tabfor moving between panes,
Spacefor staging files from the Files pane,
and:
cfor creating a commit.
Use:
?inside Lazygit to see current commands.
7.58 — Why Lazygit Is Useful
Git commands are essential because they teach the underlying model.
Lazygit is useful once you understand that model.
It provides a visual view of:
- files;
- staged changes;
- commits;
- branches;
- remotes;
- diffs.
Course Recommendation
Learn the core Git CLI first.
Then use Lazygit when its visual interface makes the task faster.
Do not use a TUI to avoid understanding what staging and commits mean.
7.59 — Lazygit and Neovim
Current Omarchy documentation also provides Lazygit integration inside Neovim.
The current TUI documentation identifies:
Space G Ginside Neovim as the Lazygit launcher.
We will keep editor-specific details in the editor module.
For now:
lazygitis enough.
7.60 — GitHub Repository Visibility
GitHub repositories may be:
- public;
- private;
- internal for eligible organizations.
For personal proprietary work or private workstation configuration, use:
privatewhen appropriate.
Current GitHub CLI syntax:
gh repo create NAME --private7.61 — Private Does Not Mean “Safe for Secrets”
A private repository is access-controlled.
But credentials should still not be committed.
Reasons include:
- accidental sharing;
- collaborator access;
- compromised account;
- repository visibility changes;
- secrets preserved in commit history.
Use proper secret management.
7.62 — Creating a GitHub Repository Interactively
You can also run:
gh repo createwith no repository name.
Current GitHub CLI documentation provides an interactive creation flow.
This is useful for beginners.
Once you know exactly what you want, the non-interactive command is faster.
7.63 — Existing Folder → Private GitHub Repo: Recommended Workflow
This is the workflow you recently used.
Enter the folder:
cd ~/Projects/YOUR_PROJECTInitialize Git if necessary:
git initInspect:
git statusCreate a .gitignore if appropriate.
Stage:
git add .Inspect staged changes:
git diff --stagedCommit:
git commit -m "chore: initial commit"Create the GitHub repo and push:
gh repo create YOUR_REPO_NAME --private --source=. --remote=origin --pushVerify:
git remote -vThen:
gh repo view --webThis is one of the most useful repeatable workflows in the handbook.
7.64 — Practical Exercise: Build a Repository from Scratch
Create:
mkdir -p ~/Projects/git-module-exercise
cd ~/Projects/git-module-exercise
Initialize:
git initCreate files:
echo "# Git Module Exercise" > README.md
echo "console.log('hello');" > app.js
Inspect:
git statusStage only README:
git add README.mdInspect:
git status --shortYou should see one staged file and one untracked file.
7.65 — Practical Exercise: Two Focused Commits
Commit the README:
git commit -m "docs: add README"Now stage:
git add app.jsCommit:
git commit -m "feat: add starter application"Inspect:
git log --onelineYou should now see two understandable commits instead of one vague “everything” commit.
7.66 — Practical Exercise: Create a Private Remote
Ensure GitHub authentication:
gh auth statusThen:
gh repo create git-module-exercise --private --source=. --remote=origin --pushVerify:
git remote -vOpen:
gh repo view --web7.67 — Practical Exercise: Daily Workflow
Modify:
echo "Second line" >> README.mdInspect:
git statusThen:
git diffStage:
git add README.mdInspect:
git diff --stagedCommit:
git commit -m "docs: expand README"Push:
git push7.68 — Practical Exercise: Create a Branch
Run:
git switch -c feature/exampleVerify:
git branch --show-currentModify:
echo "Feature branch" >> app.jsCommit:
git add app.js
git commit -m "feat: add example branch change"
Switch back:
git switch mainInspect:
git log --oneline --all --decorate --graphThis provides a visual terminal representation of the branch history.
7.69 — Practical Exercise: Create a Worktree
From the main repository:
git worktree add -b feature/worktree-example ../git-module-exercise-worktreeList:
git worktree listEnter:
cd ../git-module-exercise-worktreeCheck:
git branch --show-currentYou now have another branch checked out in another folder at the same time.
7.70 — Practical Exercise: Remove the Worktree
Return to the main worktree:
cd ../git-module-exerciseRemove:
git worktree remove ../git-module-exercise-worktreeDelete the branch if no longer needed:
git branch -d feature/worktree-exampleOnly delete a branch when you are sure you no longer need it.
7.71 — Practical Exercise: Inspect Omarchy Worktree Helpers
Run:
type gaThen:
type gdIf they exist, inspect what your current Omarchy version provides.
You do not need to use them yet.
The goal is simply to understand that Omarchy includes worktree ergonomics for developer workflows.
7.72 — Practical Exercise: Lazygit
Inside the exercise repository:
lazygitExplore:
- Files;
- Local branches;
- Commits;
- Remotes.
Press:
?for help.
Exit when finished.
The purpose is to connect the Git concepts you learned to a visual terminal interface.
7.73 — Common Git Mistakes
Mistake 1 — Running git add . Without Checking Status
Always inspect:
git statusfirst.
You may accidentally stage:
- secrets;
- logs;
- generated files;
- huge directories.
Mistake 2 — Committing .env
Put sensitive local environment files in:
.gitignorebefore the first commit.
Mistake 3 — Using One Giant Commit
Prefer understandable units of work.
A commit should tell a story.
Mistake 4 — Using git reset --hard as a Universal Fix
Understand which Git state you want to change first.
Mistake 5 — Assuming “Private Repo” Means Secrets Are Fine
Private repositories are not secret stores.
Mistake 6 — Pulling with Uncommitted Changes and No Idea What Will Happen
Run:
git statusbefore integrating remote changes.
Mistake 7 — Letting an AI Agent Commit Unrelated Files
Always inspect:
git status
git diff
git diff --staged
before accepting a commit.
Mistake 8 — Using Multiple AI Agents in One Working Tree
For genuinely parallel edits, prefer isolated branches/worktrees.
Mistake 9 — Deleting a Worktree Folder Manually
Prefer:
git worktree remove PATHso Git cleans up its linked-worktree metadata properly.
Mistake 10 — Treating GitHub as the Source of Truth Instead of Git
GitHub hosts the repository.
Git is still the version-control system.
Understand local state first.
7.74 — AI-Assisted Git Workflow
A strong coding-agent workflow looks like:
clean Git status
        ↓
create branch/worktree if appropriate
        ↓
agent inspects project
        ↓
agent makes focused changes
        ↓
run tests
        ↓
git diff
        ↓
human/agent review
        ↓
stage
        ↓
git diff --staged
        ↓
commit
        ↓
push
Git provides the safety boundary around AI-generated changes.
7.75 — Why Git Is Essential for AI Development
AI agents can change files quickly.
That is powerful.
It also increases the value of:
- clean history;
- small commits;
- branches;
- diffs;
- worktrees;
- review.
Without Git:
agent changed 14 files
→ what exactly happened?
With Git:
git diffyou can inspect the precise change set.
Git is therefore not just source control in an AI workstation.
It is part of the control and review system.
7.76 — Recommended Commit Boundaries for AI Work
Try to keep one commit focused on one objective.
Examples:
feat: add login screenfix: handle expired auth tokenstest: add router regression coverageAvoid:
feat: auth + refactor database + update docs + formatting everywhereSmaller commits are easier to:
- review;
- revert;
- cherry-pick;
- debug;
- compare.
7.77 — Checkpoint
Before moving on, you should be able to answer yes to the following.
Git Fundamentals
- I understand what a Git repository is.
- I understand working tree, staging area, commit history, and remote.
- I know the difference between Git and GitHub.
- I can initialize a repository.
- I can use
git status. - I can use
git diff. - I can stage files.
- I can create a commit.
- I can inspect history.
GitHub
- I can authenticate with
gh auth login. - I can verify authentication with
gh auth status. - I can create a private GitHub repository from an existing local folder.
- I can inspect remotes.
- I can push commits.
- I can open the repository in the browser.
Repository Hygiene
- I understand
.gitignore. - I know not to commit secrets.
- I inspect staged changes before committing.
- I understand why focused commits are useful.
Branches
- I understand what a branch represents.
- I can create and switch branches.
- I understand merge conflicts at a high level.
Worktrees
- I understand what a Git worktree is.
- I understand why worktrees are useful for parallel development.
- I can list worktrees.
- I understand the Omarchy
gaandgdhelpers conceptually. - I understand why worktrees are especially useful for parallel AI agents.
Tools
- I can open Lazygit.
- I understand that Lazygit is an interface over Git, not a replacement for understanding Git.
7.78 — What You Can Now Do
After completing Module 7, you can now:
- create version-controlled software projects;
- inspect project state confidently;
- create meaningful commits;
- push projects to GitHub;
- create private repositories from the terminal;
- clone and update repositories;
- protect secrets with
.gitignoreand sane practices; - create feature branches;
- understand worktrees;
- use Omarchy’s Git ergonomics;
- use Lazygit for visual Git workflows;
- use Git as a safety and review layer around AI-generated code.
Most importantly:
Your code is no longer just a collection of files. It has history, review boundaries, recovery points, and a reproducible remote home.
Module 7 Summary
Core Git model:
Working tree
    ↓ git add

Staging area
    ↓ git commit

Local history
    ↓ git push

GitHub remote
Daily workflow:
git status
git diff
git add ...
git diff --staged
git commit -m "..."
git push
Create a repository:
git initCreate a private GitHub repository from the current local repository:
gh repo create YOUR_REPO_NAME --private --source=. --remote=origin --pushVerify:
git remote -v
gh repo view --web
Branch:
git switch -c feature/nameSwitch:
git switch mainWorktrees:
git worktree list
git worktree add -b feature/name ../project-feature-name
git worktree remove ../project-feature-name
Omarchy helpers:
ga [branch]
→ create branch + worktree and enter it

gd
→ remove current worktree + branch after confirmation
Visual Git:
lazygitAnd the most important AI-development lesson:
Never give an AI agent a blank check over your working tree. Use Git status, diffs, commits, branches, and worktrees to keep changes inspectable and reversible.