Module 09: AI Coding Agents in Omarchy
In this module — 71 sections
- What You Will Learn
- 9.1 — Omarchy’s AI Philosophy
- 9.2 — Current Supported Agent Launchers
- 9.3 — Discover the Current Agent Choices
- 9.4 — Lazy-Loaded Agent Launchers
- 9.5 — Why Lazy Loading Is Useful
- 9.6 — Inspect an Agent Command
- 9.7 — Choose the Default Agent
- 9.8 — Our Stevinator Baseline
- 9.9 — Verify the Selected Default
- 9.10 — Launch the Default Agent
- 9.11 — Launch the Default Agent Inline
- 9.12 — Dedicated Window vs Inline Agent
- 9.13 — Launch an Agent with a Direct Prompt
- 9.14 — The Working Directory Is Part of the Prompt
- 9.15 — Verify the Directory Before Launching
- 9.16 — Why Omarchy Avoids $HOME for Agent Launches
- 9.17 — Projects vs ~/Work
- 9.18 — AI Agents Are Just Processes
- 9.19 — The Agent Uses Your Development Environment
- 9.20 — Why Reproducible Environments Improve AI Agents
- 9.21 — Project Instructions
- 9.22 — What Belongs in AGENTS.md?
- 9.23 — Agent Support for Instruction Files Varies
- 9.24 — Our Recommended AI Project Baseline
- 9.25 — Start with Read-Only Analysis
- 9.26 — Example Read-Only Prompt
- 9.27 — Verify That Read-Only Really Means Read-Only
- 9.28 — Approval Modes Matter
- 9.29 — The Omarchy Prompt Launcher Is Powerful
- 9.30 — Bad Automated Prompt
- 9.31 — Better Automated Prompt
- 9.32 — Git Before Agent
- 9.33 — Recommended Agent Editing Loop
- 9.34 — Never Let “Agent Finished” Mean “Task Verified”
- 9.35 — Agent + Tmux
- 9.36 — Why Tmux Helps AI Development
- 9.37 — Agent + Git Worktree
- 9.38 — Do Not Parallelize Too Early
- 9.39 — Model Roles Are Agent-Specific
- 9.40 — Use the Right Model for the Job
- 9.41 — Agent Sessions
- 9.42 — Omarchy’s Agents Panel
- 9.43 — Agent Usage Updates
- 9.44 — Why Usage Visibility Matters
- 9.45 — Theme Synchronization
- 9.46 — Crash Diagnosis with the Default Agent
- 9.47 — Why Crash Diagnosis Is a Good AI Use Case
- 9.48 — AI-Assisted Workstation Troubleshooting
- 9.49 — Let the Agent Inspect Before It Repairs
- 9.50 — Good System-Troubleshooting Prompt
- 9.51 — Agent Permissions and sudo
- 9.52 — Agent Permissions and Secrets
- 9.53 — Agent Permissions and Network Access
- 9.54 — Verify Agent Authentication Separately
- 9.55 — Changing the Default Agent
- 9.56 — Agent-Specific Aliases
- 9.57 — Custom Agent Wrappers
- 9.58 — Do Not Install Duplicate Copies of the Same Agent
- 9.59 — Practical Exercise: Inspect Agent Integration
- 9.60 — Practical Exercise: Inspect the Agent Command
- 9.61 — Practical Exercise: Launch From the Correct Project
- 9.62 — Practical Exercise: Read-Only Repository Map
- 9.63 — Practical Exercise: Create AGENTS.md
- 9.64 — Practical Exercise: AI Change with Git Review
- 9.65 — Practical Exercise: Tmux Agent Pane
- 9.66 — Practical Exercise: System Inspection Without Changes
- 9.67 — Common AI-Agent Mistakes
- 9.68 — Checkpoint
- 9.69 — What You Can Now Do
- Module 9 Summary
About This Module
Omarchy treats AI coding agents as first-class development tools.
Current Omarchy 4 / Quattro integrates a growing list of coding-agent CLIs directly into the workstation through:
- lazy-loaded launchers;
- mise-backed installation;
- a configurable default agent;
- keyboard shortcuts;
- terminal aliases;
- Omarchy’s own agent launcher;
- usage tracking in the Omarchy Shell;
- crash-diagnosis integration;
- theme synchronization for supported agents.
This module is about using AI coding agents as part of Omarchy.
It is deliberately not a complete course on:
- OMP;
- Claude Code;
- Codex;
- OpenCode;
- Pi;
- or any other individual agent.
Those products evolve quickly and each can justify its own course.
Our goal is to understand the stable Omarchy layer around them.
The workflow we want is:
Project
    ↓
Git
    ↓
Declared runtime environment
    ↓
AI coding agent
    ↓
Inspect
    ↓
Change
    ↓
Test
    ↓
Review diff
    ↓
Commit
The AI agent is not a replacement for the rest of the workstation.
It becomes much more useful because the workstation around it is structured.
What You Will Learn
By the end of Module 9, you will understand:
- how Omarchy integrates coding agents;
- how lazy-loaded agent launchers work;
- how to inspect currently supported agents;
- how to choose the default agent;
- how to launch the default agent;
- how to launch an agent in the current terminal;
- how to prompt an agent directly through Omarchy;
- why working directory matters;
- why Omarchy avoids launching agents directly from your home directory;
- how agent CLIs fit into mise;
- how to verify where an agent command comes from;
- how project instruction files such as
AGENTS.mdfit into AI workflows; - how to use read-only analysis safely;
- how to use Git as the safety boundary around AI-generated changes;
- when a second agent or worktree makes sense;
- how Omarchy’s AI usage panel works at a high level;
- how Omarchy can hand crashes to your default agent for diagnosis;
- how to avoid dangerous auto-approval habits.
9.1 — Omarchy’s AI Philosophy
The current official Omarchy AI documentation says that Omarchy treats AI coding agents as first-class citizens while not choosing one favorite agent for you.
That is an important design choice.
Omarchy provides the integration layer.
You choose the agent.
Conceptually:
Omarchy
├── agent launcher
├── default agent selection
├── mise integration
├── keyboard shortcuts
├── usage panel
├── theme integration
└── crash diagnosis

        ↓

Your chosen coding agent
This means your workstation workflow can remain relatively stable even if you change coding agents later.
9.2 — Current Supported Agent Launchers
As of the current Omarchy 4 / Quattro documentation in September 2026, Omarchy provides lazy-loaded launchers for major coding-agent CLIs.
The current official AI manual lists commands including:
claude
codex
opencode
agy
copilot
crush
grok
pi
omp
ori
The current Quattro source also includes additional current options such as:
hermes
muse
cursor-agent
openclaw
The exact list changes as Omarchy evolves.
Therefore:
Do not treat this handbook’s list as permanent.
Inspect the current default-agent command on your installed system.
9.3 — Discover the Current Agent Choices
Run:
omarchy default agent --help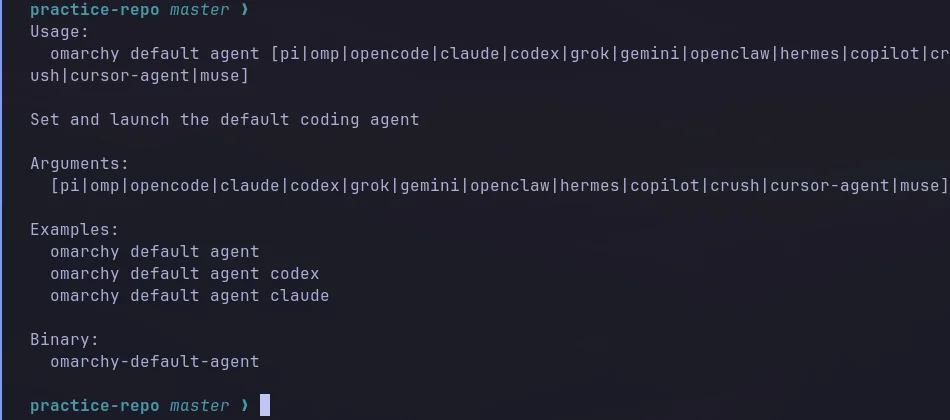
You can also inspect the current command surface:
omarchy commands --all | grep -i agentAnd inspect the current selected default:
omarchy default agentIf no agent has been selected yet, the command may return no value.
That is intentional.
Current Omarchy does not force one default agent on you.
9.4 — Lazy-Loaded Agent Launchers
Current official Omarchy documentation explains that coding-agent commands are exposed as tiny launchers under:
~/.local/bin/The actual tool is installed only when it is first needed.
The installation is managed through mise.
Conceptually:
type agent command
        ↓
Omarchy launcher stub
        ↓
mise installs agent if needed
        ↓
agent starts
This keeps a fresh Omarchy installation from downloading every coding agent immediately.
9.5 — Why Lazy Loading Is Useful
Imagine Omarchy supports ten coding agents.
Without lazy loading:
fresh install
→ install all ten agents
→ large unnecessary setup
→ constant updates
With lazy loading:
fresh install
→ tiny launcher stubs

first time you use one agent
→ install only that agent
This is cleaner and fits the same environment-management philosophy we learned in Module 6.
9.6 — Inspect an Agent Command
Suppose you use:
ompCheck:
type ompThen:
command -v ompDo the same for another supported agent:
type piThis tells you what your shell will actually execute.
You learned this pattern earlier for:
- Python;
- Node;
- Omarchy helpers.
It is equally useful for coding agents.
9.7 — Choose the Default Agent
Current official syntax:
omarchy default agent NAMEExample:
omarchy default agent ompor:
omarchy default agent codexor another currently supported name.
You can also use the Omarchy Menu:
Super + Space
→ Setup
→ Defaults
→ Agent
Current Omarchy installs the selected agent if necessary.
9.8 — Our Stevinator Baseline
The workstation used while developing this course currently uses:
OMPas the default agent.
That is a workstation choice.
It is not a course requirement.
You may prefer:
- Pi;
- Codex;
- Claude Code;
- OpenCode;
- Cursor CLI;
- another currently supported agent.
The principles in this module are intentionally agent-independent.
9.9 — Verify the Selected Default
Run:
omarchy default agentExpected example:
ompYour result may differ.
9.10 — Launch the Default Agent
Current official Omarchy shortcut:
Super + Shift + Ctrl + AThis launches the configured default coding agent in a dedicated terminal window.
If no default agent has been selected, current Omarchy can present the agent picker instead.
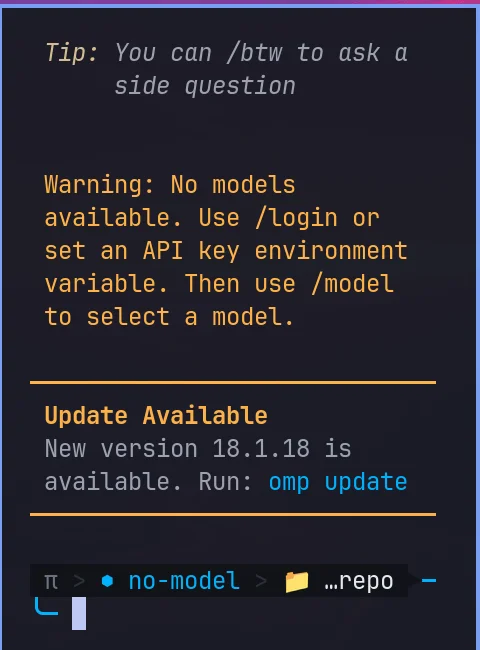
9.11 — Launch the Default Agent Inline
Current official Omarchy documentation also provides the terminal shortcut:
afor launching the default agent inline in the current terminal.
Verify first:
type aThis is useful inside:
- a normal terminal;
- a Tmux pane;
- an existing project directory.
9.12 — Dedicated Window vs Inline Agent
Both approaches are useful.
Dedicated Agent Window
Super + Shift + Ctrl + AGood when:
- you want the agent as a separate Omarchy application;
- you want it independent from your current terminal layout.
Inline Agent
aGood when:
- you are already inside Tmux;
- you want the agent in a specific pane;
- you are already inside the correct project directory.
9.13 — Launch an Agent with a Direct Prompt
Current official Omarchy supports:
omarchy agent prompt "Review this project"This allows you to launch the configured agent directly into a task.
Example:
omarchy agent prompt "Map this repository and explain the main components"Important Warning
The current official Omarchy AI documentation states that agents launched through this prompt workflow run in their respective unattended / don’t-stop-to-ask modes.
That means they may be allowed to actually perform actions rather than asking for approval at every step.
Treat this as a powerful automation interface.
Do not use it casually with destructive or vague prompts.
9.14 — The Working Directory Is Part of the Prompt
Consider:
cd ~/Projects/project-a
a
The agent starts with:
project-aas its working context.
Now consider:
cd ~/Projects/project-b
a
The same agent command now starts in a different project.
This is one reason terminal fluency matters so much for AI development.
9.15 — Verify the Directory Before Launching
Before starting an agent:
pwdThen:
git statusThen launch:
aThis tiny habit prevents a huge category of mistakes.
Course Rule
Before an AI agent edits anything, know exactly which repository and branch it is standing in.
9.16 — Why Omarchy Avoids $HOME for Agent Launches
Current official Omarchy documentation explains that agents launched from:
$HOMEare instead started in:
~/Workbecause coding agents generally should not permanently trust or treat the entire home directory as one development workspace.
This is a sensible safety boundary.
Your home directory can contain:
- SSH keys;
- personal config;
- credentials;
- browser state;
- unrelated projects.
An agent usually does not need project-style access to everything under $HOME.
9.17 — Projects vs ~/Work
In this course, we have used:
~/Projectsas our preferred development folder.
Current Omarchy’s automatic home-directory fallback uses:
~/Workfor agent launching.
These do not need to be the same directory.
Our recommendation remains:
Launch the agent from the actual project directory whenever possible.
9.18 — AI Agents Are Just Processes
Even though an AI agent may feel like a special system component, at the operating-system level it is still a running process.
That means all of the Linux concepts you learned still apply:
- working directory;
- environment variables;
- PATH;
- permissions;
- files;
- processes;
- network access.
This is useful when troubleshooting.
9.19 — The Agent Uses Your Development Environment
Suppose the project contains:
mise.tomlwith:
[tools]
node = "24"
You enter the project:
cd ~/Projects/my-appMise activates the project’s environment.
Then you launch:
aThe agent inherits that project environment.
This gives the agent access to the same runtime context you use.
9.20 — Why Reproducible Environments Improve AI Agents
Without a declared environment:
Agent:
"Which Node version should I use?"
With:
mise.tomlthe project answers that question.
Likewise:
package.json
pyproject.toml
Cargo.toml
AGENTS.md
README.md
can all provide structure.
The more explicit your project is, the less the agent must guess.
9.21 — Project Instructions
Many modern coding-agent workflows support repository-level instruction files.
A common convention is:
AGENTS.mdOmarchy itself uses an AGENTS.md file in its official repository to give coding agents instructions about the codebase.
That makes it a useful pattern for our own projects.
9.22 — What Belongs in AGENTS.md?
A useful project instruction file may contain:
Project purpose
Architecture overview
Important directories
Build command
Test command
Lint command
Formatting rules
Files agents should not modify
Expected Git workflow
Safety constraints
Example:
## AGENTS.md

### Project

This is a Node.js API.

### Development

Use the runtime versions declared in `mise.toml`.

Install dependencies with:

npm install

Run tests with:

npm test

### Rules

- Do not modify `.env`.
- Do not commit generated files.
- Run tests before proposing a commit.
- Keep changes focused on the requested task.
9.23 — Agent Support for Instruction Files Varies
Do not assume every coding agent interprets:
AGENTS.mdin exactly the same way.
Some agents have their own instruction mechanisms or naming conventions.
Therefore:
- follow the current documentation for your chosen agent;
- keep
AGENTS.mduseful to humans even if one agent ignores it; - avoid putting sensitive information into instruction files.
9.24 — Our Recommended AI Project Baseline
A strong repository may look like:
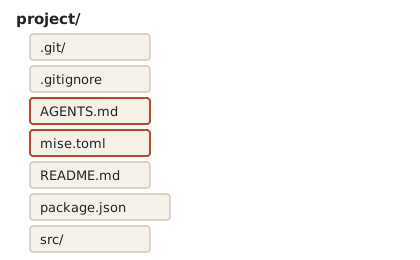
The files communicate different things:
Git
→ project history

.gitignore
→ what not to track

mise.toml
→ runtime requirements

AGENTS.md
→ AI/development instructions

README.md
→ project documentation
This is a much better AI workspace than an undocumented folder full of files.
9.25 — Start with Read-Only Analysis
A good first agent task is not:
Rewrite this application.A better first task is:
Inspect this repository without modifying files.
Explain the architecture, important directories, runtime, test commands, and likely entry points.
Why?
Because you first want to verify whether the agent understands the project.
9.26 — Example Read-Only Prompt
A useful prompt:
Analyze this repository without changing any files.

Tell me:
1. what the application does;
2. the main entry points;
3. the important directories;
4. the runtime/toolchain;
5. how tests are run;
6. any obvious architectural risks or unclear areas.

Do not edit anything.
This is one of the best ways to begin work with a new codebase.
9.27 — Verify That Read-Only Really Means Read-Only
Different agent harnesses have different permission systems.
A natural-language instruction such as:
Do not edit anything.is useful, but it is not a cryptographic sandbox.
If the agent offers a genuine read-only or restricted permission mode, use it when appropriate.
Always refer to the current documentation for the specific agent.
9.28 — Approval Modes Matter
Coding agents vary widely in how they handle:
- file writes;
- command execution;
- network access;
- destructive operations.
Some agents:
ask before writesOthers can:
write automaticallyOthers can run in:
fully unattended modeDo not generalize permission semantics from one agent to another.
9.29 — The Omarchy Prompt Launcher Is Powerful
Remember:
omarchy agent prompt "..."currently launches agents in unattended modes appropriate to the selected harness.
This makes it excellent for:
- deliberate automation;
- repeatable agent tasks;
- scripted workstation workflows.
It also means a vague prompt can have real consequences.
9.30 — Bad Automated Prompt
Avoid:
omarchy agent prompt "Fix everything"Why?
The scope is undefined.
The agent may:
- edit many files;
- run unnecessary commands;
- change configuration;
- create difficult-to-review diffs.
9.31 — Better Automated Prompt
Prefer:
Inspect the failing test in tests/auth.test.ts.

Identify the root cause.

Change only the files required to fix that failure.

Run the relevant test suite.

Do not commit or push.

At the end, summarize the files changed and remaining risks.
Boundaries make agents more useful.
9.32 — Git Before Agent
Before meaningful AI changes:
git statusIdeally:
working tree cleanWhy?
Because after the agent works:
git diffcan show exactly what it changed.
If your repository already contains unrelated modifications, review becomes much harder.
9.33 — Recommended Agent Editing Loop
Use:
git status
        ↓
launch agent
        ↓
agent edits
        ↓
run tests
        ↓
git status
        ↓
git diff
        ↓
human review
        ↓
git add
        ↓
git diff --staged
        ↓
commit
This is our default AI-development discipline.
9.34 — Never Let “Agent Finished” Mean “Task Verified”
An agent saying:
Done.does not prove:
- the application works;
- tests pass;
- no unrelated files changed;
- security is preserved;
- the intended behavior is correct.
Verification still matters.
9.35 — Agent + Tmux
A strong setup:
┌──────────────────────┬──────────────────────┐
│                      │                      │
│       Editor         │       AI Agent       │
│                      │                      │
├──────────────────────┴──────────────────────┤
│                  Terminal                   │
└─────────────────────────────────────────────┘
You already learned this in the Tmux module.
Current Omarchy’s:
tdlhelper is built specifically around this type of workflow.
9.36 — Why Tmux Helps AI Development
One pane:
editorSecond pane:
agentThird pane:
tests / Git / serverThis keeps the control loop visible.
You are less likely to blindly trust the agent because you can immediately inspect and test its work.
9.37 — Agent + Git Worktree
For one agent:
normal branchis often enough.
For genuinely parallel agents:
separate Git worktreesare much safer.
Conceptually:
Worktree A
→ Agent A

Worktree B
→ Agent B
Each agent has its own filesystem checkout.
9.38 — Do Not Parallelize Too Early
Using multiple agents at once creates coordination overhead.
Potential problems:
- duplicate work;
- conflicting design decisions;
- higher cost;
- unclear ownership;
- difficult merges.
Start with:
one agent
+
one focused task
Parallelize only when the tasks are truly separable.
9.39 — Model Roles Are Agent-Specific
Some coding-agent tools allow multiple model roles such as:
fast model
planning model
deep reasoning model
review model
This can be useful.
But model configuration belongs to the specific agent.
Omarchy’s job is mainly to:
- install;
- select;
- launch;
- integrate.
We will not turn this course into a model-routing course.
9.40 — Use the Right Model for the Job
At a high level:
fast/cheap model
→ simple search, mechanical tasks

strong reasoning model
→ architecture, difficult debugging

specialized reviewer
→ second-pass review
Exact model names, pricing, and capabilities change rapidly.
Follow the current documentation for your agent/provider.
9.41 — Agent Sessions
Most coding agents support some concept of conversation/session history.
Useful session behavior includes:
- resuming a long investigation;
- preserving project discussion;
- returning to a plan later.
However:
A saved agent session is not a substitute for project documentation.
Important decisions should still live in durable places such as:
- Git commits;
- issues;
- README;
- architecture docs;
AGENTS.md.
9.42 — Omarchy’s Agents Panel
Current Omarchy 4 documentation includes an AI usage panel in the top bar.
The agents icon appears once Omarchy detects AI coding usage on the machine.
The current official documentation states that the panel can track supported subscription/token usage such as:
- plan information;
- session/weekly usage;
- prepaid balance where relevant;
- tokens by day;
- tokens by model.
Current built-in coverage includes selected providers such as Claude Code, Codex, and Fireworks.
The exact providers and metrics can evolve.
9.43 — Agent Usage Updates
Current official Omarchy documentation states that usage records are regenerated periodically using:
omarchy agent usage-updateYou generally do not need to run this manually.
The shell integration updates the panel automatically.
9.44 — Why Usage Visibility Matters
AI coding can become expensive without obvious feedback.
A visible usage panel helps answer:
Which provider am I using?
How much of my plan is consumed?
Which model is generating most tokens?
This supports better model/cost decisions.
We will revisit cost-aware workflows in Module 10.
9.45 — Theme Synchronization
Current Omarchy AI integration can synchronize the active Omarchy theme with supported coding agents.
The current official documentation explicitly mentions theme synchronization for agents including:
- Claude Code;
- Pi;
- OpenCode;
and current Quattro source also references Hermes where supported.
This is a quality-of-life feature rather than a core engineering capability.
But it reinforces the idea that agents are integrated into the workstation rather than bolted on as unrelated tools.
9.46 — Crash Diagnosis with the Default Agent
Current Omarchy documentation includes a particularly interesting AI integration.
Omarchy watches:
systemd-coredumpfor process crashes.
When a process crashes, current Omarchy can display a:
Process crashednotification.
Clicking it can hand the crash information to your default coding agent together with Omarchy’s crash-diagnosis guidance.
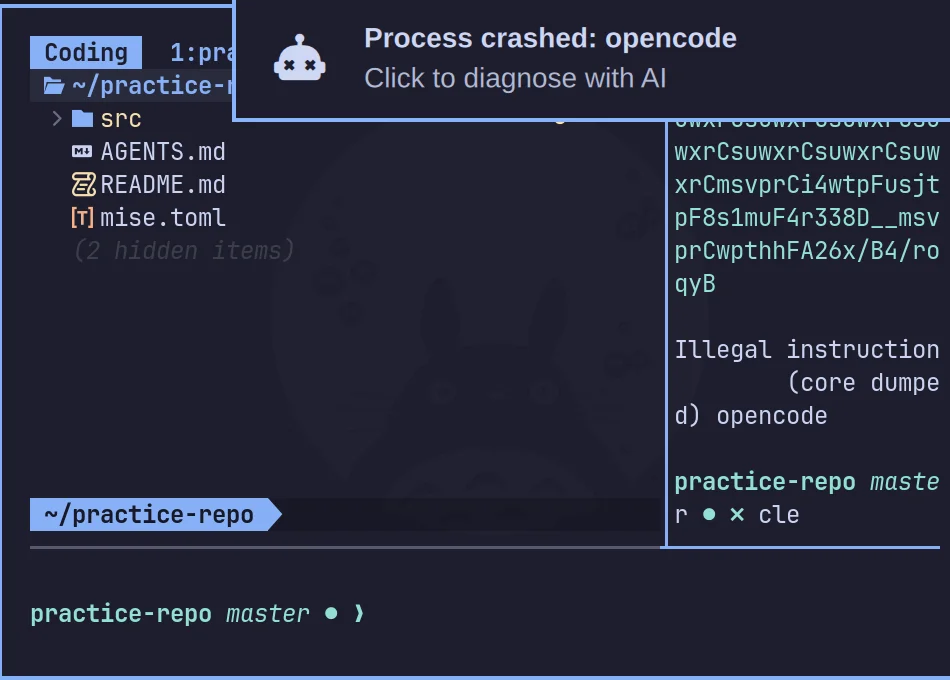
The agent can then inspect the available crash data and help determine whether the issue:
- is understandable locally;
- needs more investigation;
- may be worth reporting upstream.
9.47 — Why Crash Diagnosis Is a Good AI Use Case
Crash investigation often requires:
- reading logs;
- inspecting stack traces;
- identifying binaries;
- understanding package versions;
- correlating symptoms.
Those are tasks AI agents can assist with well.
But the agent still needs evidence.
The correct workflow is:
crash
↓
collect real system information
↓
agent analyzes evidence
not:
crash
↓
agent guesses
9.48 — AI-Assisted Workstation Troubleshooting
Your coding agent can also help inspect the workstation itself.
Good read-only tasks include:
Inspect failed user services and explain which ones matter.Read my Hyprland monitor configuration and compare it with `hyprctl monitors all`.Inspect this application's logs and propose likely causes without changing anything.This can be extremely useful because the agent can combine:
- shell commands;
- config reading;
- log analysis.
9.49 — Let the Agent Inspect Before It Repairs
Good troubleshooting workflow:
symptom
↓
ask agent to inspect
↓
collect facts
↓
explain likely cause
↓
propose minimal change
↓
you approve
↓
apply
↓
verify
Avoid:
Something is broken.
Fix my system.
especially in unattended mode.
9.50 — Good System-Troubleshooting Prompt
Example:
My Bluetooth panel is not showing my device.

Do not change anything yet.

Inspect the relevant Omarchy commands, Bluetooth state, failed services, and recent relevant logs.

Tell me what you find and propose the smallest next step.
This encourages evidence-first debugging.
9.51 — Agent Permissions and sudo
Be very cautious about giving unattended agents broad sudo capability.
With root privileges, an agent could potentially:
- modify system configuration;
- install/remove packages;
- alter services;
- change permissions;
- damage the boot system.
The same rule from the terminal module applies:
sudois privilege elevation, not a magic problem-solving command.
9.52 — Agent Permissions and Secrets
Your development machine may contain:
~/.ssh
API credentials
GitHub tokens
cloud credentials
.env files
browser session data
Do not assume every agent needs access to all of them.
Use:
- project-scoped working directories;
- separate secret-management mechanisms;
- minimal permissions;
- explicit approval for sensitive operations.
9.53 — Agent Permissions and Network Access
Some tasks require network access:
- package installation;
- documentation lookup;
- Git push;
- API testing.
Others do not.
When the agent offers network permission controls, grant only what the task needs.
The exact controls depend on the chosen agent.
9.54 — Verify Agent Authentication Separately
Each coding agent can have its own authentication mechanism.
Examples may include:
- subscription login;
- API key;
- OAuth;
- provider account.
Omarchy installs and launches the tool.
It does not make all third-party service accounts interchangeable.
Follow the current official authentication instructions for your selected agent.
9.55 — Changing the Default Agent
One advantage of Omarchy’s abstraction is that switching agents is straightforward.
Example:
omarchy default agent piLater:
omarchy default agent codexThen:
Super + Shift + Ctrl + Alaunches the newly selected default.
Your surrounding Omarchy workflow remains similar.
9.56 — Agent-Specific Aliases
Current official Omarchy documentation also exposes direct terminal shortcuts for certain agents.
Examples currently documented include:
c
cx
cy
for selected agent CLIs.
Exact mappings can change.
Inspect them:
type c
type cx
type cy
Do not assume old aliases forever.
9.57 — Custom Agent Wrappers
Current official Omarchy AI documentation provides:
omarchy-mise-install <package> [command-name]for wrapping additional CLIs through the same mise-backed pattern.
This is an advanced capability.
You do not need it for normal use.
The important concept is:
Omarchy’s agent system is extensible beyond the built-in launcher list.
9.58 — Do Not Install Duplicate Copies of the Same Agent
Before manually running:
npm install -g ...
curl | bash ...
check:
type AGENTand:
omarchy default agent --helpOmarchy may already provide a mise-backed installation path.
Duplicate installations can create PATH confusion.
9.59 — Practical Exercise: Inspect Agent Integration
Run:
omarchy default agentThen:
omarchy default agent --helpThen:
omarchy commands --all | grep -i agentWrite down:
- your current default;
- the available agent-related Omarchy commands.
9.60 — Practical Exercise: Inspect the Agent Command
If your default is OMP:
type omp
command -v omp
If your default is another agent, substitute its command.
The purpose is to connect:
Omarchy
→ shell command
→ mise-managed installation
9.61 — Practical Exercise: Launch From the Correct Project
Run:
cd ~/Projects/YOUR_PROJECTVerify:
pwd
git status
Launch inline:
aExit when finished.
This is the basic AI-agent entry workflow.
9.62 — Practical Exercise: Read-Only Repository Map
Ask your agent:
Analyze this repository without modifying files.

Explain:
- what the project does;
- the major directories;
- the main entry points;
- the runtime/tooling;
- how tests are run;
- any important project instructions.

Do not make changes.
Compare the response with the real repository.
Does it understand the project correctly?
9.63 — Practical Exercise: Create AGENTS.md
If your project does not already have one, create:
AGENTS.mdKeep it small.
Example:
## AGENTS.md

### Project

Briefly describe the project.

### Environment

Use the runtime versions declared in `mise.toml`.

### Validation

Run the relevant tests before considering a change complete.

### Rules

- Keep changes focused.
- Do not modify secrets.
- Do not commit or push without explicit approval.
Add project-specific details.
Commit it if it is intended to be shared:
git add AGENTS.md
git commit -m "docs: add agent development instructions"
9.64 — Practical Exercise: AI Change with Git Review
Start clean:
git statusAsk the agent for one small code/documentation change.
After it finishes:
git statusThen:
git diffCheck:
- expected files only;
- no secrets;
- no unrelated formatting;
- no generated junk.
Run the relevant validation.
Only then stage/commit.
9.65 — Practical Exercise: Tmux Agent Pane
Enter your project:
cd ~/Projects/YOUR_PROJECTOpen your Tmux development layout.
Place:
editorin one pane,
agentin another,
and:
tests / Gitin a third.
Practice moving between them without leaving the project workspace.
9.66 — Practical Exercise: System Inspection Without Changes
Ask your default agent:
Inspect this Omarchy machine without changing anything.

Check:
- Omarchy version;
- failed system services;
- failed user services;
- active network state.

Explain anything that appears abnormal.

Do not modify configuration or restart services.
Then manually verify the commands/results.
This demonstrates AI-assisted system inspection while keeping the human in control.
9.67 — Common AI-Agent Mistakes
Mistake 1 — Launching From the Wrong Directory
Always check:
pwd
git status
before editing tasks.
Mistake 2 — Giving a Huge Vague Task
Bad:
Improve the whole project.Better:
Fix this failing endpoint and run these tests.Mistake 3 — Assuming “Read Only” from Natural Language Is a Security Boundary
Use actual agent permission controls where available.
Mistake 4 — Letting an Unattended Agent Use sudo Casually
System-level changes deserve stronger scrutiny.
Mistake 5 — Starting With a Dirty Git Working Tree
You lose the ability to distinguish your changes from the agent’s changes.
Mistake 6 — Accepting the Agent’s Summary Instead of Inspecting git diff
The diff is the evidence.
Mistake 7 — Letting Multiple Agents Edit the Same Working Tree
Use separate worktrees when true parallel editing is required.
Mistake 8 — Treating AGENTS.md as Universal Agent Configuration
Different agents may interpret repository instructions differently.
Follow the current documentation for the selected harness.
Mistake 9 — Installing Another Copy of an Agent Manually
Check the existing Omarchy/mise integration first.
Mistake 10 — Turning the Omarchy Course Into an Agent-Specific Course
The point of this module is the workstation integration.
Agent-specific advanced topics belong in separate training.
9.68 — Checkpoint
Before moving on, you should be able to answer yes to the following.
Omarchy Integration
- I understand that Omarchy treats coding agents as first-class development tools.
- I know how to inspect current supported agent choices.
- I know how to choose the default agent.
- I know how to check the current default.
- I can launch the default agent through Omarchy.
- I can launch it inline in a terminal.
Environment
- I understand that agent launchers are mise-backed.
- I can inspect an agent command with
type. - I understand why working directory matters.
- I understand why launching from
$HOMEis handled specially.
Project Context
- I understand what
AGENTS.mdis used for conceptually. - I know not to assume every agent interprets it identically.
- I understand how
mise.toml, Git, README, and agent instructions work together.
Safety
- I check
git statusbefore an editing task. - I inspect
git diffafter the task. - I understand that unattended Omarchy agent prompts can perform real actions.
- I do not casually grant agents
sudo. - I understand that read-only prompts are not necessarily hard security boundaries.
Workflow
- I can ask an agent to map a repository without modifying it.
- I can use an agent inside Tmux.
- I understand when a worktree is useful for a second agent.
- I understand that agent output still requires validation.
9.69 — What You Can Now Do
After completing Module 9, you can now:
- choose and switch coding agents through Omarchy;
- understand Omarchy’s mise-backed lazy agent installation;
- launch an agent from the correct project;
- give an agent structured project context;
- use project-level AI instructions;
- start with read-only repository analysis;
- use Git as a control boundary around AI changes;
- integrate AI into Tmux-based development;
- use separate worktrees for parallel tasks;
- inspect AI usage from the Omarchy Shell;
- use AI as a system-diagnostics assistant;
- understand the risk of unattended prompt execution.
Most importantly:
You are not merely “using an AI chatbot while coding.” You now have an AI coding agent integrated into a structured, version-controlled, reproducible development workstation.
Module 9 Summary
Omarchy integration:
Agent command
        ↓
lazy Omarchy launcher
        ↓
mise-managed installation
        ↓
coding agent
Choose default:
omarchy default agent NAMECheck:
omarchy default agentLaunch:
Super + Shift + Ctrl + AInline:
aPrompt directly:
omarchy agent prompt "TASK"with the important current warning:
direct prompt launcher
→ unattended agent mode
→ real actions may occur
Project AI baseline:
project/
├── .git/
├── .gitignore
├── AGENTS.md
├── mise.toml
├── README.md
└── source
Recommended AI loop:
pwd
↓
git status
↓
agent
↓
test
↓
git status
↓
git diff
↓
review
↓
commit
Parallel work:
one task
→ one agent / branch

independent parallel tasks
→ separate Git worktrees
And the most important rule:
AI agents are fastest when the environment is explicit, and safest when every meaningful change is reviewable through Git.