Module 11: Hyprland Configuration the Omarchy Way
In this module — 74 sections
- What You Will Learn
- 11.1 — The Most Important Rule
- 11.2 — Why Reading /usr/share/omarchy Is Still Useful
- 11.3 — The Main Hyprland Configuration
- 11.4 — Understand the Load Order
- 11.5 — Why This Architecture Is Better
- 11.6 — Your Main Hyprland Files
- 11.7 — Inspect the Directory
- 11.8 — Prefer the Omarchy Setup Menu for Common Configs
- 11.9 — The Lua Configuration Layer
- 11.10 — Why Use Omarchy Helpers?
- 11.11 — Inspect Active Hyprland State
- 11.12 — The Configuration Loop
- 11.13 — Monitor Configuration
- 11.14 — Identify Monitor Names First
- 11.15 — Real-World Monitor Example
- 11.16 — Never Copy a Monitor Name From Someone Else
- 11.17 — Monitor Scaling
- 11.18 — Fractional Scaling
- 11.19 — Multiple Monitors
- 11.20 — Laptop + External Display
- 11.21 — Verify After a Monitor Change
- 11.22 — Input Configuration
- 11.23 — Current Input Configuration Pattern
- 11.24 — Keyboard Layout
- 11.25 — Keyboard Options
- 11.26 — Mouse Sensitivity
- 11.27 — Mouse Acceleration
- 11.28 — Trackpad Configuration
- 11.29 — Keybindings
- 11.30 — Add a New Binding
- 11.31 — Replace an Existing Binding
- 11.32 — Remove a Binding
- 11.33 — Current Documentation Can Differ Slightly Between Published Manual and Source
- 11.34 — Disable All Default Omarchy Bindings
- 11.35 — Verify Bindings Before Editing
- 11.36 — Keyboard Hardware Can Lie to You
- 11.37 — Window Rules
- 11.38 — Identify the Actual Window Class
- 11.39 — Example Window Rule
- 11.40 — Do Not Over-Automate Window Placement
- 11.41 — Real Course Decision: Ghostty Rule
- 11.42 — Workspace Rules
- 11.43 — Verify Workspace Behavior
- 11.44 — Look and Feel
- 11.45 — Themes vs looknfeel.lua
- 11.46 — Autostart
- 11.47 — What Belongs in Autostart?
- 11.48 — Autostart vs Systemd Service
- 11.49 — Autostart vs Omarchy Hooks
- 11.50 — Reloading Hyprland Configuration
- 11.51 — Check for Configuration Errors
- 11.52 — Inspect Current Window State
- 11.53 — Inspect Monitor State
- 11.54 — Inspect Input Devices
- 11.55 — Reload vs Restart vs Reboot
- 11.56 — Back Up Before Major Changes
- 11.57 — omarchy refresh config
- 11.58 — omarchy refresh hyprland Is Destructive to Personal Hyprland Files
- 11.59 — omarchy reinstall configs Is Even Broader
- 11.60 — Practical Exercise: Map Your Hyprland Config
- 11.61 — Practical Exercise: Verify Monitor Reality
- 11.62 — Practical Exercise: Make One Safe Monitor Change
- 11.63 — Practical Exercise: Inspect Input
- 11.64 — Practical Exercise: Identify a Window Class
- 11.65 — Practical Exercise: Add a Harmless Window Rule
- 11.66 — Practical Exercise: Inspect Your Bindings File
- 11.67 — Practical Exercise: Find a Default Binding
- 11.68 — Practical Exercise: Verify Key Hardware
- 11.69 — Practical Exercise: Safe Recovery Thought Experiment
- 11.70 — Common Hyprland Configuration Mistakes
- 11.71 — Checkpoint
- 11.72 — What You Can Now Do
- Module 11 Summary
About This Module
You now know how to use Omarchy as a development workstation.
Now we begin customizing the workstation itself.
This is where many Linux users make a costly mistake:
find a Hyprland config online
→ copy the entire thing
→ replace the existing setup
→ lose Omarchy integration
→ updates become harder
→ troubleshooting becomes confusing
We are not going to do that.
Current Omarchy 4 / Quattro is designed around a layered Hyprland configuration:
Omarchy defaults
        ↓
your personal override files
        ↓
your additional rules
The official current Omarchy configuration explicitly loads the Omarchy defaults first and then loads your personal files from:
~/.config/hypr/That architecture is extremely important.
It means you can customize the workstation heavily without copying or permanently forking the entire Omarchy configuration.
The goal of this module is:
Customize Hyprland while preserving Omarchy’s upgrade path.
What You Will Learn
By the end of Module 11, you will understand:
- how Omarchy loads Hyprland configuration;
- where the package-owned defaults live;
- where your personal Hyprland configuration lives;
- what
hyprland.luadoes; - what
monitors.luacontrols; - what
input.luacontrols; - what
bindings.luacontrols; - what
looknfeel.luacontrols; - what
autostart.luacontrols; - how Omarchy’s Lua helpers fit over Hyprland;
- how to inspect active Hyprland state with
hyprctl; - how to configure monitors safely;
- how to configure input devices safely;
- how to add window rules;
- how to bind applications to workspaces;
- how to add, replace, and remove bindings;
- how to reload/test changes safely;
- how to recover from a broken config;
- why
omarchy refresh hyprlandis destructive to personal Hyprland configuration.
11.1 — The Most Important Rule
Current official Omarchy documentation draws a clear boundary.
Your files:
~/.configOmarchy-owned files:
/usr/share/omarchyFor normal customization:
Edit your files, not Omarchy’s package-owned files.
Files under:
/usr/share/omarchyare installed and managed by the Omarchy package.
An update can replace them.
11.2 — Why Reading /usr/share/omarchy Is Still Useful
Do not normally edit Omarchy’s internal files.
But reading them is extremely useful.
For example:
rg "scratchpad" /usr/share/omarchy/default/hypror:
rg "SUPER + RETURN" /usr/share/omarchyThis helps answer:
How does Omarchy currently implement this?The pattern is:
read defaults
↓
understand behavior
↓
override in ~/.config
not:
edit defaults11.3 — The Main Hyprland Configuration
Current Omarchy user configuration begins with:
~/.config/hypr/hyprland.luaInspect it:
bat ~/.config/hypr/hyprland.luaThe current official Quattro template follows this structure:
dofile((os.getenv("OMARCHY_PATH") or "/usr/share/omarchy") .. "/default/hypr/bootstrap.lua")

require("default.hypr.omarchy")

require("hypr.monitors")
require("hypr.input")
require("hypr.bindings")
require("hypr.looknfeel")
require("hypr.autostart")

require("default.hypr.toggles")
The exact comments or surrounding lines may change, but the important load order is deliberate.
11.4 — Understand the Load Order
Conceptually:
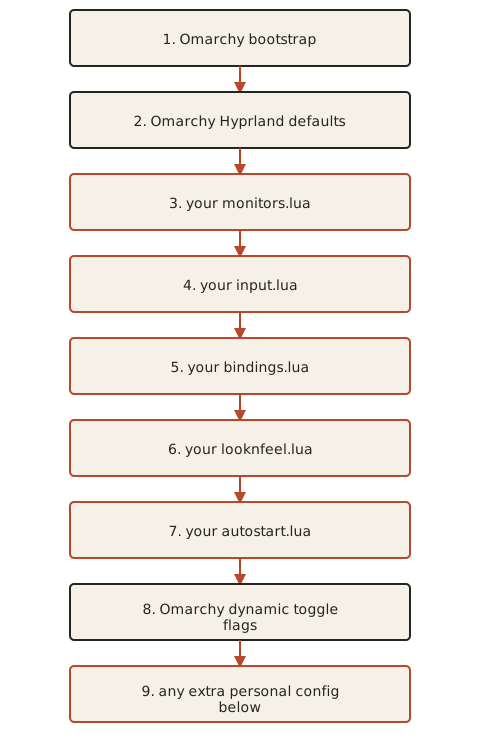
Your files are loaded after Omarchy’s defaults.
That gives your own configuration the opportunity to override default behavior.
11.5 — Why This Architecture Is Better
Suppose Omarchy improves its default configuration in an update.
If you copied the entire default configuration six months ago:
your giant copied config
→ remains frozen
→ misses improvements
With small overrides:
new Omarchy defaults
+
your small personal changes
You benefit from upstream improvements while preserving your preferences.
This is the correct long-term model.
11.6 — Your Main Hyprland Files
Current official Omarchy documentation identifies these key files:
~/.config/hypr/hyprland.luaMain config and load order.
~/.config/hypr/monitors.luaMonitor mode, scaling, positioning, and related display rules.
~/.config/hypr/input.luaKeyboard, mouse, and trackpad configuration.
~/.config/hypr/bindings.luaYour bindings and binding overrides.
~/.config/hypr/looknfeel.luaGaps, borders, animations, and visual/layout behavior.
~/.config/hypr/autostart.luaYour session startup processes.
11.7 — Inspect the Directory
Run:
ls -la ~/.config/hyprThen:
lt ~/.config/hyprif your current Omarchy shell provides the lt helper.
The point is to know exactly which files are yours before editing anything.
11.8 — Prefer the Omarchy Setup Menu for Common Configs
Current official Omarchy documentation allows core config files to be opened through:
Super + Space
→ Setup
Examples include:
Setup → Monitors
Setup → Keybindings
Setup → Input
Setup → Config
One advantage of opening config this way is that Omarchy can perform relevant reload/restart behavior when you exit the editor.
This is a good beginner workflow.
11.9 — The Lua Configuration Layer
Current Omarchy 4 uses Lua-based helper APIs around Hyprland configuration.
You will see helpers such as:
hl.config(...)
hl.monitor(...)
hl.bind(...)
hl.unbind(...)
o.bind(...)
o.rebind(...)
o.window(...)
o.launch_on_start(...)
You do not need to understand the implementation of these helper libraries.
Treat them as Omarchy’s supported configuration interface.
11.10 — Why Use Omarchy Helpers?
You could try to bypass Omarchy’s structure and write raw Hyprland configuration everywhere.
But the Omarchy helper layer gives you:
- consistent syntax;
- integration with Omarchy defaults;
- easier readable configuration;
- a configuration style that matches the current project.
Our course therefore prefers:
Current Omarchy configuration conventions first, raw Hyprland internals when genuinely needed.
11.11 — Inspect Active Hyprland State
Before changing configuration, inspect reality.
Current Hyprland provides:
hyprctl monitors allfor monitor state.
Use:
hyprctl activewindowfor the currently focused window.
You can also inspect configuration errors:
hyprctl configerrorsThese commands are extremely valuable.
11.12 — The Configuration Loop
Use this pattern whenever changing Hyprland:
inspect current state
        ↓
edit one small thing
        ↓
reload/apply
        ↓
check config errors
        ↓
verify behavior
Not:
change 20 things
↓
desktop behaves strangely
↓
no idea which change caused it
11.13 — Monitor Configuration
Current official Omarchy documentation uses:
~/.config/hypr/monitors.luafor persistent monitor configuration.
Open it:
nvim ~/.config/hypr/monitors.luaor:
Super + Space
→ Setup
→ Monitors
11.14 — Identify Monitor Names First
Run:
hyprctl monitors allLook for names such as:
DP-1
DP-2
HDMI-A-1
eDP-1
Do not guess the output name.
Monitor names depend on:
- GPU;
- connection type;
- port;
- laptop hardware.
11.15 — Real-World Monitor Example
On the workstation used to develop this course, the monitor is:
DP-2and the preferred configuration is:
2560x1440 @ 144 HzThe personal Omarchy monitor rule is:
hl.monitor({
  output = "DP-2",
  mode = "2560x1440@144",
  position = "0x0",
  scale = 1
})
This is a good example because the display initially worked while running at a lower refresh rate.
Nothing looked obviously broken.
Verification exposed the problem.
11.16 — Never Copy a Monitor Name From Someone Else
This:
output = "DP-2"is correct only if your monitor is actually DP-2.
Always run:
hyprctl monitors allfirst.
11.17 — Monitor Scaling
Current official Omarchy monitor documentation discusses scaling extensively.
The correct scale depends on:
- physical display size;
- resolution;
- pixel density;
- eyesight;
- application behavior.
Broadly:
1080p / 1440p desktop monitor
→ often scale 1

very high-DPI display
→ often higher or fractional scaling
Do not blindly copy another user’s scaling value.
11.18 — Fractional Scaling
Current Omarchy documentation includes recommendations for fractional scaling on displays such as 4K screens that are below extremely high “retina-class” pixel density.
You may encounter combinations such as:
Omarchy/GDK scale
+
Hyprland monitor scale
Use the current official monitor documentation for the exact recommendation for your display class.
Do not freeze these recommendations in your memory forever; they can evolve.
11.19 — Multiple Monitors
Hyprland can position monitors using coordinates.
Conceptually:
Monitor A
position 0x0

Monitor B
position 2560x0
means Monitor B begins to the right of a 2560-pixel-wide Monitor A.
Example layout:
┌──────────────────────┬──────────────────────┐
│                      │                      │
│      Monitor A       │      Monitor B       │
│                      │                      │
└──────────────────────┴──────────────────────┘
Use the current Hyprland monitor documentation for advanced multi-monitor positioning rules.
11.20 — Laptop + External Display
Current official Omarchy monitor documentation includes behavior for laptop external displays.
Current Quattro automatically extends to an external display by default.
The documentation also describes current Omarchy hardware triggers for:
- mirroring;
- toggling internal display behavior.
Exact shortcuts should be verified with:
Super + Kbecause hardware bindings may evolve.
11.21 — Verify After a Monitor Change
Run:
hyprctl monitors allConfirm:
- correct output;
- resolution;
- refresh rate;
- scale;
- position.
Then:
hyprctl configerrorsIf there are errors, fix those before adding more configuration.
11.22 — Input Configuration
Current official Omarchy documentation uses:
~/.config/hypr/input.luafor:
- keyboard layout;
- keyboard options;
- repeat behavior;
- mouse sensitivity;
- acceleration;
- trackpad configuration.
Open:
Super + Space
→ Setup
→ Input
or:
nvim ~/.config/hypr/input.lua11.23 — Current Input Configuration Pattern
Current official documentation shows a pattern such as:
hl.config({
  input = {
    kb_layout = "us",
    repeat_rate = 40,
    repeat_delay = 600,
    sensitivity = 0.35,

    touchpad = {
      natural_scroll = true,
    },
  },
})
Treat this as a structural example.
Use settings appropriate to your hardware and preferences.
11.24 — Keyboard Layout
Example:
kb_layout = "us"Multiple layouts are possible.
The official current documentation shows examples of multiple layouts and keyboard options.
If you need multiple languages, use the current Omarchy/Hyprland input documentation rather than guessing syntax.
11.25 — Keyboard Options
Omarchy may include keyboard options for behaviors such as:
- Compose key;
- layout switching;
- Caps Lock behavior.
During our real workstation setup, the user wanted ordinary Caps Lock behavior.
The personal config included:
kb_options = ""This removed the inherited option behavior for that machine.
Do not copy this unless you actually want to clear those options.
11.26 — Mouse Sensitivity
A personal example from the course workstation:
sensitivity = -0.3This reduced pointer sensitivity.
The current official Omarchy input documentation notes that:
0is the default baseline.
Your correct value is personal.
11.27 — Mouse Acceleration
For some users, particularly gaming or precision desktop work, a flat acceleration profile may feel better.
Our real workstation used:
accel_profile = "flat"This is a preference, not an Omarchy requirement.
Try changes gradually.
11.28 — Trackpad Configuration
Laptop users may configure options such as:
touchpad = {
  natural_scroll = true,
}
Additional current Hyprland options can control:
- tapping;
- click behavior;
- scroll direction;
- sensitivity.
Use the current official Omarchy input documentation plus upstream Hyprland documentation for advanced settings.
11.29 — Keybindings
Personal bindings belong in:
~/.config/hypr/bindings.luaCurrent official Omarchy documentation explicitly directs users here for adding or replacing bindings.
Open:
Super + Space
→ Setup
→ Keybindings
or:
nvim ~/.config/hypr/bindings.lua11.30 — Add a New Binding
Current Omarchy provides:
o.bind(...)A conceptual example:
o.bind("SUPER + ALT + RETURN", "Tmux", { omarchy = "terminal-tmux" })The workstation used while building this course contains this personal binding.
The important structure is:
key combination
description
action
11.31 — Replace an Existing Binding
Current Quattro source provides:
o.rebind(...)for replacing an existing binding.
The current official dotfiles source explains that o.rebind removes the previous binding before adding its replacement.
Conceptual example:
o.rebind("SUPER + SHIFT + O", "Joplin", "joplin-desktop")This is cleaner than leaving two actions competing for the same shortcut.
11.32 — Remove a Binding
Current Omarchy supports:
hl.unbind(...)Example:
hl.unbind("SUPER + SHIFT + O")Use this when you want a default shortcut removed without replacing it.
11.33 — Current Documentation Can Differ Slightly Between Published Manual and Source
Because Omarchy evolves quickly, you may occasionally see the published manual demonstrate:
hl.unbind(...)
o.bind(...)
while the current Quattro source also provides:
o.rebind(...)This is exactly why our documentation policy is:
current official manual
+
current official Quattro source
+
installed system
When in doubt, inspect the installed/current implementation.
11.34 — Disable All Default Omarchy Bindings
The current official hyprland.lua template contains an advanced option:
-- omarchy_default_bindings = falseIf enabled before the default configuration loads, it disables Omarchy’s default bindings.
The same template also currently provides:
-- omarchy_preinstalled_bindings = falseto disable preinstalled app/web-app bindings while keeping the core window-manager bindings.
These are advanced options.
Stevinator Recommendation
Do not disable all Omarchy defaults while learning the system.
Override individual bindings first.
11.35 — Verify Bindings Before Editing
Current Omarchy gives you:
Super + Kfor keybinding discovery.
You can also use:
omarchy menu keybindingsBefore adding a shortcut, check whether that combination is already used.
11.36 — Keyboard Hardware Can Lie to You
Sometimes the config is correct but the physical keyboard sends a different key.
This is especially relevant for:
- compact keyboards;
- Fn layers;
- non-standard layouts;
- vendor remapping software.
Use:
wevto inspect the actual Wayland key event.
This saved time during the real workstation setup used for this course.
11.37 — Window Rules
Hyprland can apply rules to specific application windows.
Current Omarchy’s hyprland.lua template includes a personal example:
o.window("qemu", { workspace = "5" })Conceptually:
when window class matches qemu
→ place it on workspace 5
This is powerful for building predictable workspaces.
11.38 — Identify the Actual Window Class
Never guess.
Focus the application and run:
hyprctl activewindowLook for:
class:Example from the workstation used in this course:
com.mitchellh.ghosttyThat is the current Ghostty window class on that machine.
The visible application title is not necessarily the correct rule identifier.
11.39 — Example Window Rule
Suppose:
hyprctl activewindowreports:
class: example-appA conceptual rule might be:
o.window("example-app", { workspace = "4" })Now the application can be assigned to workspace 4.
Verify behavior after adding it.
11.40 — Do Not Over-Automate Window Placement
It is tempting to create rules for every application.
That can make the desktop feel rigid.
Good candidates:
- virtual machine;
- dedicated monitoring app;
- communication app;
- application that always belongs in one workflow.
Poor candidate:
- every terminal;
- every browser window;
- every transient utility.
Use workspace rules when they remove recurring friction.
11.41 — Real Course Decision: Ghostty Rule
During the workstation setup we identified Ghostty’s class:
com.mitchellh.ghosttyWe deliberately did not create a rule forcing every Ghostty window to one workspace.
Why?
Because terminal windows can serve many purposes across many workspaces.
This is a good example of not automating something simply because you can.
11.42 — Workspace Rules
Hyprland can also apply rules to workspaces.
For example, advanced configurations may assign:
- a workspace to a monitor;
- layout behavior;
- special properties.
Current Omarchy monitor documentation says workspace-to-monitor rules belong conceptually with the monitor setup.
Use upstream current Hyprland workspace-rule documentation for advanced rules.
11.43 — Verify Workspace Behavior
After configuring a rule:
hyprctl workspacesand:
hyprctl monitors allcan help you inspect current workspace/monitor state.
Do not rely only on what you remember configuring.
11.44 — Look and Feel
Current Omarchy uses:
~/.config/hypr/looknfeel.luafor Hyprland visual/layout overrides.
Current official dotfiles documentation says it controls areas such as:
- gaps;
- borders;
- animations;
- other look/feel behavior.
Open:
nvim ~/.config/hypr/looknfeel.luaDo not immediately replace the entire visual configuration.
11.45 — Themes vs looknfeel.lua
These are related but not identical.
Omarchy themes can control broad visual styling.
looknfeel.lua is your Hyprland-level override layer.
Conceptually:
Omarchy theme
→ coordinated colors/background/etc.

looknfeel.lua
→ your Hyprland behavior/visual overrides
We will cover themes in Module 13.
11.46 — Autostart
Current Omarchy uses:
~/.config/hypr/autostart.luafor processes that should start with your graphical session.
Current official documentation provides:
o.launch_on_start("my-service")as the user-facing pattern.
11.47 — What Belongs in Autostart?
Possible examples:
- sync daemon;
- local helper;
- communication app;
- personal script.
But ask:
Does this really need to start every login?
Unnecessary autostart programs increase:
- startup complexity;
- resource use;
- troubleshooting surface.
11.48 — Autostart vs Systemd Service
These are not the same.
Use autostart when something belongs to:
your graphical sessionA systemd service may be better when the process:
- needs restart policy;
- must run independently of Hyprland;
- has service dependencies;
- needs structured logging.
We will explore services and hooks later.
11.49 — Autostart vs Omarchy Hooks
Also different:
autostart
→ run when your session starts

hook
→ run when a particular Omarchy event occurs
Example:
post-update
→ hook

launch chat app each session
→ autostart
Hooks belong to Module 14.
11.50 — Reloading Hyprland Configuration
Hyprland normally supports dynamic configuration reloads.
For current Omarchy, using the Setup menu for supported config files is a good option because Omarchy can perform the required reload/restart action when the editor exits.
If editing manually, check the current Hyprland/Omarchy behavior after saving.
Do not assume every component reacts identically.
11.51 — Check for Configuration Errors
After editing:
hyprctl configerrorsIf the output is empty/no-errors, that is a good sign.
If it reports errors:
stop
↓
fix the error
↓
do not keep stacking more changes
This should become automatic.
11.52 — Inspect Current Window State
For window rules:
hyprctl activewindowUseful fields can include:
class
title
workspace
monitor
pid
xwayland
This is much better than guessing based on the app name shown in the UI.
11.53 — Inspect Monitor State
For monitor changes:
hyprctl monitors allCompare:
configured mode
vs
active mode
Do not consider the change successful until the active state matches your intention.
11.54 — Inspect Input Devices
For advanced troubleshooting, current Hyprland provides tools to inspect devices.
You can also use:
wevfor actual keyboard/mouse events.
This is especially useful when:
binding looks correct
but key does nothing
11.55 — Reload vs Restart vs Reboot
Do not reboot for every Hyprland problem.
Preferred escalation:
save/reload config
        ↓
restart affected component if necessary
        ↓
restart Hyprland/session if necessary
        ↓
reboot only when genuinely needed
Omarchy provides component-level restart helpers we will cover in detail later.
11.56 — Back Up Before Major Changes
Before substantial customization, your personal Hyprland config should be version-controlled.
At minimum:
~/.config/hypr/hyprland.lua
~/.config/hypr/monitors.lua
~/.config/hypr/input.lua
~/.config/hypr/bindings.lua
~/.config/hypr/looknfeel.lua
~/.config/hypr/autostart.lua
should be part of your dotfiles strategy once intentionally modified.
We will build that properly in Module 22.
11.57 — omarchy refresh config
Current Omarchy includes configuration refresh functionality.
The important behavior is:
refresh a user config
→ backup the user's current version
→ replace it with the shipped Omarchy version
This can be valuable for recovery.
It is not something to run casually on working customized files.
11.58 — omarchy refresh hyprland Is Destructive to Personal Hyprland Files
Current official Quattro source for:
omarchy refresh hyprlandshows that it refreshes/overwrites the user Hyprland Lua configs including:
hyprland.lua
autostart.lua
bindings.lua
input.lua
looknfeel.lua
monitors.lua
That means:
Do not run
omarchy refresh hyprlandmerely because one shortcut or monitor setting is wrong.
It is a broad recovery action.
11.59 — omarchy reinstall configs Is Even Broader
Current Omarchy provides:
omarchy reinstall configsto reset user configuration.
This is destructive to custom configuration.
Use it only when you intentionally want a reset/recovery.
Our later troubleshooting hierarchy will be:
inspect
↓
fix specific line/file
↓
reload
↓
refresh one config
↓
refresh Hyprland
↓
reinstall configs
Use the smallest recovery action that solves the problem.
11.60 — Practical Exercise: Map Your Hyprland Config
Run:
cd ~/.config/hyprThen:
ls -laOpen:
bat hyprland.luaIdentify:
Omarchy bootstrap
Omarchy defaults
personal config requires
toggle config
Do not edit yet.
11.61 — Practical Exercise: Verify Monitor Reality
Run:
hyprctl monitors allWrite down:
output name
resolution
refresh rate
scale
position
Then open:
bat ~/.config/hypr/monitors.luaCompare configuration with reality.
11.62 — Practical Exercise: Make One Safe Monitor Change
Only if your display actually needs a change, modify one property.
Example structure:
hl.monitor({
  output = "YOUR_OUTPUT",
  mode = "YOUR_RESOLUTION@YOUR_REFRESH",
  position = "0x0",
  scale = 1
})
Save.
Then:
hyprctl configerrorsand:
hyprctl monitors allIf your display is already correct, do not change it just for the exercise.
Inspection alone is valid.
11.63 — Practical Exercise: Inspect Input
Open:
bat ~/.config/hypr/input.luaThen read current device behavior.
If you want to test pointer sensitivity, change only the sensitivity value.
Afterwards:
hyprctl configerrorsIf the original setting was already good, leave it unchanged.
11.64 — Practical Exercise: Identify a Window Class
Open an application.
Focus it.
Run:
hyprctl activewindowRecord:
class
title
workspace
Repeat with your terminal.
Observe that the human-visible app name and Hyprland class may differ.
11.65 — Practical Exercise: Add a Harmless Window Rule
Choose an application where automatic placement makes sense.
Example structure:
o.window("ACTUAL_CLASS", { workspace = "5" })Add it below the existing personal-load section in:
~/.config/hypr/hyprland.luaSave.
Run:
hyprctl configerrorsClose and reopen the application.
Verify the behavior.
Remove the rule afterwards if you do not actually want it.
11.66 — Practical Exercise: Inspect Your Bindings File
Open:
bat ~/.config/hypr/bindings.luaThen open:
Super + KCompare:
personal overrides
vs
effective binding list
This demonstrates how your small file participates in a much larger default configuration.
11.67 — Practical Exercise: Find a Default Binding
Suppose you want to know where Omarchy defines a scratchpad binding.
Search:
rg "scratchpad" /usr/share/omarchy/default/hypror search the broader current Omarchy tree:
rg "Scratchpad" /usr/share/omarchyRead the implementation.
Do not edit it.
This is one of the best ways to learn how the current system really works.
11.68 — Practical Exercise: Verify Key Hardware
If a keybinding does not respond:
wevPress the intended key.
Check whether the expected event appears.
Exit wev when done.
This separates:
keyboard problemfrom:
Hyprland binding problem11.69 — Practical Exercise: Safe Recovery Thought Experiment
Imagine:
bindings.luanow contains a syntax error.
What should you do?
Correct order:
1. inspect hyprctl configerrors
2. reopen bindings.lua
3. undo/fix the last change
4. save
5. check configerrors again
Not:
omarchy reinstall configsfor one typo.
11.70 — Common Hyprland Configuration Mistakes
Mistake 1 — Editing /usr/share/omarchy
Those files belong to Omarchy and can be overwritten by package updates.
Mistake 2 — Copying an Entire Stranger’s Hyprland Config
You lose the advantages of Omarchy’s layered configuration.
Mistake 3 — Guessing Monitor Output Names
Run:
hyprctl monitors allMistake 4 — Assuming a Display Is Correct Because It Shows an Image
Verify resolution and refresh rate.
Mistake 5 — Guessing Window Classes
Run:
hyprctl activewindowMistake 6 — Changing Five Config Files Before Testing
Change one thing at a time.
Mistake 7 — Ignoring hyprctl configerrors
A config syntax problem should be resolved before further customization.
Mistake 8 — Creating Rules for Every Application
Automation can become rigidity.
Mistake 9 — Assuming a Keybinding Problem Is Always Hyprland
Check actual hardware events with:
wevMistake 10 — Running omarchy refresh hyprland for a Tiny Problem
That action replaces the user’s Hyprland configuration files with the shipped defaults.
Use targeted repair first.
11.71 — Checkpoint
Before moving on, you should be able to answer yes to the following.
Architecture
- I understand the Hyprland configuration load order.
- I know the difference between
/usr/share/omarchyand~/.config/hypr. - I understand why small overrides are better than copied full configs.
Files
- I know what
hyprland.luadoes. - I know what
monitors.luadoes. - I know what
input.luadoes. - I know what
bindings.luadoes. - I know what
looknfeel.luadoes. - I know what
autostart.luadoes.
Inspection
- I can use
hyprctl monitors all. - I can use
hyprctl activewindow. - I can use
hyprctl configerrors. - I know when to use
wev.
Configuration
- I understand
hl.monitor(...). - I understand
o.bind(...)conceptually. - I understand
o.rebind(...)conceptually. - I understand
hl.unbind(...). - I understand
o.window(...). - I understand
o.launch_on_start(...).
Safety
- I test one change at a time.
- I do not edit package-owned defaults.
- I understand that
omarchy refresh hyprlandis a broad reset action. - I understand that
omarchy reinstall configsis destructive to personal config.
11.72 — What You Can Now Do
After completing Module 11, you can now:
- understand Omarchy’s Hyprland configuration architecture;
- safely customize monitors;
- customize keyboard and pointer behavior;
- add or replace keybindings;
- remove unwanted bindings;
- identify real application window classes;
- create intentional window/workspace rules;
- configure graphical-session autostart;
- inspect active Hyprland state;
- validate configuration changes;
- diagnose input-event problems;
- recover from configuration mistakes without wiping your setup;
- preserve Omarchy’s upgrade path while customizing your workstation.
Most importantly:
You can now customize Hyprland as an Omarchy user, rather than turning Omarchy into an unmanaged personal fork.
Module 11 Summary
Configuration hierarchy:
/usr/share/omarchy
→ Omarchy-owned defaults

~/.config/hypr
→ your overrides
Current load order:
bootstrap
↓
default.hypr.omarchy
↓
monitors
↓
input
↓
bindings
↓
looknfeel
↓
autostart
↓
toggles
↓
additional personal rules
Key files:
hyprland.lua
→ main load structure

monitors.lua
→ display configuration

input.lua
→ keyboard/mouse/trackpad

bindings.lua
→ shortcuts

looknfeel.lua
→ gaps/borders/animations/etc.

autostart.lua
→ session startup processes
Core inspection tools:
hyprctl monitors allhyprctl activewindowhyprctl configerrorswevCurrent Omarchy helper concepts:
hl.monitor(...)
o.bind(...)
o.rebind(...)
hl.unbind(...)
o.window(...)
o.launch_on_start(...)
Recovery hierarchy:
fix specific config
↓
reload
↓
refresh specific config
↓
refresh Hyprland
↓
reinstall configs
And the most important rule:
Override Omarchy. Do not overwrite Omarchy.