Module 15: Audio, Bluetooth, Network, and Displays on Omarchy
In this module — 83 sections
- What You Will Learn
- 15.1 — Omarchy’s Hardware Control Philosophy
- 15.2 — Current Hardware Panel Shortcuts
- 15.3 — The Top-Bar Hardware Widgets Are Interactive
- 15.4 — Use the Panel First
- 15.5 — Audio Panel
- 15.6 — Master Volume
- 15.7 — Mute
- 15.8 — Microphone / Input
- 15.9 — Output Device Selection
- 15.10 — Per-Application Mixing
- 15.11 — Switching Output While Audio Is Playing
- 15.12 — Audio CLI
- 15.13 — Inspect Current Audio State
- 15.14 — Precise Volume Control
- 15.15 — Switch to the Next Audio Output
- 15.16 — Audio Restart Before Reboot
- 15.17 — Why Component Restart Is Better
- 15.18 — Laptop Speaker Tuning
- 15.19 — Do Not “Fix” Tuning That Is Working
- 15.20 — Bluetooth Panel
- 15.21 — Pairing a Device
- 15.22 — Connect and Disconnect
- 15.23 — Forget a Device
- 15.24 — Bluetooth Radio Toggle
- 15.25 — Bluetooth CLI
- 15.26 — Bluetooth Power State
- 15.27 — Bluetooth State Persists Across Reboots
- 15.28 — Restart Bluetooth Before Reboot
- 15.29 — Network Panel
- 15.30 — Connect to Wi-Fi
- 15.31 — Do Not Follow Old Omarchy Wi-Fi Tutorials Blindly
- 15.32 — Network CLI
- 15.33 — Network Status
- 15.34 — Network Status as a Troubleshooting Baseline
- 15.35 — Signal Strength
- 15.36 — Wi-Fi Band Selection
- 15.37 — When Band Selection Helps
- 15.38 — Wi-Fi QR Sharing
- 15.39 — Wi-Fi Password Display
- 15.40 — DNS Provider Selection
- 15.41 — Speed Test
- 15.42 — Ping
- 15.43 — Restart Wi-Fi Before Reboot
- 15.44 — Display Panel
- 15.45 — Brightness vs Monitor Configuration
- 15.46 — Hardware Brightness Keys
- 15.47 — Keyboard Backlight
- 15.48 — Brightness CLI
- 15.49 — External Monitor DDC Brightness
- 15.50 — Text Size
- 15.51 — Display Settings Hierarchy
- 15.52 — Persistent Monitor Configuration
- 15.53 — Verify Refresh Rate
- 15.54 — Display Panel vs monitors.lua
- 15.55 — Laptop Display Toggle
- 15.56 — Power Panel
- 15.57 — Power Profiles on Laptops
- 15.58 — Hardware Troubleshooting Principle
- 15.59 — The Hardware Recovery Ladder
- 15.60 — Why Rebooting First Is Bad Troubleshooting
- 15.61 — Audio Troubleshooting Flow
- 15.62 — Bluetooth Troubleshooting Flow
- 15.63 — Wi-Fi Troubleshooting Flow
- 15.64 — Display Troubleshooting Flow
- 15.65 — Trackpad Troubleshooting
- 15.66 — Practical Exercise: Audio Panel
- 15.67 — Practical Exercise: Audio Shortcut
- 15.68 — Practical Exercise: Audio CLI Discovery
- 15.69 — Practical Exercise: Bluetooth Panel
- 15.70 — Practical Exercise: Bluetooth CLI Discovery
- 15.71 — Practical Exercise: Network Panel
- 15.72 — Practical Exercise: Network Status
- 15.73 — Practical Exercise: Speed Test
- 15.74 — Practical Exercise: Wi-Fi QR
- 15.75 — Practical Exercise: Display Panel
- 15.76 — Practical Exercise: Verify Monitor Mode
- 15.77 — Practical Exercise: Text Size Discovery
- 15.78 — Practical Exercise: Restart One Subsystem
- 15.79 — Common Hardware-Control Mistakes
- 15.80 — Checkpoint
- 15.81 — What You Can Now Do
- Module 15 Summary
About This Module
A development workstation is only useful if the hardware layer is reliable.
You need:
- working audio;
- predictable Bluetooth;
- stable Wi-Fi/networking;
- correct monitor configuration;
- usable brightness and scaling.
Current Omarchy 4 / Quattro has moved a large part of this day-to-day hardware control into the Omarchy Shell panels and corresponding CLI groups.
Current official documentation provides dedicated panels for:
Audio
Network
Bluetooth
Display
Power
with direct shortcuts such as:
Super + Ctrl + A
Super + Ctrl + W
Super + Ctrl + B
Super + Ctrl + D
The goal of this module is not to turn you into an audio-stack or NetworkManager expert.
The goal is:
Operate the hardware confidently, use the Omarchy layer first, restart only the affected subsystem when something breaks, and know when to inspect deeper.
What You Will Learn
By the end of Module 15, you will understand:
- how the Omarchy Shell exposes hardware controls;
- how to use the audio panel;
- how to switch output devices;
- how to control microphone/input;
- how per-app volume works;
- how to restart audio without rebooting;
- how to inspect laptop speaker tuning;
- how to use the Bluetooth panel;
- how to pair, connect, disconnect, forget, and power Bluetooth;
- how to restart Bluetooth;
- how to use the network panel;
- how to inspect Wi-Fi signal and status;
- how to connect to networks;
- how to use DNS selection;
- how to use Wi-Fi QR sharing;
- how to inspect/change Wi-Fi band behavior;
- how to run network speed tests;
- how to restart networking;
- how to use the display panel;
- how brightness controls differ from monitor configuration;
- how to inspect text-size/display CLI controls;
- how to verify monitor state with
hyprctl; - how to distinguish display brightness, scale, resolution, refresh rate, and text size;
- why subsystem restart should come before rebooting.
15.1 — Omarchy’s Hardware Control Philosophy
Current Omarchy 4 routes common desktop hardware tasks through the Omarchy Shell.
That includes:
Audio
Network
Bluetooth
Display
Power
This is intentional.
Instead of opening several separate TUIs or random vendor utilities, the workstation provides integrated shell panels.
Conceptually:
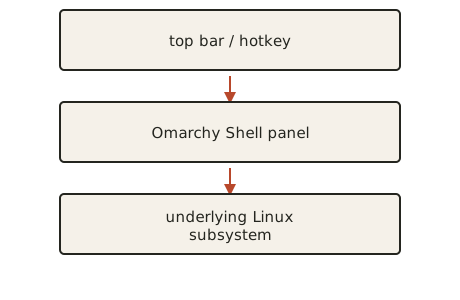
This gives you a consistent user experience while still leaving the underlying Linux tools available when deeper troubleshooting is required.
15.2 — Current Hardware Panel Shortcuts
Current official Omarchy hotkeys:
Super + Ctrl + A
→ Audio panel

Super + Ctrl + W
→ Network panel

Super + Ctrl + B
→ Bluetooth panel

Super + Ctrl + D
→ Display panel

Super + Ctrl + P
→ Power panel
These panels are also accessible by clicking their corresponding icons in the top bar.
Practice with Superkey
All five of these are the opening steps of Superkey’s Panels & tools lesson, which you may already have run in Module 3. If not, it is a quick way to get them into your hands. Click SK in the bar → Hyprland → Panels & tools, or launch it directly:
omarchy-shell shell summon stevinator.superkey '{"lesson":"hyprland.panels"}'15.3 — The Top-Bar Hardware Widgets Are Interactive
Current official Omarchy top-bar documentation states that the hardware widgets are not just indicators.
They are controls.
Examples:
Audio icon
left-click
→ audio panel

right-click
→ mute

scroll
→ volume
Bluetooth icon
left-click
→ Bluetooth panel
right-click
→ toggle Bluetooth radioDisplay icon
left-click
→ display panel
scroll
→ brightnessThis is worth learning because it makes routine adjustments very fast.
15.4 — Use the Panel First
For normal daily tasks, prefer:
panelover:
low-level command experimentationExamples:
Need new audio output?
→ Audio panel

Need Wi-Fi network?
→ Network panel

Need to reconnect headphones?
→ Bluetooth panel

Need brightness?
→ Display panel
The lower-level tools remain valuable for diagnostics.
15.5 — Audio Panel
Open:
Super + Ctrl + ACurrent official Omarchy documentation says the audio panel includes:
- master volume;
- output-device selection;
- per-application mixer.
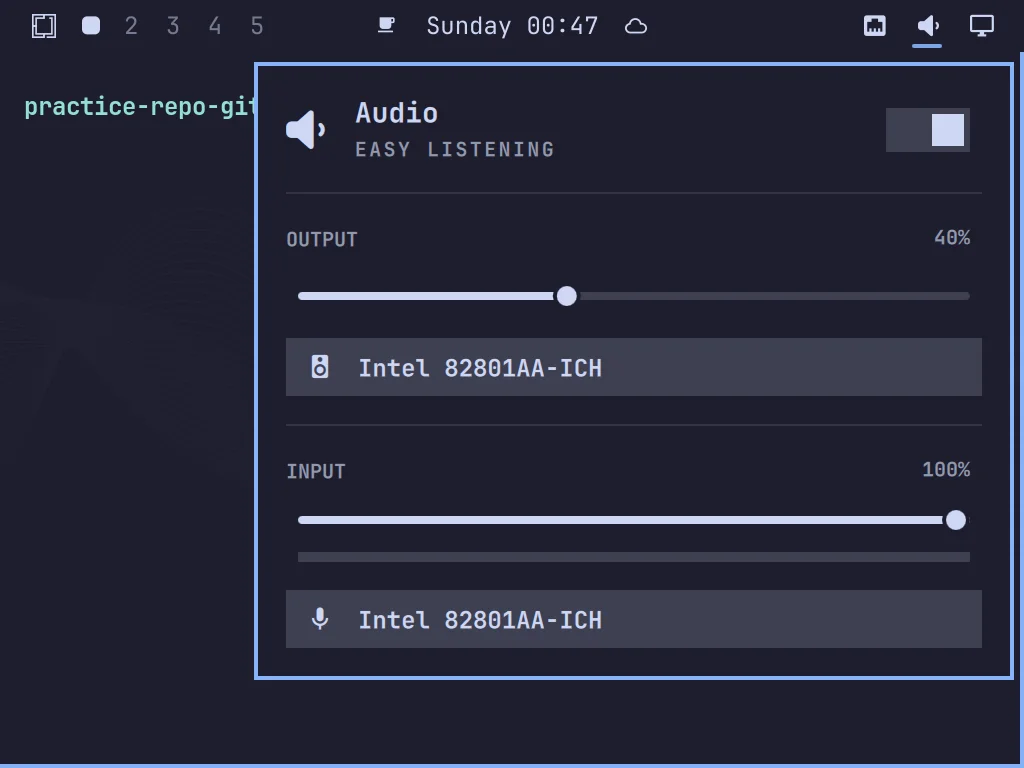
This means you can control both:
global audioand:
individual application streamsfrom one panel.
15.6 — Master Volume
The master volume changes the current output level.
You may also use hardware media keys.
Current official hotkeys document:
Alt + Volume Up/Downfor precise 1% volume changes.
Normal hardware volume keys can perform the usual larger-step adjustments.
15.7 — Mute
The current top-bar audio widget supports right-click mute.
Hardware mute keys can also work where present.
The important distinction is:
output mute
vs
microphone mute
Do not confuse the two.
15.8 — Microphone / Input
Current Omarchy shell includes microphone/input controls.
If the microphone widget is enabled on the bar, current official docs state that it supports:
left click
→ mute microphone

middle click
→ audio panel

scroll
→ input volume
Even when the microphone widget is not visible, input control is available through the audio subsystem/CLI.
15.9 — Output Device Selection
The most common audio problem on a multi-device workstation is:
sound is playing
but from the wrong device
Examples:
- HDMI monitor;
- USB headset;
- Bluetooth headphones;
- built-in speakers;
- external speakers.
Current official troubleshooting guidance says the first thing to check is whether the correct output is selected in the audio panel.
Do that before assuming the audio stack is broken.
15.10 — Per-Application Mixing
Current Omarchy’s audio panel includes a per-app mixer.
This lets you do things like:
Browser
→ 20%

Music player
→ 60%

Game/dev tool
→ 40%
without changing master volume.
This is especially useful during development when:
- a browser tab is noisy;
- a meeting app needs to stay audible;
- a local dev app produces media.
15.11 — Switching Output While Audio Is Playing
Current Quattro audio behavior is designed to preserve active playback when switching outputs.
This matters when moving between:
speakers
→ headset
→ monitor
The shell/CLI handles stream movement rather than forcing you to restart applications manually.
15.12 — Audio CLI
Current Omarchy CLI exposes an:
omarchy audiogroup.
Inspect:
omarchy audio --helpThis is the correct first discovery method because exact subcommands can evolve.
Current workstation behavior has included controls for:
- output;
- input;
- mute;
- source switching;
- output switching;
- tuning.
15.13 — Inspect Current Audio State
Start with:
omarchy audio --helpThen inspect relevant current subcommands.
Do not memorize old syntax if the installed help has changed.
The course rule remains:
Use current CLI discovery before guessing subcommands.
15.14 — Precise Volume Control
Current official Omarchy hotkeys include:
Alt + Volume Up
Alt + Volume Down
for 1% volume increments.
This is useful when:
normal volume steps feel too coarse15.15 — Switch to the Next Audio Output
Current official hotkeys include:
Shift + Muteto switch to the next audio output.
This is very convenient when you frequently alternate between:
headphones
speakers
monitor
15.16 — Audio Restart Before Reboot
Current official Omarchy troubleshooting guidance explicitly recommends restarting the affected subsystem before rebooting.
If sound suddenly stops:
do not reboot firstUse the Omarchy hardware restart workflow.
Current Omarchy restart commands include an audio restart helper.
Inspect:
omarchy restart --helpor:
omarchy restart audioif supported on your installed version.
15.17 — Why Component Restart Is Better
A full reboot disrupts:
- Tmux sessions;
- development servers;
- applications;
- browser state;
- running jobs.
If the problem is only the audio subsystem, restarting only audio is much cheaper.
Use escalation:
select correct output
↓
restart audio
↓
inspect deeper
↓
reboot only if needed
15.18 — Laptop Speaker Tuning
Current official troubleshooting documentation states that some laptops can receive Omarchy speaker tuning.
Inspect current state with:
omarchy audio tuning statusTurn tuning off if you intentionally want raw output:
omarchy audio tuning offThis is laptop-specific.
Desktop systems may not use tuning at all.
15.19 — Do Not “Fix” Tuning That Is Working
If laptop speakers sound correct:
leave tuning aloneDo not disable it simply because you discovered the command.
This course repeatedly follows the rule:
Do not change healthy settings for the sake of customization.
15.20 — Bluetooth Panel
Open:
Super + Ctrl + BCurrent official Omarchy top-bar documentation says the Bluetooth panel can show:
- known devices;
- connection state;
- battery levels where available;
- connect/disconnect controls.
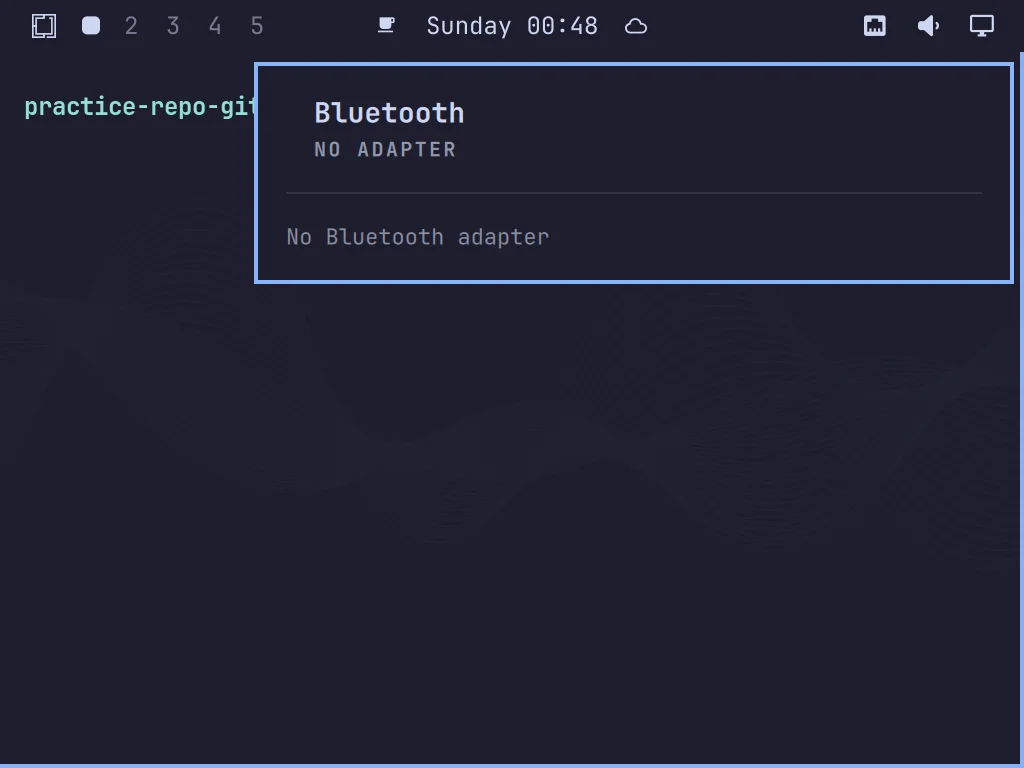
This makes normal Bluetooth management a shell-level task.
15.21 — Pairing a Device
Typical workflow:
1. put device into pairing mode
2. open Bluetooth panel
3. select device
4. pair
5. connect
The exact UI labels may vary slightly across current releases.
Use the panel first.
15.22 — Connect and Disconnect
For a previously paired device:
open Bluetooth panel
→ select device
→ connect/disconnect
This is faster than re-pairing.
If a device refuses to reconnect, try:
disconnect
→ reconnect
before forgetting it.
15.23 — Forget a Device
Forget/removal is appropriate when:
- pairing state is corrupted;
- device changed identity/firmware;
- you intentionally want to remove trust.
Do not forget a device every time it fails to connect once.
That creates extra pairing work unnecessarily.
15.24 — Bluetooth Radio Toggle
Current official top-bar behavior allows Bluetooth radio toggle from the Bluetooth widget.
Use this when you want:
Bluetooth fully offrather than merely disconnecting one device.
15.25 — Bluetooth CLI
Current Omarchy CLI exposes:
omarchy bluetoothInspect:
omarchy bluetooth --helpCurrent workstation behavior has included controls for:
- power;
- pairing;
- connect;
- disconnect;
- forget.
Exact subcommands should be taken from the installed help.
15.26 — Bluetooth Power State
Current Omarchy Bluetooth commands support power control.
Typical capabilities include:
on
off
toggle
status/is-on
Inspect:
omarchy bluetooth --helpfor the current spelling.
15.27 — Bluetooth State Persists Across Reboots
Current Omarchy behavior remembers Bluetooth power state across reboots.
That means if you intentionally turn Bluetooth off, do not be surprised when it remains off after restarting.
Always check power state before debugging pairing.
15.28 — Restart Bluetooth Before Reboot
Current official troubleshooting guidance says Bluetooth is one of the subsystems that should be restarted independently first.
If a headset worked earlier and suddenly will not reconnect:
1. verify Bluetooth is on
2. disconnect/reconnect device
3. restart Bluetooth subsystem
4. retry
5. reboot only later if necessary
15.29 — Network Panel
Open:
Super + Ctrl + WCurrent official Omarchy top-bar documentation states that the network panel can:
- scan Wi-Fi networks;
- show signal strength;
- connect to networks;
- select DNS providers.
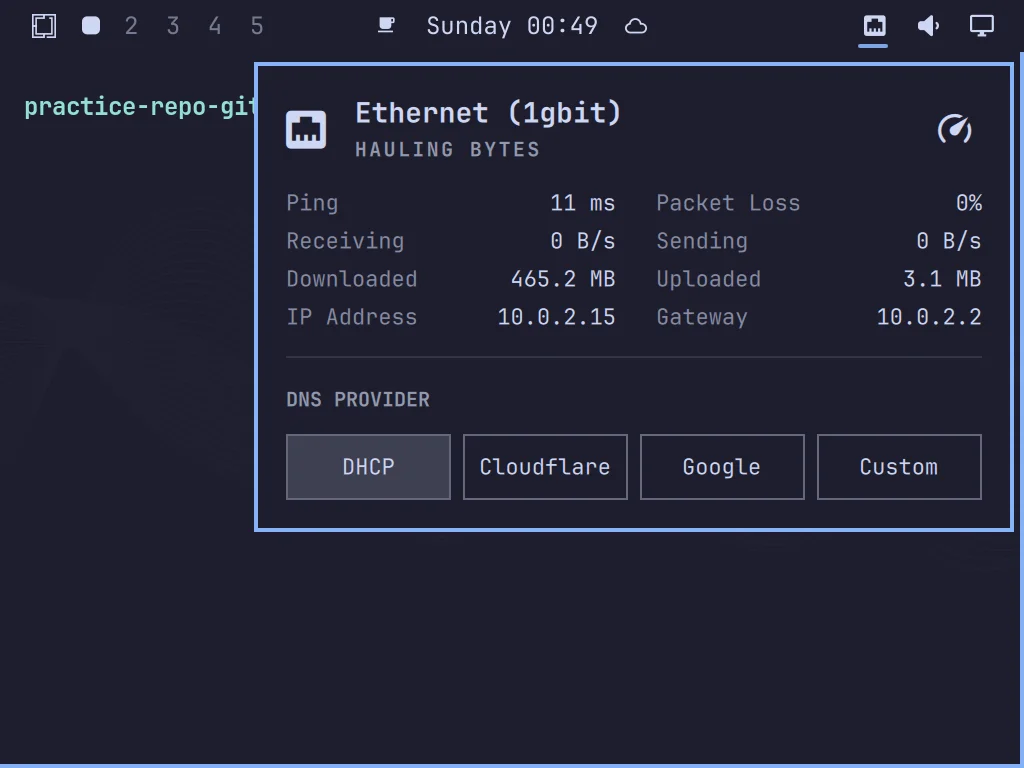
Current Quattro also includes additional network functionality such as:
- live up/down statistics;
- ping;
- speed testing;
- Wi-Fi QR sharing;
- Wi-Fi band selection.
15.30 — Connect to Wi-Fi
Normal workflow:
open Network panel
→ choose network
→ enter password
→ connect
Current Omarchy 4 uses NetworkManager for Wi-Fi management.
This replaced older Omarchy generations that used a different stack.
That is a good example of why current-version documentation matters.
15.31 — Do Not Follow Old Omarchy Wi-Fi Tutorials Blindly
Older tutorials may mention tools that current Quattro no longer uses as the primary Wi-Fi interface.
Current Omarchy has moved network management into the Shell and NetworkManager-backed controls.
Therefore:
Use the current Network panel and current
omarchy networkCLI before following legacy instructions.
15.32 — Network CLI
Current Omarchy exposes:
omarchy networkInspect:
omarchy network --helpCurrent workstation behavior includes capabilities such as:
- status;
- speed tests;
- band selection;
- Wi-Fi QR sharing;
- password display.
Use the installed help as the authoritative command map.
15.33 — Network Status
A useful current command is:
omarchy network status --verboseThis is useful for inspecting:
- connectivity;
- interface state;
- current network;
- other relevant connection details.
This has been tested on the workstation used in this course.
15.34 — Network Status as a Troubleshooting Baseline
When something says:
"Internet doesn't work"first distinguish:
Wi-Fi not connected
vs
connected but no internet
vs
DNS issue
vs
remote service issue
Start with:
omarchy network status --verboseThen test deeper only as needed.
15.35 — Signal Strength
The current network panel shows signal information.
Poor Wi-Fi performance may simply be:
weak signalnot a Linux configuration problem.
Before changing DNS, kernel settings, or drivers:
check signal15.36 — Wi-Fi Band Selection
Current Quattro includes Wi-Fi band controls.
Current workstation behavior has included modes such as:
auto
2.4 GHz
5 GHz
6 GHz
depending on adapter/router support.
Inspect:
omarchy network --helpand the Network panel for current options.
15.37 — When Band Selection Helps
Possible reasons:
2.4 GHz
→ longer range, lower throughput, more interference

5 GHz
→ shorter range, higher throughput

6 GHz
→ newer hardware, cleaner spectrum, shorter range
These are general wireless characteristics.
Your router and client hardware determine what is actually available.
For most users:
Autois the correct default.
15.38 — Wi-Fi QR Sharing
Current Omarchy includes Wi-Fi QR sharing from the network panel/CLI.
This is useful when you want to connect a phone or another device without manually typing the network password.
Use the current panel or:
omarchy network --helpto discover the exact QR subcommand on your installed version.
15.39 — Wi-Fi Password Display
Current Omarchy network commands can expose the current Wi-Fi password where available.
Treat that as sensitive information.
Do not:
- paste it into public screenshots;
- expose it during recordings;
- include it in course assets.
When filming the course, blur/redact credentials.
15.40 — DNS Provider Selection
Current official top-bar documentation says the Network panel lets you choose a DNS provider.
DNS affects:
name resolutionnot raw Wi-Fi signal strength.
If:
Wi-Fi signal is poorchanging DNS will not fix the radio link.
Use DNS settings for DNS-related reasons.
15.41 — Speed Test
Current Omarchy includes network speed-test capability.
Current workstation behavior has included separate:
download
upload
tests.
Inspect the current syntax:
omarchy network --helpUse this to distinguish:
network connectedfrom:
network performing well15.42 — Ping
Current Quattro network panel includes ping information.
Ping helps evaluate:
- reachability;
- basic latency;
- packet-path responsiveness.
Do not treat one ping result as a complete network diagnosis.
Use it as one signal.
15.43 — Restart Wi-Fi Before Reboot
Current official troubleshooting guidance includes Wi-Fi among the subsystems that should be restarted independently first.
Escalation:
check connected network
↓
check signal
↓
restart Wi-Fi/network subsystem
↓
reconnect
↓
inspect deeper
↓
reboot only if needed
15.44 — Display Panel
Open:
Super + Ctrl + DThe display panel handles normal display controls.
Current top-bar documentation also states:
scroll on Display widget
→ brightness
This is distinct from persistent monitor mode configuration in:
~/.config/hypr/monitors.lua15.45 — Brightness vs Monitor Configuration
These are different.
Brightness
how much light the panel emitsMonitor Configuration
resolution
refresh rate
scale
position
Do not edit:
monitors.luato solve a brightness issue.
15.46 — Hardware Brightness Keys
Current official hotkeys include:
Shift + Brightness Up
→ maximum brightness

Shift + Brightness Down
→ minimum brightness

Alt + Brightness Up/Down
→ precise 1% changes
Normal hardware brightness keys can use regular step sizes.
15.47 — Keyboard Backlight
Current official hotkeys also include keyboard-backlight controls when hardware supports them:
Keyboard Brightness Up/Down
Keyboard Backlight
Hardware availability varies.
A desktop keyboard may manage lighting through its own firmware instead.
15.48 — Brightness CLI
Current Omarchy exposes:
omarchy brightnessInspect:
omarchy brightness --helpCurrent workstation behavior includes display brightness functionality including DDC for compatible external displays.
15.49 — External Monitor DDC Brightness
Some external monitors support:
DDC/CIwhich allows software brightness control over the display connection.
Current Omarchy includes DDC-related brightness commands.
Inspect:
omarchy brightness display --helpor the current command tree.
Support depends on:
- monitor;
- cable;
- GPU;
- DDC settings.
Do not assume every external display supports software brightness control.
15.50 — Text Size
Current workstation behavior exposes:
omarchy display text sizefor text-size adjustment.
Inspect:
omarchy display text size --helpThis is different from:
monitor scaleand:
resolution15.51 — Display Settings Hierarchy
Use this decision tree:
Image too dark?
→ brightness

Everything physically too small?
→ monitor scale

Text specifically too small?
→ text size/font settings

Image blurry/wrong geometry?
→ resolution

Motion not smooth enough?
→ refresh rate

Windows on wrong screen?
→ monitor positioning/workspace rules
This prevents changing the wrong layer.
15.52 — Persistent Monitor Configuration
For:
resolution
refresh rate
scale
position
use:
~/.config/hypr/monitors.luaand the Module 11 workflow.
Inspect reality:
hyprctl monitors allbefore changing anything.
15.53 — Verify Refresh Rate
A monitor can display an image correctly while still running at the wrong refresh rate.
Example:
144 Hz monitor
running at 60 Hz
The desktop works.
But it is not configured optimally.
Run:
hyprctl monitors alland confirm the active mode.
This was a real issue during the workstation setup used for this course.
15.54 — Display Panel vs monitors.lua
Use:
Display panelfor routine interactive controls.
Use:
monitors.luafor persistent hardware layout configuration.
Examples:
brightness now
→ panel

make DP-2 always 2560x1440@144
→ monitors.lua
15.55 — Laptop Display Toggle
Current official hotkeys include:
Super + Ctrl + Deletefor toggling the laptop display on/off.
Current Quattro also includes mirroring behavior:
Super + Ctrl + Alt + Deletefor toggling laptop display mirroring.
These are laptop-specific.
Desktop users can ignore them.
15.56 — Power Panel
Although this module focuses on audio/Bluetooth/network/display, the Power panel belongs in the same hardware-control family.
Open:
Super + Ctrl + PCurrent official documentation says it provides:
- battery stats;
- power-profile switching;
- separate remembered AC/battery choices;
- system information.
Power profiles can affect performance and battery life.
15.57 — Power Profiles on Laptops
Typical profile categories can include:
power saver
balanced
performance
depending on hardware/support.
Use:
balancedas the safe general default unless your workload or battery goals justify another profile.
15.58 — Hardware Troubleshooting Principle
Current official Omarchy troubleshooting guidance explicitly says:
Before rebooting, restart only the offending subsystem.
This applies to:
Wi-Fi
Bluetooth
Audio
Trackpad
This should become your default mental model.
15.59 — The Hardware Recovery Ladder
Use:
1. verify current state
2. correct obvious selection/config
3. restart only affected subsystem
4. retry
5. inspect logs/services
6. reboot if needed
This is far better than:
problem
→ reboot
as the first response.
15.60 — Why Rebooting First Is Bad Troubleshooting
If you reboot immediately:
problem disappearsbut you learned nothing.
You do not know whether the issue was:
- Bluetooth daemon;
- PipeWire/WirePlumber;
- NetworkManager;
- device state;
- application stream;
- compositor state.
A targeted restart teaches you which layer failed.
15.61 — Audio Troubleshooting Flow
If audio is missing:
1. check master mute
2. check correct output
3. check per-app stream volume
4. switch output away/back
5. restart audio subsystem
6. inspect deeper
For laptop speakers specifically:
check tuning stateif sound quality is the issue rather than total silence.
15.62 — Bluetooth Troubleshooting Flow
If a device will not connect:
1. confirm Bluetooth radio is on
2. verify device is paired
3. disconnect/reconnect
4. restart Bluetooth
5. forget/re-pair if necessary
6. inspect deeper
Do not start with re-pairing unless needed.
15.63 — Wi-Fi Troubleshooting Flow
If networking fails:
1. open network panel
2. check current SSID
3. check signal strength
4. run network status
5. reconnect
6. restart Wi-Fi/network
7. test connectivity
8. inspect deeper
Changing DNS should only happen when the symptoms support a DNS issue.
15.64 — Display Troubleshooting Flow
If display behavior looks wrong:
1. hyprctl monitors all
2. identify actual output
3. check mode/resolution/refresh
4. check scale
5. check monitors.lua
6. hyprctl configerrors
7. change one thing
8. verify again
Do not combine display configuration with unrelated theme/text-size changes.
15.65 — Trackpad Troubleshooting
Current official Omarchy troubleshooting also includes trackpad restart among common hardware restart actions.
Laptop users should remember:
trackpad stopped after suspenddoes not necessarily mean:
reboot requiredTry the current Omarchy trackpad restart helper first.
15.66 — Practical Exercise: Audio Panel
Open:
Super + Ctrl + AIdentify:
- current output;
- master volume;
- application streams.
If you have two outputs, switch between them.
Return to your preferred output.
15.67 — Practical Exercise: Audio Shortcut
Test:
Alt + Volume Up
Alt + Volume Down
Observe 1% changes.
If your hardware supports multiple outputs, test:
Shift + Muteand observe output switching.
15.68 — Practical Exercise: Audio CLI Discovery
Run:
omarchy audio --helpWrite down the current subcommands on your installed version.
If your machine exposes tuning:
omarchy audio tuning statusDo not change tuning unless you actually want to.
15.69 — Practical Exercise: Bluetooth Panel
Open:
Super + Ctrl + BIdentify:
- Bluetooth power state;
- paired devices;
- currently connected device;
- battery percentage if available.
If you have a device, disconnect/reconnect it.
15.70 — Practical Exercise: Bluetooth CLI Discovery
Run:
omarchy bluetooth --helpIdentify the current commands for:
- power;
- connect;
- disconnect;
- pair;
- forget.
Do not forget a useful device just to complete the exercise.
15.71 — Practical Exercise: Network Panel
Open:
Super + Ctrl + WIdentify:
- current network;
- signal strength;
- DNS selection;
- any live network statistics;
- band control if available.
Do not disconnect if you are in the middle of important online work.
15.72 — Practical Exercise: Network Status
Run:
omarchy network status --verboseRecord:
connection state
active network
interface information
Then compare the CLI result with the panel.
15.73 — Practical Exercise: Speed Test
Inspect:
omarchy network --helpRun the current documented speed-test command.
Record:
download
upload
Do not treat one result as a permanent measurement.
Wireless speed fluctuates.
15.74 — Practical Exercise: Wi-Fi QR
If your current network CLI/panel supports it:
generate the Wi-Fi QR codeDo not publish a screenshot containing real credentials.
This exercise is optional.
15.75 — Practical Exercise: Display Panel
Open:
Super + Ctrl + DAdjust brightness slightly.
Return to your preferred level.
Observe that this did not change:
- resolution;
- refresh rate;
- scale.
15.76 — Practical Exercise: Verify Monitor Mode
Run:
hyprctl monitors allRecord:
output
resolution
refresh
scale
position
Compare with:
bat ~/.config/hypr/monitors.luaConfirm that persistent config and active reality make sense together.
15.77 — Practical Exercise: Text Size Discovery
Run:
omarchy display --helpThen:
omarchy display text size --helpDo not change it if your current text size is already correct.
The goal is knowing where the control lives.
15.78 — Practical Exercise: Restart One Subsystem
If one subsystem currently has a harmless issue, use that.
Otherwise simply inspect:
omarchy restart --helpIdentify current helpers for:
- audio;
- Bluetooth;
- Wi-Fi;
- trackpad.
Do not restart hardware randomly in the middle of important work.
15.79 — Common Hardware-Control Mistakes
Mistake 1 — Rebooting First
Restart the affected subsystem first.
Mistake 2 — Assuming Audio Is Broken When the Wrong Output Is Selected
Check the audio panel.
Mistake 3 — Re-Pairing Bluetooth for Every Reconnect Failure
Try reconnect and subsystem restart first.
Mistake 4 — Changing DNS Because Wi-Fi Signal Is Weak
DNS does not improve radio strength.
Mistake 5 — Following Old Omarchy Networking Tutorials
Current Quattro uses the current shell/network stack and NetworkManager-backed controls.
Mistake 6 — Changing Monitor Scale to Fix Only Text Size
Use the correct display layer.
Mistake 7 — Assuming 144 Hz Is Active Because the Monitor Supports 144 Hz
Verify:
hyprctl monitors allMistake 8 — Assuming External Monitor Brightness Is Software-Controlled
DDC support varies by hardware.
Mistake 9 — Publishing Wi-Fi Password/QR Screenshots
Treat network credentials as secrets.
Mistake 10 — Treating Every Hardware Issue as a Kernel/driver problem
Start with current state, device selection, and subsystem restart.
15.80 — Checkpoint
Before moving on, you should be able to answer yes to the following.
Audio
- I can open the audio panel.
- I can select the correct output.
- I understand per-app volume.
- I can distinguish microphone input from output audio.
- I know how to discover current audio CLI commands.
- I know to restart audio before rebooting.
- I know laptop speaker tuning may exist.
Bluetooth
- I can open the Bluetooth panel.
- I understand pair/connect/disconnect/forget.
- I can verify Bluetooth power state.
- I know to restart Bluetooth before rebooting.
- I know Bluetooth power state can persist across reboots.
Network
- I can open the Network panel.
- I can check signal strength.
- I can connect to Wi-Fi.
- I can run
omarchy network status --verbose. - I understand DNS vs Wi-Fi signal.
- I understand Wi-Fi band selection at a high level.
- I know about QR sharing and speed testing.
- I know to restart networking before rebooting.
Display
- I can open the Display panel.
- I understand brightness vs monitor configuration.
- I understand text size vs monitor scale.
- I can verify active monitor mode with
hyprctl monitors all. - I know where persistent monitor config lives.
- I understand DDC brightness may depend on hardware.
Troubleshooting
- I follow the subsystem-first restart model.
- I verify current state before changing configuration.
- I know when a full reboot is actually the later escalation step.
15.81 — What You Can Now Do
After completing Module 15, you can now:
- operate audio confidently;
- switch outputs without restarting applications;
- control per-app audio;
- manage microphones;
- pair and reconnect Bluetooth devices;
- troubleshoot Bluetooth without immediately re-pairing;
- connect and inspect Wi-Fi;
- use signal, DNS, band, speed, and QR features intelligently;
- control brightness;
- distinguish brightness, text size, scale, refresh rate, and resolution;
- verify display hardware state;
- restart individual hardware subsystems before rebooting;
- approach hardware troubleshooting methodically.
Most importantly:
You can now treat hardware control as part of the Omarchy workflow instead of a collection of unrelated Linux utilities.
Module 15 Summary
Current panel shortcuts:
Super + Ctrl + A
→ Audio

Super + Ctrl + W
→ Network

Super + Ctrl + B
→ Bluetooth

Super + Ctrl + D
→ Display

Super + Ctrl + P
→ Power
Audio:
select output
per-app mixer
microphone/input
precise volume
output switching
subsystem restart
Bluetooth:
power
pair
connect
disconnect
forget
restart
Network:
Wi-Fi scan/connect
signal strength
DNS
band selection
QR sharing
speed test
status
restart
Display:
brightness
text size
persistent monitor mode
refresh rate
scale
position
Core verification:
omarchy audio --helpomarchy bluetooth --helpomarchy network --helpomarchy display --helpomarchy brightness --helphyprctl monitors allHardware recovery ladder:
verify
↓
correct obvious selection
↓
restart affected subsystem
↓
retry
↓
inspect deeper
↓
reboot
And the most important rule:
If one subsystem breaks, restart one subsystem — not the whole workstation.