Module 24: Understand the Full Stack You Built
In this module — 78 sections
- What You Will Learn
- 24.1 — The Complete Workstation
- 24.2 — Layer 1: Hardware
- 24.3 — Firmware
- 24.4 — Layer 2: Boot
- 24.5 — Limine
- 24.6 — Unified Kernel Image
- 24.7 — Linux Kernel
- 24.8 — systemd
- 24.9 — Linux Filesystem Model
- 24.10 — Package-Owned vs User-Owned Files
- 24.11 — Layer 3: Wayland
- 24.12 — Hyprland
- 24.13 — Hyprland Is Not Omarchy
- 24.14 — Omarchy’s Hyprland Layering
- 24.15 — Omarchy Shell
- 24.16 — Plugins
- 24.17 — Runtime Toggles
- 24.18 — Layer 4: Terminal
- 24.19 — XDG Terminal Integration
- 24.20 — Bash
- 24.21 — Shell Tools
- 24.22 — Tmux
- 24.23 — Tmux State Is Independent
- 24.24 — Editor
- 24.25 — Layer 5: Development Environment
- 24.26 — Mise
- 24.27 — Global vs Project Runtime
- 24.28 — Why This Matters for AI
- 24.29 — Git
- 24.30 — GitHub
- 24.31 — Branches and Worktrees
- 24.32 — Layer 6: AI Coding Agent
- 24.33 — Agent Neutrality
- 24.34 — AGENTS.md
- 24.35 — AI Session vs Project Knowledge
- 24.36 — The AI-Native Development Loop
- 24.37 — Full Input Path Example
- 24.38 — Full Browser Launch Path
- 24.39 — Full Monitor Configuration Path
- 24.40 — Full Audio Path
- 24.41 — Full Network Path
- 24.42 — Full Update Path
- 24.43 — Full Recovery Path
- 24.44 — Configuration Ownership Map
- 24.45 — State Ownership Map
- 24.46 — Tool Selection Map
- 24.47 — Why the Taxonomy Matters
- 24.48 — The “One Owner” Rule
- 24.49 — When Two Layers Intentionally Interact
- 24.50 — Security Boundaries in the Stack
- 24.51 — Reproducibility Boundaries
- 24.52 — Observability Boundaries
- 24.53 — “Current Reality” Beats Memory
- 24.54 — The Best Question When Something Changes
- 24.55 — The Best Question Before Customizing
- 24.56 — The Best Question Before Installing
- 24.57 — The Best Question Before Recovery
- 24.58 — The Best Question Before Giving AI Permissions
- 24.59 — Practical Exercise: Draw Your Own Stack
- 24.60 — Practical Exercise: Map Five Behaviors
- 24.61 — Practical Exercise: Map Your Configuration
- 24.62 — Practical Exercise: Map Your Development Loop
- 24.63 — Practical Exercise: Map Your Recovery Stack
- 24.64 — Practical Exercise: Explain the Workstation to Someone Else
- 24.65 — Practical Exercise: Verify Current Reality
- 24.66 — Practical Exercise: Identify One Unnecessary Complexity
- 24.67 — Avoid Configuration Archaeology
- 24.68 — Your Workstation Is Software
- 24.69 — Your Workstation Is Also Infrastructure
- 24.70 — Your Workstation Is Not the Project
- 24.71 — The Ultimate Architecture Principle
- 24.72 — The Ultimate Troubleshooting Principle
- 24.73 — The Ultimate AI Principle
- 24.74 — The Ultimate Omarchy Principle
- 24.75 — Checkpoint
- 24.76 — What You Can Now Do
- Module 24 Summary
About This Module
You have reached the final core module.
By now, you can:
- install Omarchy;
- navigate Hyprland;
- use the terminal;
- work in Tmux;
- manage runtimes with mise;
- use Git and GitHub;
- integrate coding agents;
- customize Hyprland;
- build keybindings;
- manage themes;
- automate with hooks/plugins;
- control hardware;
- manage defaults;
- update and recover the system;
- understand the boot chain;
- harden the workstation;
- reproduce your setup;
- troubleshoot it methodically.
This module answers one final question:
What did we actually build?
A power user should not see the workstation as a bag of commands.
You should see a stack.
Each layer has:
- a responsibility;
- an owner;
- an interface;
- a recovery strategy.
Once you understand that stack, unfamiliar problems become easier because you can place them somewhere.
The complete system is roughly:
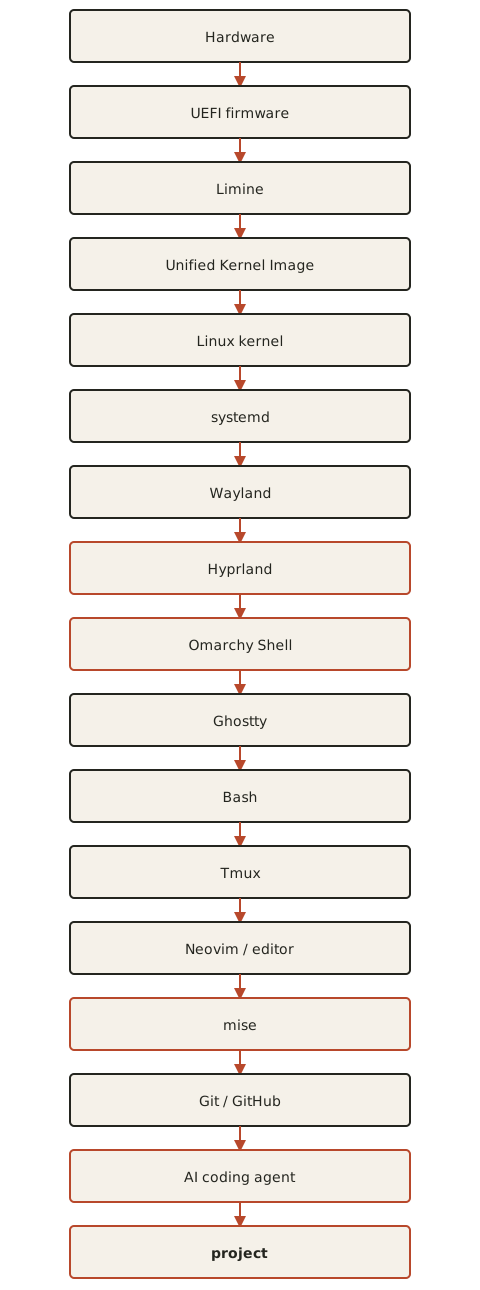
Not every interaction follows this exact vertical path, but it is the right mental model.
The goal of this module is:
Turn everything you learned into one coherent architecture you can reason about, rebuild, debug, and extend.
What You Will Learn
By the end of Module 24, you will be able to:
- explain the full Omarchy workstation stack;
- identify which layer owns a behavior;
- distinguish Linux, Hyprland, and Omarchy responsibilities;
- understand how the boot stack becomes the desktop stack;
- understand how the desktop becomes the development stack;
- understand how configuration flows through the system;
- understand how defaults and XDG connect applications;
- understand how Git, mise, Tmux, and AI agents work together;
- understand how recovery differs by layer;
- explain the workstation architecture to another developer;
- make future changes without losing the architectural model.
24.1 — The Complete Workstation
The system you built can be grouped into six major layers:
1. Hardware + firmware
2. Operating system + boot
3. Graphical desktop
4. Shell + terminal environment
5. Development environment
6. Project + AI workflow
Each has its own job.
24.2 — Layer 1: Hardware
Examples:
CPU
GPU
RAM
NVMe/SSD
monitor
keyboard
mouse
Wi-Fi
Bluetooth
audio hardware
TPM
The hardware determines what the operating system can work with.
Examples:
144 Hz monitor
→ compositor must request 144 Hz

compact keyboard
→ firmware may hide keys behind Fn layer

hybrid-GPU laptop
→ runtime GPU controls may exist

TPM 2.0
→ hardware-backed security capabilities
Software cannot make unsupported hardware capabilities appear.
24.3 — Firmware
The firmware is normally:
UEFIIt initializes hardware and chooses what EFI program to boot.
Useful responsibilities:
boot order
Secure Boot
TPM configuration
virtualization settings
hardware initialization
firmware boot menu
The firmware exists before Linux.
That distinction matters.
24.4 — Layer 2: Boot
The current Omarchy architecture uses a modern UEFI boot path.
Conceptually:
UEFI
↓
Limine
↓
Omarchy UKI
↓
Linux kernel
On the course workstation, this was verified as:
Limine
Omarchy.linux
/boot/EFI/Linux/omarchy_linux.efi
The key lesson was not the exact filename.
The lesson was:
Verify the actual boot chain.
24.5 — Limine
Limine is more than a simple launcher.
In the current Omarchy recovery model, it also exposes:
bootable system snapshotsThat means the bootloader is part of the recovery architecture.
Conceptually:
normal boot
or
previous system snapshot
can be selected before the Linux system fully starts.
24.6 — Unified Kernel Image
The UKI bundles important boot components into one EFI image.
Conceptually:
EFI stub
kernel
initramfs
kernel command line
metadata
become:
one bootable .efi imageThis is a clean modern boot model and integrates naturally with boot signing.
24.7 — Linux Kernel
Once control passes to the kernel, Linux manages:
- CPU scheduling;
- memory;
- devices;
- filesystems;
- networking;
- process isolation;
- drivers.
Check the running kernel:
uname -rThe kernel does not know what:
Super + Spacemeans.
That behavior lives much higher in the stack.
24.8 — systemd
After early boot, systemd manages services and session infrastructure.
Examples:
NetworkManager
Bluetooth
PipeWire-related services
login/session services
user services
Troubleshooting tools:
systemctl
systemctl --user
journalctl
If a service is dead:
Hyprland config is usually not the first place to look.24.9 — Linux Filesystem Model
The important high-level split:
/
→ system/root filesystem

/home
→ personal data/config
This matters strongly for recovery.
Current Omarchy snapshots restore:
rootbut not:
/homeThat is why:
snapshot
≠
dotfiles backup
24.10 — Package-Owned vs User-Owned Files
Current Omarchy follows an important configuration boundary:
/usr/share/omarchy
→ Omarchy-owned

~/.config
→ user-owned
This one distinction explains a huge part of the workstation architecture.
You normally:
read /usr/share/omarchy
override in ~/.config
You do not maintain a private fork of Omarchy by editing package-owned defaults.
24.11 — Layer 3: Wayland
Wayland is the graphical display protocol architecture used by the current desktop stack.
At a high level:
applications
↔
compositor
rather than applications talking to a traditional X server.
You do not need to become a Wayland developer.
You do need to know:
wevis useful because input events are happening in a Wayland environment.
24.12 — Hyprland
Hyprland is the compositor/window manager.
It owns behavior such as:
- workspaces;
- window focus;
- tiling;
- floating;
- monitors;
- input;
- window rules;
- keybindings.
Your personal config lives under:
~/.config/hyprExamples:
monitors.lua
input.lua
bindings.lua
looknfeel.lua
autostart.lua
24.13 — Hyprland Is Not Omarchy
This distinction is essential.
Hyprland provides the underlying compositor.
Omarchy provides:
- curated defaults;
- helper APIs;
- menu integration;
- shell UI;
- installation flows;
- restart/refresh commands;
- development setup;
- update/recovery behavior.
Conceptually:
Hyprland
→ engine

Omarchy
→ integrated workstation system around it
24.14 — Omarchy’s Hyprland Layering
Current Quattro config follows the general pattern:
bootstrap
↓
Omarchy defaults
↓
your monitor config
↓
your input config
↓
your bindings
↓
your look/feel
↓
your autostart
↓
dynamic toggles
This is why small personal overrides can survive alongside evolving upstream defaults.
24.15 — Omarchy Shell
The Omarchy Shell is the interactive desktop shell layer.
It provides things such as:
- top bar;
- system panels;
- menu;
- notifications;
- overlays;
- clipboard UI;
- plugins.
Current architecture runs it as a long-lived Quickshell process.
This is distinct from Hyprland.
If:
bar is brokenbut windows/workspaces still work:
Hyprland may be fine.
Omarchy Shell may be the broken layer.
24.16 — Plugins
Shell plugins extend this layer.
Current plugin types include concepts such as:
bar widget
panel
overlay
menu
service
bar
Third-party plugins execute code.
Therefore:
shell customizationis also a security boundary.
24.17 — Runtime Toggles
Current Omarchy exposes temporary state through:
omarchy toggleExamples:
idle
night light
bar
notifications
suspend
touchpad
These are not the same as persistent config.
The architecture separates:
desired normal configurationfrom:
temporary current state24.18 — Layer 4: Terminal
The terminal emulator provides the graphical terminal window.
On the course workstation:
Ghosttyis selected.
A fresh Omarchy install may use a different current default.
The important abstraction is:
default terminalnot:
hard-code Ghostty everywhere24.19 — XDG Terminal Integration
Current Omarchy terminal defaults integrate with:
xdg-terminal-execThis lets generic terminal launchers ask:
"What terminal does this user prefer?"rather than embedding an application name.
This is clean system design.
24.20 — Bash
Inside the terminal, Bash provides the shell.
Bash owns:
- shell command parsing;
- variables;
- aliases;
- functions;
- pipelines;
- redirection;
- environment.
Personal shell configuration belongs in:
~/.bashrcThe shell is not the terminal.
A useful distinction:
Ghostty
→ terminal emulator

Bash
→ command shell
24.21 — Shell Tools
Omarchy ships enhanced terminal tools such as current documented:
fzf
zoxide
eza
bat
rg
fd
These improve navigation and search.
Examples:
rg "pattern"fd fileCtrl + R
→ fuzzy shell history via fzfThese tools improve speed without changing the architecture.
24.22 — Tmux
Tmux sits inside the terminal/shell workflow and provides persistence.
It owns:
- sessions;
- windows;
- panes;
- detached processes;
- development layouts.
Conceptually:
terminal window can disappear
↓
Tmux session continues
This is why Tmux is ideal for:
- long-running development;
- SSH;
- multi-pane work;
- AI-agent layouts.
24.23 — Tmux State Is Independent
An important course lesson:
new terminal current directorydoes not automatically alter:
existing Tmux pane current directoryTmux persists state.
Once you understand that architectural boundary, this behavior is obvious rather than mysterious.
24.24 — Editor
Your editor is another replaceable layer.
Current course workstation:
NeovimBut Omarchy can use other editors.
The architectural goal is:
default editorso Omarchy’s workflows do not require rewriting every launch path.
The project should not depend on one human editor.
24.25 — Layer 5: Development Environment
Now we move from workstation mechanics into software-development mechanics.
Core tools:
mise
Git
GitHub CLI
editor
Tmux
coding agent
Each owns a different responsibility.
24.26 — Mise
Mise manages development tools and runtime versions.
It answers:
Which Node version?
Which Python version?
Which Bun version?
Which CLI tool version?
The key architectural separation:
system packages
≠
developer runtimes
This avoids polluting system-level package management with every project runtime.
24.27 — Global vs Project Runtime
Example:
global Node
→ workstation convenience

project Node
→ project requirement
The project should declare what it needs.
Current course convention:
mise.tomlProject configuration wins when inside that project environment.
24.28 — Why This Matters for AI
If an AI agent runs:
npm testit should inherit the same project runtime environment as the developer.
A declared project environment reduces:
works for developer
fails for agent
and:
works on machine A
fails on machine B
24.29 — Git
Git is the change-control layer.
It owns:
- working tree;
- staging;
- commits;
- branches;
- history;
- worktrees.
Git is one of the most important safety boundaries in an AI-native workflow.
Before AI work:
git statusAfter AI work:
git diffGit tells you what actually changed.
24.30 — GitHub
GitHub is the remote collaboration/backup layer for Git repositories.
GitHub is not Git.
Conceptually:
Git
→ local version control system

GitHub
→ remote hosting/collaboration service
gh is an interface to GitHub.
git remains the repository engine.
24.31 — Branches and Worktrees
Branches provide logical history separation.
Worktrees provide:
multiple filesystem checkoutsfor separate branches at the same time.
This is especially useful for parallel AI tasks.
Conceptually:
Agent A
→ worktree A

Agent B
→ worktree B
instead of both writing into one directory.
24.32 — Layer 6: AI Coding Agent
The AI coding agent is a development assistant with local capabilities.
Depending on the selected agent and permission mode, it may:
- read;
- write;
- execute;
- search;
- use network tools;
- interact with Git;
- inspect system state.
That makes it:
a local operatornot merely a chat interface.
24.33 — Agent Neutrality
The workstation architecture should not depend on:
- one vendor;
- one model;
- one pricing plan.
The stable interface is:
project
+
terminal
+
Git
+
runtime
+
agent
Agents can change.
The project remains.
24.34 — AGENTS.md
AGENTS.md is durable project-level agent context.
It can describe:
- architecture;
- commands;
- constraints;
- test procedures;
- coding rules.
This is better than repeating important project instructions in every AI session.
It is also better than expecting an AI session history to become project documentation.
24.35 — AI Session vs Project Knowledge
An AI session is temporary.
Project documentation is durable.
Useful durable locations:
README
AGENTS.md
ADR
issue
code comments
tests
commit history
If a decision matters to future developers:
write it into the projectnot only into the agent conversation.
24.36 — The AI-Native Development Loop
The stack now supports:
project
↓
mise environment
↓
Git clean state
↓
Tmux workspace
↓
editor + agent + terminal
↓
analyze
↓
implement
↓
test
↓
git diff
↓
review
↓
commit
↓
push
This is the practical outcome of the entire course.
24.37 — Full Input Path Example
What happens when you press:
Super + Alt + Returnon the course workstation?
Conceptually:
physical keyboard
↓
keyboard firmware/Fn layer
↓
Linux input subsystem
↓
Wayland
↓
Hyprland binding
↓
Omarchy action
↓
default/specific terminal launcher
↓
terminal
↓
Tmux workflow
A problem anywhere in that chain can make the shortcut “not work.”
This is why debugging by layer is so powerful.
24.38 — Full Browser Launch Path
When an application opens a URL:
application
↓
XDG open/default logic
↓
desktop application ID
↓
selected browser
But an application can override this and hard-code its own browser behavior.
Therefore:
system default correctdoes not guarantee:
every application follows itArchitecture gives you the right place to inspect.
24.39 — Full Monitor Configuration Path
Conceptually:
monitor hardware
↓
GPU/driver
↓
kernel DRM stack
↓
Wayland compositor
↓
Hyprland monitor config
↓
Omarchy user override
If:
display physically supports 144 Hzbut Hyprland is configured at:
60 Hzthe hardware capability exists, but the compositor is not using it.
Again:
layer matters.24.40 — Full Audio Path
High level:
application
↓
audio stream
↓
PipeWire/session management
↓
selected output
↓
audio device
Omarchy’s panel wraps the common controls.
If:
wrong output selectedyou do not need to debug the kernel.
24.41 — Full Network Path
High level:
application
↓
DNS / sockets
↓
NetworkManager
↓
network interface
↓
Wi-Fi/Ethernet
↓
router
↓
internet
↓
remote service
A failed GitHub request could exist at several places in this path.
Start local, then move outward.
24.42 — Full Update Path
Current Omarchy update architecture conceptually:
omarchy update
↓
preflight
↓
snapshot
↓
package update
↓
migrations
↓
mise updates
↓
hooks
↓
restart checks
↓
current system
This is why bypassing the wrapper is architecturally significant.
It skips coordinated layers.
24.43 — Full Recovery Path
The full recovery strategy is layered:
app problem
→ restart app

shell problem
→ restart shell

hardware service
→ restart subsystem

user config
→ Git restore / targeted refresh

session problem
→ restart session

system update problem
→ boot snapshot

severe system/config corruption
→ reinstall
The correct recovery action is determined by ownership.
24.44 — Configuration Ownership Map
Use this reference.
Hyprland
→ ~/.config/hypr

Omarchy Shell
→ ~/.config/omarchy/shell.json

Bash
→ ~/.bashrc

Mise
→ ~/.config/mise
→ project mise.toml

XCompose
→ ~/.XCompose

Omarchy-owned defaults
→ /usr/share/omarchy
This is one of the most useful maps in the course.
24.45 — State Ownership Map
Not everything is configuration.
Examples:
Tmux session
→ runtime state

Git working tree
→ project state

notification silence
→ runtime toggle

Bluetooth pairing
→ hardware/service state

system snapshot
→ filesystem recovery state

browser session
→ application state
This prevents treating every state problem as a config-file problem.
24.46 — Tool Selection Map
Question:
What should I use?Answer:
system package
→ omarchy pkg

Omarchy-integrated app/setup
→ omarchy install / menu

developer runtime/CLI
→ mise

project history
→ Git

remote repo
→ GitHub

persistent terminal workspace
→ Tmux

project AI assistance
→ coding agent
This is the workstation’s operational taxonomy.
24.47 — Why the Taxonomy Matters
Without clear tool ownership:
install Node with pacman
install another Node with curl
install third Node with mise
or:
edit Omarchy defaults directly
override in user config
and also create a script doing the same thing
Complexity becomes self-created.
A coherent workstation has one preferred layer for each responsibility.
24.48 — The “One Owner” Rule
Whenever possible:
One behavior should have one primary owner.
Examples:
default browser
→ Omarchy default/XDG

project Node version
→ mise.toml

window binding
→ bindings.lua

monitor refresh
→ monitors.lua

project history
→ Git

system update
→ omarchy update
This reduces ambiguity.
24.49 — When Two Layers Intentionally Interact
Some behaviors genuinely cross layers.
Example:
Omarchy default terminal
↓
xdg-terminal-exec
↓
Ghostty
Another:
Hyprland binding
↓
Omarchy command
↓
Tmux layout helper
Cross-layer behavior is fine when the interface is intentional.
The problem is accidental duplication.
24.50 — Security Boundaries in the Stack
Security-relevant boundaries include:
firmware Secure Boot
disk encryption
user authentication
sudo
Docker group
firewall
SSH
plugin execution
hook execution
agent execution
project dependencies
Git secrets
Notice how security is distributed across the entire architecture.
It is not one “security module” sitting beside everything else.
24.51 — Reproducibility Boundaries
Reproducibility is also distributed:
Omarchy installer
→ base system

dotfiles Git
→ user config

mise
→ dev tools

project mise.toml
→ project runtime

GitHub
→ project remote

WORKSTATION.md
→ human procedure
The stack is reproducible because each layer has a source of truth.
24.52 — Observability Boundaries
Useful diagnostics by layer:
Boot
→ bootctl / efibootmgr

System
→ systemctl / journalctl

Hyprland
→ hyprctl

Input
→ wev

Shell
→ omarchy-shell

Terminal command resolution
→ type / command -v

Mise
→ mise ls --current

Git
→ git status / git diff

Network
→ omarchy network status --verbose
A good power user knows which tool sees which layer.
24.53 — “Current Reality” Beats Memory
A recurring theme throughout the course:
official default
≠
your current selection

old documentation
≠
current release

generic Linux behavior
≠
Omarchy wrapper behavior

tool name
≠
obvious semantics
Examples from the course:
- Foot vs Ghostty;
- GRUB vs Limine;
.mise.tomlvsmise.toml;omarchy --versionvsomarchy version;omarchy idlevsomarchy toggle idle;- OMP permission semantics.
This lesson is foundational.
24.54 — The Best Question When Something Changes
Ask:
Which layer changed?
If Omarchy updates:
package defaults?
CLI?
shell?
migration?
If a project changes:
runtime?
dependencies?
Git state?
If hardware changes:
monitor output name?
input event?
driver?
The architectural model gives you a way to reason about change.
24.55 — The Best Question Before Customizing
Ask:
Which layer should own this customization?
Examples:
new keybinding
→ Hyprland user binding

new developer runtime
→ mise

new session startup helper
→ autostart or systemd user service

run action after update
→ hook

new top-bar widget
→ plugin

default browser
→ Omarchy default/XDG
This prevents hacks.
24.56 — The Best Question Before Installing
Ask:
Which installation layer should own this tool?
Use the Module 6 decision tree.
system package
Omarchy-integrated install
mise
A clean workstation does not install the same tool through three unrelated mechanisms.
24.57 — The Best Question Before Recovery
Ask:
Which state do I want to restore?
Examples:
one file
→ Git restore

personal config
→ dotfiles Git

root system state
→ snapshot

project source
→ project Git

personal documents
→ backup
Recovery only works well if the recovery tool matches the damaged state.
24.58 — The Best Question Before Giving AI Permissions
Ask:
What layer can this agent change?
If it can:
write project filesGit is the main recovery boundary.
If it can:
sudothe blast radius becomes system-wide.
If it can:
control Dockerit may effectively have root-equivalent power.
Architecture makes permission decisions clearer.
24.59 — Practical Exercise: Draw Your Own Stack
Without copying this handbook, draw:
your current workstation stackInclude:
- hardware;
- boot;
- compositor;
- shell;
- terminal;
- Tmux;
- editor;
- mise;
- Git;
- agent;
- project.
If you cannot explain one box:
review that module.24.60 — Practical Exercise: Map Five Behaviors
For each behavior, identify the owner.
Example 1
Super+Return opens GhosttyPossible ownership chain:
Hyprland binding
→ Omarchy terminal default
→ xdg-terminal-exec
→ Ghostty
Example 2
Node 24 inside projectOwner:
project mise.tomlExample 3
144 Hz monitorOwner:
Hyprland monitors.luaExample 4
bar widgetOwner:
Omarchy Shell plugin/stateExample 5
system before updateRecovery owner:
snapshotDo five more yourself.
24.61 — Practical Exercise: Map Your Configuration
Create a table:
Behavior | File/Tool | Layer | RecoveryExamples:
Monitor | monitors.lua | Hyprland | Git restore
Theme | omarchy theme | Omarchy | reset/select theme
Node | mise.toml | Project | Git restore
Shell bar | shell.json | Omarchy Shell | dotfiles restore
System update | omarchy update | OS | snapshot
This becomes a powerful reference.
24.62 — Practical Exercise: Map Your Development Loop
Write your actual workflow:
open project
↓
check Git
↓
check runtime
↓
start Tmux
↓
open editor
↓
launch agent
↓
analyze
↓
implement
↓
test
↓
review diff
↓
commit
↓
push
If your real workflow differs, document the real one.
The goal is not to imitate the course mechanically.
24.63 — Practical Exercise: Map Your Recovery Stack
Write:
Config mistake
→ ?

System update break
→ ?

Deleted project file
→ ?

Lost laptop
→ ?

Wrong runtime version
→ ?

Shell plugin crash
→ ?
Expected answers should involve different layers.
This proves you understand recovery ownership.
24.64 — Practical Exercise: Explain the Workstation to Someone Else
Explain in five minutes:
What is Omarchy?
What does Hyprland do?
What does the Omarchy Shell do?
Why use Tmux?
Why use mise?
Why is Git essential for AI coding?
Why does the bootloader matter?
Teaching is one of the best tests of understanding.
24.65 — Practical Exercise: Verify Current Reality
Run:
omarchy versionuname -romarchy default browseromarchy default terminalomarchy default agentmise --versiongit --versionhyprctl monitors allThen update:
WORKSTATION.mdwith any changed facts.
24.66 — Practical Exercise: Identify One Unnecessary Complexity
Look at your setup and ask:
What did I customize that I no longer need?Possible examples:
- unused binding;
- old script;
- stale plugin;
- obsolete global runtime;
- old workaround;
- duplicate config.
Remove complexity deliberately.
A mature workstation often becomes simpler over time.
24.67 — Avoid Configuration Archaeology
Bad future:
three years later
→ no idea why this script runs
→ afraid to delete it
Better:
small configs
clear comments
small Git commits
documented rationale
Maintainability applies to your workstation too.
24.68 — Your Workstation Is Software
Treat it like software.
It has:
- dependencies;
- configuration;
- runtime state;
- updates;
- interfaces;
- bugs;
- recovery;
- version control;
- documentation.
That is why developer practices work so well here.
24.69 — Your Workstation Is Also Infrastructure
It is also infrastructure.
It hosts:
- credentials;
- development runtimes;
- repositories;
- local services;
- remote-access tools;
- AI agents.
That means:
security
recovery
observability
reproducibility
matter just as much as appearance.
24.70 — Your Workstation Is Not the Project
Keep the final separation clear.
workstation
→ enables development

project
→ contains the software
Do not let a project depend on invisible workstation magic.
A strong project remains reproducible through:
Git
mise.toml
documentation
tests
24.71 — The Ultimate Architecture Principle
If you remember only one architectural principle:
Make state explicit and put it in the layer that owns it.
Examples:
project runtime
→ mise.toml

keybinding
→ bindings.lua

monitor
→ monitors.lua

system default browser
→ Omarchy/XDG default

project rules
→ AGENTS.md

system update
→ omarchy update

personal config history
→ dotfiles Git
This single habit prevents enormous complexity.
24.72 — The Ultimate Troubleshooting Principle
If you remember only one troubleshooting principle:
Find the owning layer before changing state.
Do not:
fix by superstitionDo:
inspect
classify
test
verify
24.73 — The Ultimate AI Principle
If you remember only one AI-workflow principle:
AI accelerates the development loop; it does not replace Git, tests, review, or project documentation.
The agent is one component.
The engineering system is larger.
24.74 — The Ultimate Omarchy Principle
If you remember only one Omarchy customization principle:
Override Omarchy; do not overwrite Omarchy.
Use:
~/.configfor your personal changes.
Let:
/usr/share/omarchyremain package-owned.
This preserves upgradeability.
24.75 — Checkpoint
Before finishing the core curriculum, you should be able to answer yes to the following.
Boot
- I understand UEFI → Limine → UKI → kernel.
- I understand the role of snapshots.
- I can classify boot vs userspace failures.
Desktop
- I understand Wayland and Hyprland at a practical level.
- I understand Omarchy Shell is separate from Hyprland.
- I know where personal desktop config belongs.
Terminal
- I understand terminal vs shell vs Tmux.
- I understand persistent Tmux state.
- I understand default terminal integration.
Development
- I understand mise’s responsibility.
- I understand Git vs GitHub.
- I understand branches/worktrees.
- I understand the AI agent as a local operator.
Configuration
- I can identify the owner of monitor/input/binding/theme/default/runtime settings.
- I understand package-owned vs user-owned files.
- I understand runtime state vs persistent config.
Security
- I understand where privilege boundaries appear.
- I understand plugins/hooks/agents execute code.
- I understand Docker privilege risk.
Recovery
- I understand component restart vs config restore vs snapshot vs backup.
- I know
/homeis not restored by system snapshots. - I can choose the correct recovery layer.
Reproducibility
- I understand installer + dotfiles + mise + Git + backup as separate pieces.
- I can explain how I would rebuild the workstation.
Architecture
- I can explain the complete workstation stack without reading the diagram.
24.76 — What You Can Now Do
After completing Module 24, you can now:
- reason about Omarchy as a complete system;
- explain which component owns which behavior;
- understand how the machine boots into the development environment;
- understand the distinction between Linux, Hyprland, and Omarchy;
- understand how shell, terminal, Tmux, editor, mise, Git, and AI fit together;
- place configuration in the correct layer;
- place recovery in the correct layer;
- diagnose problems more quickly;
- keep the workstation reproducible;
- evolve the system without losing architectural clarity.
Most importantly:
You are no longer just using an Omarchy installation. You understand the workstation you built.
Module 24 Summary
Full stack:
Hardware
↓
UEFI
↓
Limine
↓
UKI
↓
Kernel
↓
systemd
↓
Wayland
↓
Hyprland
↓
Omarchy Shell
↓
Terminal
↓
Bash
↓
Tmux
↓
Editor
↓
mise
↓
Git
↓
AI Agent
↓
Project
Core ownership:
Omarchy internals
→ /usr/share/omarchy

Personal config
→ ~/.config

Project runtime
→ mise.toml

Project change history
→ Git

Remote collaboration
→ GitHub

System rollback
→ snapshot

Personal config rollback
→ dotfiles Git

Personal data recovery
→ backup
Core engineering model:
explicit state
+
one clear owner
+
current verification
+
small reversible changes
And the final core-course lesson:
The power of Omarchy is not that everything is customized. The power is that the whole workstation becomes understandable.